When you want something sweet, satisfying, and incredibly simple to make, these No Bake Peanut Butter Oat Cups check every box. Made with just 4 basic ingredients, no oven required, and only 10 minutes of hands-on prep time, they’re a go-to snack for busy days, meal prep, or even a wholesome dessert.
This is one of those recipes I turn to over and over again when I want something homemade but don’t feel like turning on the oven. With creamy peanut butter, a touch of natural sweetness from maple syrup or honey, hearty rolled oats, and a smooth chocolate topping (if you’re feeling indulgent), these oat cups come together with minimal effort and major flavor payoff.
They’re perfect for lunchboxes, afternoon energy boosts, or post-dinner snacking—and because they’re made from real, pantry-staple ingredients, you can feel good about reaching for one any time of day.
Let’s take a look at what you’ll need and walk through the first simple steps.
Ingredients You’ll Need:
- 1 cup natural peanut butter (creamy or crunchy)
- ¼ cup maple syrup or honey
- 1 ½ cups rolled oats
- ½ cup dark chocolate chips (optional topping)
This recipe makes 10–12 oat cups depending on how full you fill each liner. You can easily double the batch if you want to store some in the freezer for later.
Use natural peanut butter (the kind with just peanuts and salt) for the best texture and consistency. If you’re using sweetened peanut butter, you may want to reduce the maple syrup or honey slightly.
STEP 1: Melt Peanut Butter and Sweetener
In a small saucepan over low heat, stir together 1 cup of peanut butter and ¼ cup maple syrup or honey. Stir continuously for 2–3 minutes, just until the mixture is smooth, creamy, and well combined.
Once melted and mixed, remove the pan from the heat. You don’t want the mixture to boil—just warmed enough to blend easily.
STEP 2: Add the Rolled Oats
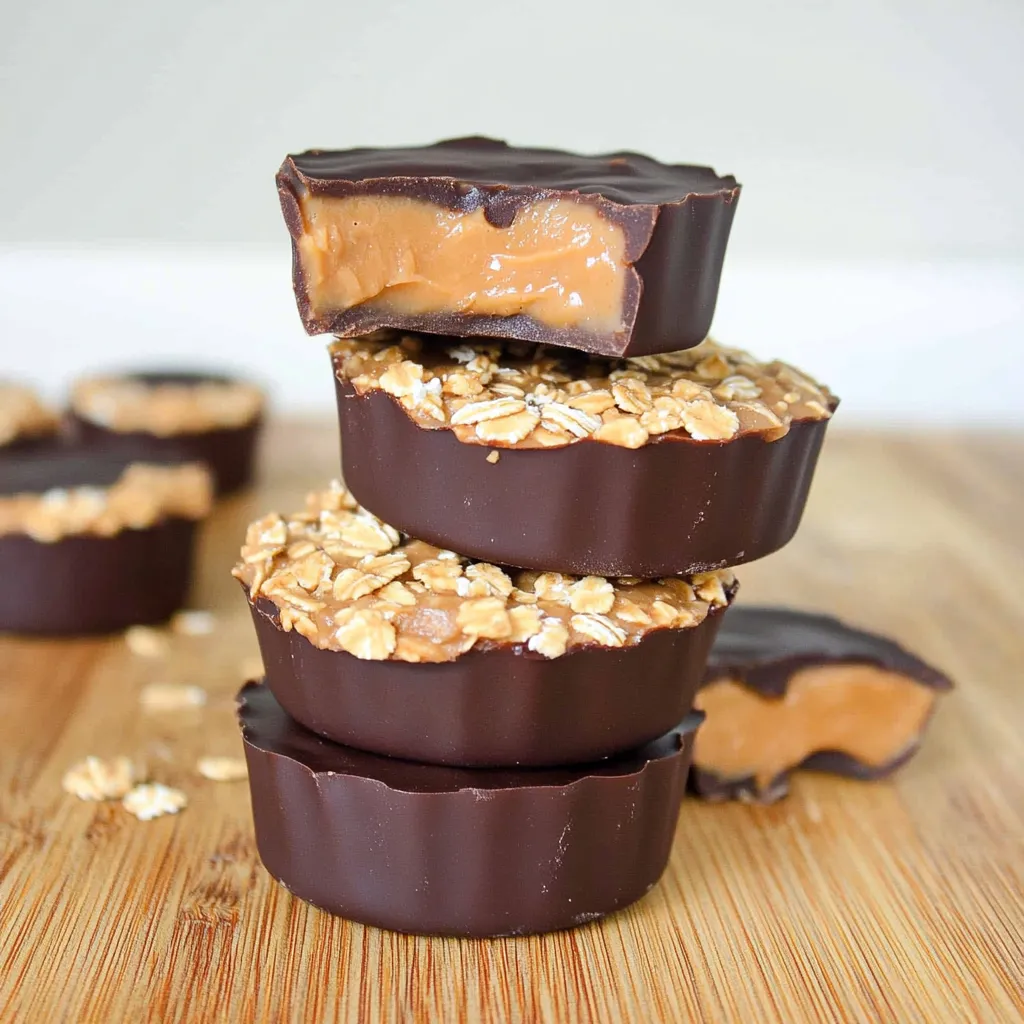
To the warm peanut butter mixture, add 1 ½ cups of rolled oats and stir until everything is evenly coated and thick.
The oats should hold together well and take on a dough-like consistency. If your mixture feels too loose, let it sit for a minute or two—it will firm up as the oats absorb some of the moisture.
STEP 3: Press into Muffin Liners
Line a muffin tin with paper liners and divide the oat mixture evenly among 10–12 cups. Use a spoon to press the mixture down firmly into each liner. This helps them hold their shape once chilled.
You can use the back of a spoon or your fingers (lightly dampened or greased) to flatten the tops and compress the oats evenly.
Topping, Chilling, and Customizing Your No Bake Peanut Butter Oat Cups
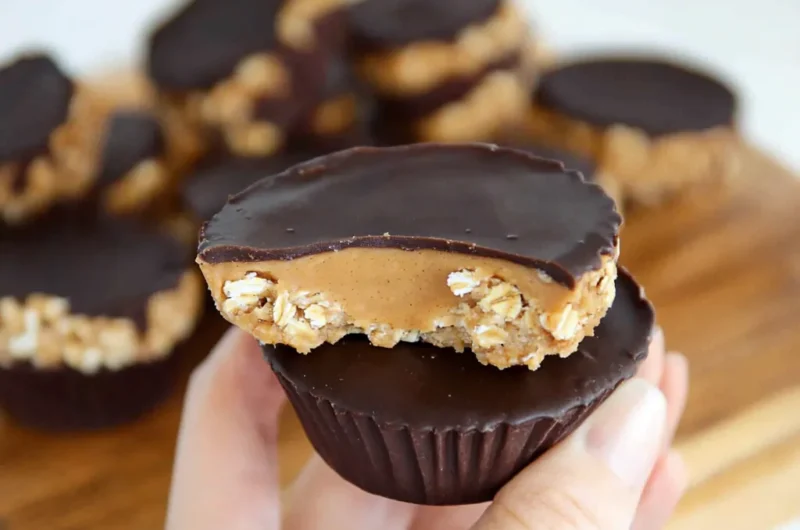
Now that your oat mixture is pressed firmly into the muffin tin, it’s time to add the final touch (if you’re choosing to): a rich, smooth layer of melted dark chocolate. This extra step takes these already satisfying oat cups from everyday snack to dessert-worthy treat. It only takes a few minutes and adds a decadent finish that pairs beautifully with the peanut butter and oats.
Let’s finish the recipe with the optional topping, and then look at how to store these perfectly portioned snacks and explore some fun flavor twists you can try next time.
STEP 4: Add the Optional Chocolate Topping
If you’re using chocolate chips, place ½ cup dark chocolate chips in a microwave-safe bowl. Microwave in 20-second intervals, stirring after each, until the chocolate is fully melted and smooth.
Then, spoon a small amount of melted chocolate over the top of each oat cup, spreading it gently with the back of the spoon to cover the surface. You don’t need a thick layer—just enough to add that rich chocolate flavor on top.
If you’d rather skip the chocolate, you can leave the cups plain or sprinkle a pinch of sea salt on top for a sweet-and-salty finish.
STEP 5: Chill Until Firm
Once your cups are assembled, place the muffin tin in the refrigerator and chill for at least 1 hour, or until the oat mixture and chocolate topping are firm to the touch.
If you’re in a hurry, you can pop them in the freezer for about 20–30 minutes instead. Once firm, they’re ready to eat!
STEP 6: Store for Later
These oat cups are perfect for make-ahead snacking. Once they’ve firmed up, you can transfer them to an airtight container and keep them stored in the refrigerator for up to 1 week. If you want to keep them longer, store them in the freezer for up to 2 months. Just let them sit at room temperature for a few minutes before eating if they’ve been frozen.
They’re great for tossing into lunchboxes, enjoying as an afternoon pick-me-up, or grabbing post-workout for a satisfying, no-fuss bite.
Tips for Success:
1. Use Natural Peanut Butter
The kind with just peanuts (and maybe salt) works best. If you’re using a no-stir or sweetened version, the texture may be firmer and you may want to reduce the sweetener slightly.
2. Press Firmly
Take a few extra seconds to really press the oat mixture into each liner. This helps the cups hold their shape and makes them easier to eat as grab-and-go snacks.
3. Add a Touch of Salt
A tiny pinch of sea salt on top of each cup (especially with chocolate) enhances the flavors and adds that salty-sweet balance that makes each bite pop.
Fun Variations to Try:
One of the best things about these No Bake Peanut Butter Oat Cups is how endlessly customizable they are. With just a few tweaks, you can change the flavor profile, adjust the texture, or even boost the nutrition to better suit your needs or cravings. Whether you’re in the mood for something fruity, nutty, or extra chocolatey, these fun variations will keep this 4-ingredient favorite feeling fresh every time.
1. Almond Butter Oat Cups
Swap the peanut butter for almond butter for a slightly milder, nutty flavor. Works especially well when paired with a drizzle of white chocolate or a sprinkle of slivered almonds on top.
2. Banana Oat Cups
Mash ½ of a very ripe banana into the peanut butter and syrup mixture before adding the oats. It adds natural sweetness and makes the texture even softer—perfect for a breakfast-style snack.
3. Chocolate Peanut Butter Oat Cups
Stir in 2 tablespoons of unsweetened cocoa powder into the oat mixture for a double-chocolate hit. Top with chocolate chips or a dusting of cocoa powder before chilling.
4. Trail Mix Cups
Add 2–3 tablespoons of chopped dried fruit, mini chocolate chips, sunflower seeds, or chopped nuts into the oat mixture. You’ll get a chewy, crunchy combo that’s great for on-the-go snacking.
5. Coconut Crunch Cups
Mix ¼ cup of unsweetened shredded coconut into the oat mixture and sprinkle more on top of the melted chocolate layer before chilling. Adds a nice tropical flair and extra texture.
6. Pumpkin Spice Oat Cups
In the fall, stir in 1–2 tablespoons of pumpkin puree and a pinch of pumpkin pie spice to the mixture. A warm seasonal twist that’s great with dark chocolate or white chocolate topping.
7. Protein-Packed Cups
Add 1–2 tablespoons of your favorite protein powder (vanilla or chocolate works best) and increase the syrup slightly if needed to maintain consistency. Great for a pre- or post-workout boost.
No matter which variation you try, the base recipe is forgiving, simple, and flexible—so feel free to get creative with what you have in your pantry. These cups are perfect for experimenting, and they freeze beautifully, so you can always have a stash ready when snack time hits.
No Bake Peanut Butter Oat Cups FAQ and Final Thoughts:
These No Bake Peanut Butter Oat Cups are the ultimate solution for busy mornings, snack cravings, or a quick dessert that doesn’t require turning on the oven. With just four wholesome ingredients and a few simple steps, they’re easy to make, easy to customize, and always a hit with kids and adults alike.
To help you make the most of this recipe, here are some frequently asked questions, helpful tips, and a quick wrap-up on why you’ll want to keep these oat cups in regular rotation.
1. Can I use quick oats instead of rolled oats?
Yes, but the texture will be softer and slightly less chewy. Rolled oats provide the best bite and structure, but quick oats will still work in a pinch.
2. Can I use a different nut butter?
Absolutely. Almond butter, cashew butter, sunflower seed butter, or any natural nut or seed butter can be used. Just make sure it’s smooth and stirable for best results.
3. Can I make these without any added sweetener?
If your peanut butter is sweetened, you might be able to skip the syrup or honey. Otherwise, the sweetener is needed to help bind the oats and give the cups flavor and moisture.
4. Do I have to use muffin liners?
Liners make removal easier and prevent sticking, especially when adding chocolate. If you don’t have any, lightly grease the muffin tin or use silicone molds for easy release.
5. How long do they last in the fridge?
Stored in an airtight container in the refrigerator, the oat cups stay fresh for up to 1 week. For longer storage, freeze them for up to 2 months.
6. Can I double or halve the recipe?
Yes! This recipe scales easily. Double it to stock up your freezer, or cut it in half if you’re making a smaller batch.
7. How can I make these more filling?
Add chia seeds, flaxseed meal, shredded coconut, or a scoop of protein powder to increase fiber and protein. These additions also give great texture.
Conclusion: A No-Bake Staple for Snacking and More
These No Bake Peanut Butter Oat Cups are the kind of recipe you’ll find yourself turning to again and again. They’re quick, mess-free, made from ingredients you probably already have, and so versatile that you can make a different version every week without getting bored.
Perfect for school lunches, afternoon pick-me-ups, road trip snacks, or even an easy after-dinner treat, they store beautifully and can be made ahead in big batches. Plus, with the option to swap ingredients or stir in your favorite extras, there’s always a new flavor combo to try.
Whether you stick to the classic 4-ingredient version or branch out into fun variations, one thing’s for sure—these oat cups will quickly become a staple in your snack routine. Try them once, and you’ll see just how easy it is to fall in love with no-bake snacking.
Print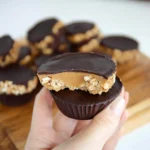
No Bake Peanut Butter Oat Cups (4 Ingredients!)
- Total Time: 1hr 10 min
Description
These No Bake Peanut Butter Oat Cups are a quick, wholesome snack made with just 4 simple ingredients. Perfect for a sweet treat, meal prep snack, or guilt-free dessert—no oven needed and totally customizable!
Ingredients
-
1 cup natural peanut butter (creamy or crunchy)
-
¼ cup maple syrup or honey
-
1½ cups rolled oats
-
½ cup dark chocolate chips (optional for topping)
Instructions
1️⃣ Melt and mix: In a saucepan over low heat, stir peanut butter and maple syrup (or honey) until smooth and fully combined. Remove from heat.
2️⃣ Add oats: Stir in rolled oats until evenly coated and thick.
3️⃣ Fill muffin cups: Line a muffin tin with paper liners. Spoon the mixture into 10–12 cups and press down firmly with the back of a spoon.
4️⃣ Top with chocolate (optional): Melt chocolate chips in the microwave in 20-second intervals, stirring between, until smooth. Spoon over oat cups.
5️⃣ Chill: Refrigerate for at least 1 hour or until firm.
6️⃣ Store: Keep in the fridge for up to 1 week or freeze for longer storage.
Notes
-
Nut-Free Option: Swap peanut butter with sunflower seed butter or almond butter.
-
Customize: Add chia seeds, dried fruit, or a pinch of sea salt on top.
-
Kids Love Them: Great for lunchboxes or after-school snacks.
-
No Bake Bonus: No oven, no stress, and great for warm weather!
-
Perfect for Prep: Make a batch ahead for the week.
- Prep Time: 10 min
- Cook Time: 1 hr