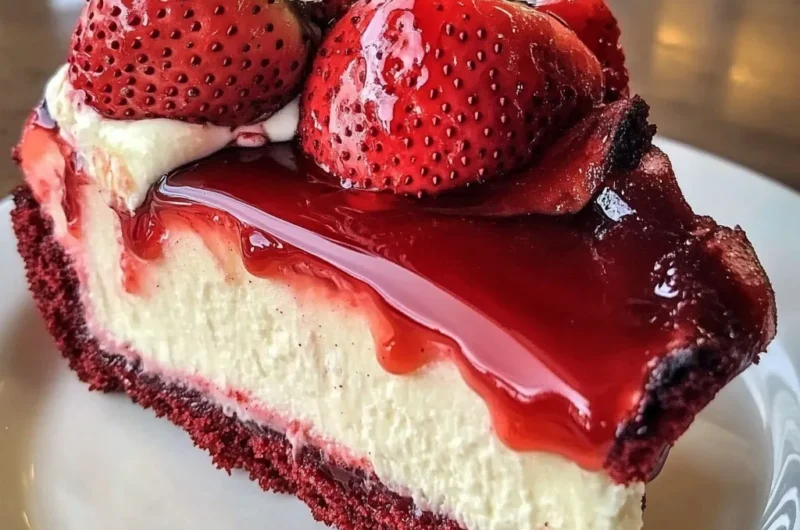
There’s something undeniably magical about red velvet. It’s rich, subtly chocolatey, and that gorgeous crimson color just feels like a celebration. Now, imagine layering that with a creamy, silky cheesecake filling and topping it all off with sweet, juicy strawberries. Yep. That’s exactly what we’re doing here—and I call it Red Velvet Strawberry Cheesecake Delight.
This dessert is everything: part cake, part no-bake cheesecake, and fully delicious. It’s got layers of texture—tender red velvet cake on the bottom, a fluffy whipped cheesecake layer in the middle, and glossy, syrupy strawberries on top. Each bite is a little bit tangy, a little sweet, and a whole lot of delightful.
The first time I made this was for a friend’s birthday. She’s the kind of person who always goes above and beyond for everyone else, and I wanted to bring her something extra special. She loves strawberries and adores anything red velvet, so I had this wild idea to mash them up into one gorgeous dessert. It was such a hit that now it’s my go-to for spring and summer celebrations—or really any time I want to impress with minimal stress.
This dessert looks like it came straight out of a bakery window, but trust me, it’s easy to make and uses basic ingredients you probably already have. It’s ideal for potlucks, Eid gatherings, birthdays, or even just a weekend treat with the fam. 💕
Why You’ll Love This Recipe
Here’s why this Red Velvet Strawberry Cheesecake Delight deserves a spot in your recipe rotation:
- Easy Layers, Big Flavor: This recipe is made in layers, so even though it looks fancy, each part is simple and comes together quickly.
- Minimal Baking Required: You’ll only bake the red velvet base—everything else is no-bake and fridge-friendly.
- Crowd-Pleaser: With its vibrant red hue and creamy filling, this dessert is guaranteed to be the first thing gone from the table.
- Great Make-Ahead Option: You can prep this a day ahead and let it chill overnight. In fact, it’s even better the next day when the flavors have time to meld.
- Kid- and Family-Friendly: It’s sweet, colorful, and easy to serve in squares. Everyone from toddlers to grandparents will love it.
- Halal-Friendly: We’re using halal ingredients—no gelatin or alcohol-based extracts here!
And can we talk texture? That moist red velvet cake layer holds up perfectly under the cloud-like cream cheese filling, while the strawberry topping adds a refreshing, fruity contrast that cuts through the richness just enough. Every bite is soft, creamy, and just a little tart from the berries.
Prep Time & Servings
- Prep Time: 25 minutes
- Cook Time: 20 minutes
- Chill Time: 4 hours (or overnight)
- Total Time: 4 hours 45 minutes
- Servings: 12 generous squares
Calories per serving: 380
Protein: 6g | Carbs: 36g | Fat: 23g
Ingredients
Here’s everything you’ll need for each dreamy layer of this dessert:
For the Red Velvet Cake Layer:
- 1 cup all-purpose flour
- 1 tbsp unsweetened cocoa powder
- ½ tsp baking soda
- ½ tsp salt
- ½ cup buttermilk (or ½ cup milk + ½ tbsp vinegar, mixed and rested for 5 mins)
- ½ cup granulated sugar
- ½ cup vegetable oil
- 1 large egg
- 1 tsp vanilla extract
- 1 tsp white vinegar
- 1 tbsp halal red food coloring
For the Cheesecake Layer:
- 1½ blocks (12 oz) cream cheese, softened
- ½ cup powdered sugar
- 1 tsp vanilla extract
- 1½ cups whipped topping (like Cool Whip or homemade whipped cream)
For the Strawberry Topping:
- 2 cups fresh strawberries, sliced
- ⅓ cup sugar
- 1 tbsp lemon juice
- 1 tbsp cornstarch
- 2 tbsp water
Step-by-Step Instructions
Step 1: Bake the Red Velvet Cake Base
- Preheat your oven to 350°F (175°C). Grease and line an 8×8-inch baking pan with parchment paper.
- In a bowl, whisk together the dry ingredients: flour, cocoa powder, baking soda, and salt.
- In a separate mixing bowl, combine sugar, oil, egg, buttermilk, vanilla, vinegar, and red food coloring. Mix until smooth.
- Add the dry ingredients to the wet mixture and stir until just combined. Don’t overmix!
- Pour the batter into your prepared pan and smooth the top with a spatula.
- Bake for 18–22 minutes, or until a toothpick inserted into the center comes out clean.
- Let the cake cool completely in the pan.
Pro Tip: You can gently press down any domed top after baking to make layering easier.
Step 2: Make the Whipped Cheesecake Layer
- In a large bowl, beat the cream cheese with an electric mixer until smooth and creamy.
- Add powdered sugar and vanilla extract, and continue beating until fully combined.
- Fold in the whipped topping gently, using a spatula. You want a light, fluffy texture.
Don’t worry if the mixture seems soft—it’ll firm up beautifully as it chills.
Step 3: Make the Strawberry Topping
- In a saucepan, combine sliced strawberries, sugar, lemon juice, and cornstarch.
- Stir in the water and cook over medium heat for 5–7 minutes, or until the mixture thickens and becomes syrupy. Stir frequently so it doesn’t burn.
- Remove from heat and let it cool to room temperature.
Optional: Want extra berry magic? Add a few whole strawberries on top just before serving.
Step 4: Assemble the Layers
- Once your cake base is cool, spread the cream cheese mixture evenly on top.
- Spoon the cooled strawberry topping over the cream layer, spreading gently to cover every corner.
- Cover the pan and chill in the refrigerator for at least 4 hours, or overnight for best results.
How to Serve It
- Slice into squares or rectangles for easy, grab-and-go servings.
- Top with fresh mint leaves or a dollop of whipped cream for a little flourish.
- Serve chilled—this dessert is best enjoyed cold!
Additional Tips for Success
- Use room temperature cream cheese for a smooth, lump-free filling.
- Don’t skip the chill time—it really helps the layers set and makes slicing easier.
- Make your own whipped topping if you like! Just beat 1 cup of cold heavy cream with 2 tbsp powdered sugar until stiff peaks form.
- Strain the strawberry topping if you prefer a smoother finish without chunks.
- Want a cleaner cut? Run your knife under hot water and wipe it dry before slicing each row.
Recipe Variations
- Gluten-Free Version: Swap the all-purpose flour for a gluten-free 1:1 baking blend.
- No Strawberry? No Problem! Use raspberries, blueberries, or even a mix of berries.
- Mini Parfaits: Layer the components into mason jars for individual servings—perfect for parties!
- Extra Chocolatey: Add mini chocolate chips into the cheesecake layer for a fun surprise.
- Less Sweet Option: Use a bit less sugar in the strawberry topping or opt for a sugar substitute.
Serving Suggestions
Pair this sweet treat with:
- A fresh mint lemonade or strawberry iced tea for a bright, citrusy contrast.
- Roasted nuts or chocolate-covered almonds for a crunchier dessert board.
- Light dinner mains like grilled chicken salad or lemon herb baked fish—it balances the richness beautifully.
- Simple side dishes: If you’re serving this at a potluck, it goes great after a rice pilaf, kabobs, or baked pasta dish.
Freezing & Storage
To Store:
Place leftovers in an airtight container and refrigerate for up to 3 days. The strawberries may soften slightly but it’ll still taste amazing.
To Freeze:
You can freeze the cake and cheesecake layers without the strawberries. Wrap tightly in plastic and foil, then freeze for up to 2 months. Add fresh strawberry topping after thawing.
To Reheat:
This is best served cold! But if frozen, let thaw in the fridge overnight before serving.
Special Equipment
- 8×8-inch baking dish: Glass or metal works fine.
- Electric hand mixer: For whipping the cheesecake layer to perfect fluffiness.
- Small saucepan: For cooking the strawberry topping.
- Offset spatula or silicone spatula: For smooth, easy layering.

FAQ
Can I use a boxed red velvet cake mix?
Absolutely! If you’re short on time, feel free to use a boxed mix for the base. Just bake in an 8×8 pan and let cool completely.
Can I make this ahead of time?
Yes! In fact, it’s even better the next day. Make it up to 24 hours in advance and store in the fridge.
Can I use frozen strawberries?
Yes, just thaw and drain them well first. They’ll be softer, but still delicious.
Can I use dairy-free alternatives?
Sure! Use a dairy-free cream cheese and coconut whipped topping.
Can I skip the food coloring?
You can! The cake will still be delicious, just more of a cocoa brown than red.
What can I substitute for whipped topping?
Homemade whipped cream works great—just whip 1 cup heavy cream with 2 tbsp powdered sugar.
Is this recipe halal?
Yes! This version uses halal-friendly ingredients—no gelatin, alcohol, or non-halal additives.
Can I double the recipe?
Definitely. Use a 9×13-inch pan and double all ingredients.
How do I get clean slices?
Chill well and use a sharp knife wiped clean between cuts. A hot knife works best!
What’s the best way to store leftovers?
Keep them in the fridge, covered. Enjoy within 3 days for best flavor and texture.
Let’s Wrap It Up!
There you have it—Red Velvet Strawberry Cheesecake Delight that looks like it came from a fancy bakery, but is secretly super easy to whip up at home. Whether you’re bringing it to a potluck, celebrating a birthday, or just want a next-level dessert for your family, this one’s going to win hearts and tastebuds.
If you try this recipe, I need to see it! Tag me on Instagram, leave a comment below, or shoot me a message. I love seeing your gorgeous dessert creations.
Print
Red Velvet Strawberry Cheesecake Delight
- Total Time: 1 hr 40 min
Description
This decadent dessert features a moist red velvet cake base, a luscious cheesecake layer infused with strawberry puree, and a topping of macerated strawberries. Each bite offers a harmonious blend of flavors and textures, making it a favorite for celebrations and gatherings.
Ingredients
Red Velvet Cake Layer:
-
1½ cups all-purpose flour
-
1 cup granulated sugar
-
¼ cup unsweetened cocoa powder
-
1 teaspoon baking powder
-
½ teaspoon baking soda
-
½ teaspoon salt
-
1 cup vegetable oil
-
½ cup buttermilk
-
1 large egg
-
2 tablespoons red food coloring
-
1 teaspoon vanilla extract
-
1 teaspoon white vinegar
Strawberry Cheesecake Layer:
-
16 oz cream cheese, softened
-
1 cup granulated sugar
-
½ cup sour cream
-
½ cup heavy cream
-
2 large eggs
-
1 teaspoon vanilla extract
-
1 cup fresh strawberries, pureed
Strawberry Topping:
-
1 cup fresh strawberries, sliced
-
¼ cup granulated sugar
-
1 tablespoon lemon juice
Instructions
1️⃣ Prepare the Red Velvet Cake Layer:
-
Preheat your oven to 350°F (175°C). Grease and line the bottom of a 9-inch springform pan with parchment paper.
-
In a large bowl, sift together the flour, sugar, cocoa powder, baking powder, baking soda, and salt.
-
In another bowl, whisk together the oil, buttermilk, egg, red food coloring, vanilla extract, and vinegar.
-
Gradually add the wet ingredients to the dry ingredients, mixing until just combined.
-
Pour the batter into the prepared pan and smooth the top. Bake for 25-30 minutes, or until a toothpick inserted into the center comes out clean.
-
Allow the cake to cool completely in the pan on a wire rack.
2️⃣ Prepare the Strawberry Cheesecake Layer:
-
Reduce the oven temperature to 325°F (160°C).
-
In a large bowl, beat the softened cream cheese until smooth. Add the sugar and beat until well combined.
-
Mix in the sour cream and heavy cream until smooth. Beat in the eggs one at a time, mixing well after each addition.
-
Stir in the vanilla extract and strawberry puree.
-
Carefully spoon the cheesecake batter over the cooled red velvet cake layer in the springform pan.
-
Place the springform pan on a baking sheet and bake in the preheated oven for 60-70 minutes, or until the center is set and the edges are slightly puffed.
-
Turn off the oven and crack the door slightly. Allow the cheesecake to cool in the oven for 1 hour to prevent cracking.
-
Chill the cheesecake in the refrigerator for at least 4 hours or overnight.
3️⃣ Prepare the Strawberry Topping:
-
In a small bowl, toss the sliced strawberries with granulated sugar and lemon juice. Let sit for about 10 minutes to macerate.
-
Once the cheesecake has fully chilled, remove it from the springform pan and top with the macerated strawberries before serving.
Notes
-
Ensure all ingredients are at room temperature before mixing to achieve a smooth cheesecake texture.
-
For a crack-free cheesecake, consider using a water bath during baking.
-
Leftovers can be stored in the refrigerator for up to 3 days.
- Prep Time: 40 min
- Cook Time: 1 hr