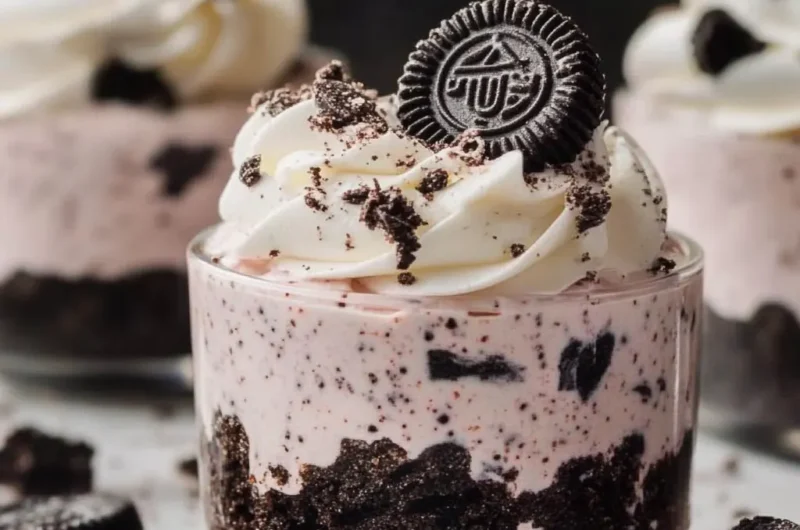
Oreo No-Bake Cheesecake Cups are a delightful treat that will leave your taste buds dancing with joy. This dessert combines the classic flavors of cookies and cream with the rich, creamy texture of cheesecake, all in a convenient cup format. The best part? You don’t need to turn on your oven! Each bite offers a blend of sweet and tangy that’s simply irresistible. Whether you’re preparing for a family gathering, a party, or just want to indulge yourself, these cheesecake cups are an ultimate choice that everyone will love.
If you’ve ever craved a cheesecake but wished there was a simpler way to make it, then these Oreo No-Bake Cheesecake Cups are for you. They are easy to assemble and require minimal ingredients, making them a quick dessert option. The creamy filling paired with crunchy Oreo crumbs creates a textural delight that’s hard to beat. This dish is not only delicious but also visually appealing, perfect for impressing guests or treating yourself on a quiet evening at home.
This guide will walk you through everything you need to know about creating these amazing cheesecake cups. You’ll learn why this recipe is so special, how to prepare it, and tips for serving it beautifully. Whether you’re a seasoned baker or a novice in the kitchen, you’ll find joy in making these Oreo No-Bake Cheesecake Cups a beloved staple in your dessert repertoire. Let’s dive into what makes this dessert such a hit!
Why You’ll Love This Recipe
There are countless reasons to fall in love with Oreo No-Bake Cheesecake Cups. Here are some key points that highlight why this dessert stands out:
1. No Baking Required – The lack of an oven means you save time and effort while still enjoying a delicious dessert.
2. Quick and Easy – With simple steps and minimal prep time, you can whip these up in no time.
3. Decadent Flavor – The combination of cream cheese and Oreo cookies creates a rich and delightful taste.
4. Perfect for Any Occasion – These cups are great for everything from casual gatherings to special celebrations.
5. Customizable – You can easily alter ingredients based on dietary preferences, such as using low-fat cream cheese or gluten-free Oreos.
6. Individual Servings – The cup format makes them perfect for portion control and easy serving.
By highlighting these aspects, you can appreciate why Oreo No-Bake Cheesecake Cups are so popular among dessert lovers. Every layer is packed with flavor and creaminess, ensuring each bite is as delightful as the last.
Preparation and Cooking Time
When it comes to making Oreo No-Bake Cheesecake Cups, the time investment is surprisingly minimal. Here’s a breakdown of the preparation and chilling times:
– Preparation Time: 15-20 minutes
– Chilling Time: 2 hours (or until set)
– Total Time: Approximately 2 hours and 20 minutes
These times may vary depending on your kitchen setup and efficiency, but this framework gives you a solid idea of what to expect.
Ingredients
– 2 cups crushed Oreo cookies
– ½ cup unsalted butter, melted
– 8 oz cream cheese, softened
– 1 cup powdered sugar
– 1 teaspoon vanilla extract
– 1 cup heavy whipping cream
– ½ cup additional Oreo cookie crumbs for topping
– Optional: Fresh berries for garnish
Step-by-Step Instructions
Creating these Oreo No-Bake Cheesecake Cups is a straightforward process. Just follow these simple steps:
1. Prepare the Cup Base: In a medium bowl, mix the crushed Oreo cookies with melted butter until combined.
2. Create the Base Layer: Spoon the Oreo mixture into the bottom of individual cups or dessert glasses. Use the back of a spoon to press down firmly to form an even layer.
3. Make the Cheesecake Filling: In a large bowl, beat the softened cream cheese with an electric mixer until smooth and creamy.
4. Add Ingredients: Gradually add the powdered sugar and vanilla extract. Mix until fully combined and the mixture is free of lumps.
5. Whip the Cream: In another bowl, whip the heavy cream until stiff peaks form.
6. Combine Mixtures: Gently fold the whipped cream into the cream cheese mixture until well combined. Take care not to deflate the whipped cream.
7. Layer the Filling: Spoon the cheesecake filling over the prepared Oreo crust in each cup. Smooth the tops with a spatula.
8. Chill Time: Cover the cups with plastic wrap and refrigerate for at least 2 hours, or until the filling is set.
9. Add Toppings: Once set, remove the cups from the refrigerator. Top with additional crushed Oreo cookies for added texture and garnish with fresh berries if desired.
10. Serve and Enjoy: Enjoy your decadent Oreo No-Bake Cheesecake Cups fresh from the fridge!
These easy steps will lead you to a delightful dessert that will impress anyone lucky enough to taste it.
How to Serve
When it comes to serving your Oreo No-Bake Cheesecake Cups, presentation can elevate the experience. Here are some tips to make your dessert shine:
1. Creative Glassware: Use clear cups or jars to showcase the beautiful layers of the dessert. Mason jars or parfait cups work wonderfully.
2. Garnishing Options: For added flair, consider garnishing with whipped cream, fresh mint leaves, or seasonal berries to create a pop of color and freshness.
3. Chocolate Drizzle: Drizzle melted chocolate or chocolate sauce over the top for an indulgent twist.
4. Serving Temperature: These cups are best served chilled, making them ideal for warm weather gatherings. Just pull them from the fridge when it’s time to indulge.
5. Accompaniment Ideas: Pair with coffee, tea, or even a glass of dessert wine to enhance the flavors of the cheesecake.
Presenting your Oreo No-Bake Cheesecake Cups creatively can turn this simple dessert into a stunning centerpiece for any event, ensuring that your guests leave with full stomachs and happy hearts. Enjoy your delicious creation!
Additional Tips
– Use Quality Oreos: Choose classic Oreos for the best layering flavor. Off-brands may not have the same crunch or richness.
– Ensure the Cream Cheese is Softened: To avoid lumps in your cheesecake filling, make sure your cream cheese is at room temperature before mixing.
– Let the Cups Chill: Patience pays off. Allow them to chill until set for a perfect creamy texture.
– Experiment with Toppings: Besides Oreo crumbs, you can add chocolate shavings, caramel drizzle, or chopped nuts for added flair.
– Keep it Cool: Store any leftovers in the fridge to maintain freshness and firmness.
Recipe Variation
Explore these variations to keep your dessert exciting and cater to your preferences:
1. Peanut Butter Lovers: Fold in some creamy peanut butter into the cheesecake filling for a nutty twist.
2. Mint Oreo Version: Use mint-flavored Oreo cookies for a refreshing chocolate-mint combination. You can also add a drop of peppermint extract to the filling.
3. Fruit-Filled Cups: Layer some fresh fruit, like strawberries or raspberries, in between the crust and the cheesecake layer for added sweetness and texture.
4. Chocolate Drizzle: Drizzle some melted chocolate over the cheesecake filling before topping with cookies for a lavish touch.
5. No-Oreo Variation: Replace Oreos with graham crackers for a different flavor profile, creating a classic cheesecake-style dessert.
Freezing and Storage
– Storage: Keep the Oreo No-Bake Cheesecake Cups in the refrigerator, covered with plastic wrap. They will stay fresh for 3-4 days.
– Freezing: You can freeze the cheesecake cups. Store them in an airtight container. They can last up to 2 months in the freezer. Thaw them in the refrigerator before serving.
Special Equipment
To prepare these delectable cheesecake cups, gather the following tools:
– Mixing bowls
– Electric mixer for combining ingredients
– Measuring cups and spoons for accuracy
– Dessert cups or jars for layering
– Rubber spatula for folding and smoothing
Frequently Asked Questions
Can I use low-fat cream cheese for a lighter option?
Yes, using low-fat cream cheese works well, but it may affect the creaminess slightly.
How long should I let the cheesecake cups chill?
Aim to chill them for at least 2 hours to allow the filling to set properly.
Can I make these cheesecake cups in advance?
Definitely! They can be prepared a day ahead, making them perfect for entertaining or meal prep.
What if I don’t have heavy whipping cream?
If heavy whipping cream is not available, you can substitute it with whipped topping for a similar texture.
Can I serve these cups at room temperature?
These cups are best served chilled. However, they can be left out for a short period during serving.
Conclusion
Oreo No-Bake Cheesecake Cups are a show-stopping dessert that brings the delightful flavors of cookies and cream into an easy-to-make format. They offer a perfect blend of creamy cheesecake and crunchy Oreo crust, making them a favorite for any occasion. With minimal prep time, endless variations, and no baking required, these cups are not only a treat for the palate but also a visually stunning dessert to impress your guests. Whip them up for your next gathering or just treat yourself—you deserve it!

Oreo No-Bake Cheesecake Cups: An Amazing Ultimate Recipe
- Total Time: 15 minutes
Ingredients
– 2 cups crushed Oreo cookies
– ½ cup unsalted butter, melted
– 8 oz cream cheese, softened
– 1 cup powdered sugar
– 1 teaspoon vanilla extract
– 1 cup heavy whipping cream
– ½ cup additional Oreo cookie crumbs for topping
– Optional: Fresh berries for garnish
Instructions
Creating these Oreo No-Bake Cheesecake Cups is a straightforward process. Just follow these simple steps:
1. Prepare the Cup Base: In a medium bowl, mix the crushed Oreo cookies with melted butter until combined.
2. Create the Base Layer: Spoon the Oreo mixture into the bottom of individual cups or dessert glasses. Use the back of a spoon to press down firmly to form an even layer.
3. Make the Cheesecake Filling: In a large bowl, beat the softened cream cheese with an electric mixer until smooth and creamy.
4. Add Ingredients: Gradually add the powdered sugar and vanilla extract. Mix until fully combined and the mixture is free of lumps.
5. Whip the Cream: In another bowl, whip the heavy cream until stiff peaks form.
6. Combine Mixtures: Gently fold the whipped cream into the cream cheese mixture until well combined. Take care not to deflate the whipped cream.
7. Layer the Filling: Spoon the cheesecake filling over the prepared Oreo crust in each cup. Smooth the tops with a spatula.
8. Chill Time: Cover the cups with plastic wrap and refrigerate for at least 2 hours, or until the filling is set.
9. Add Toppings: Once set, remove the cups from the refrigerator. Top with additional crushed Oreo cookies for added texture and garnish with fresh berries if desired.
10. Serve and Enjoy: Enjoy your decadent Oreo No-Bake Cheesecake Cups fresh from the fridge!
These easy steps will lead you to a delightful dessert that will impress anyone lucky enough to taste it.
- Prep Time: 15 minutes
- Cook Time: 0 minutes
Nutrition
- Serving Size: 6 cups
- Calories: 320 kcal
- Fat: 22g
- Protein: 3g