Oreo No-Bake Cheesecake Cups are an incredible treat that perfectly combines the rich flavors of chocolate and creamy cheesecake. This dessert is simple yet decadent, making it a fantastic choice for gatherings, celebrations, or even as a delightful indulgence on a leisurely afternoon. The magic of these cheesecake cups lies in their ease of preparation and the joy they bring with each delightful spoonful.
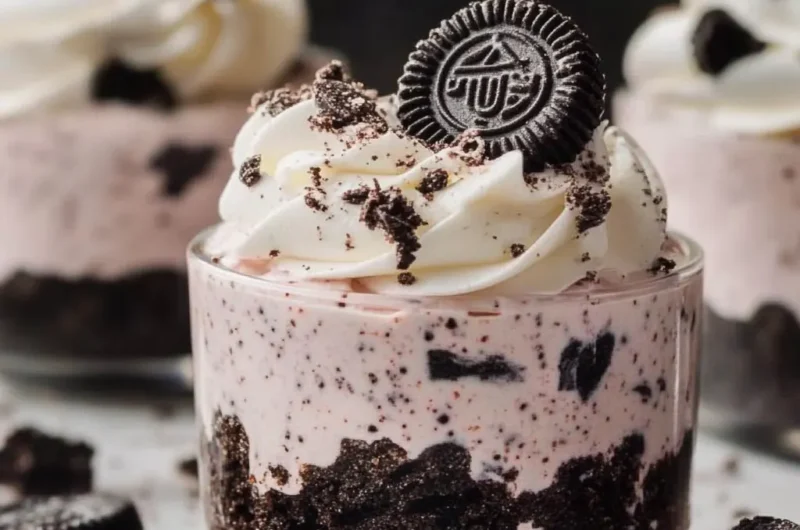
Imagine a smooth, velvety cheesecake filling cradled in a crunchy Oreo cookie crust, topped with a dollop of whipped cream and a sprinkle of crushed Oreos. Each layer contributes to a mysterious blend of textures and flavors that will have your taste buds singing. This dessert is not just easy to make; it offers an amazing balance of sweetness and richness that will leave everyone craving more.
No baking is required for this indulgent dessert, making it a perfect option for those hot summer days when you want to avoid heating up your kitchen. Oreo No-Bake Cheesecake Cups are also customizable, allowing you to experiment with flavors and toppings to suit your preferences. In this article, you will uncover why this recipe is loved by many, how to prepare it, and tips on serving for maximum enjoyment.
Why You’ll Love This Recipe
There are countless reasons why Oreo No-Bake Cheesecake Cups are a fan favorite. Here are just a few reasons you’ll fall head over heels for this delightful dessert:
1. Effortless Preparation: With no baking involved, this recipe is quick and easy to prepare, making it perfect for both novice and experienced cooks.
2. Minimal Ingredients: You likely have most of the ingredients in your pantry. Just grab some Oreos and cream cheese!
3. Versatile: Personalize your cheesecake cups by experimenting with different flavors or toppings, like fruit or chocolate drizzles.
4. Perfect for Any Occasion: Whether it’s a birthday party, holiday gathering, or casual get-together, these cups are the ideal dessert.
5. Stunning Presentation: These individual servings look gorgeous and upscale, making them a great choice for entertaining guests.
6. A Sweet Treat for Everyone: With the classic flavor of Oreo cookies, these cheesecake cups appeal to kids and adults alike.
By now, it’s clear why Oreo No-Bake Cheesecake Cups have become such a beloved dessert. They are straightforward to make and are sure to impress your family and friends.
Preparation and Cooking Time
To whip up these Oreo No-Bake Cheesecake Cups, you’ll need a total of about 30 minutes of prep time, with additional chilling time to ensure they set properly. Here’s how the timing breaks down:
– Preparation Time: 20-30 minutes
– Chilling Time: 2-4 hours (or overnight for best results)
This timeline makes it easy to plan a dessert that can be prepared ahead of time, ensuring a stress-free entertaining experience.
Ingredients
– 24 Oreo cookies (plus extra for garnish)
– 5 tablespoons unsalted butter, melted
– 8 oz cream cheese, softened
– 1 cup powdered sugar
– 1 teaspoon vanilla extract
– 1 ½ cups heavy whipping cream
– Fresh whipped cream, for topping (optional)
– Chocolate syrup, for drizzling (optional)
Step-by-Step Instructions
Creating your Oreo No-Bake Cheesecake Cups is simple and enjoyable! Follow these easy steps to bring your dessert to life:
1. Prepare the Oreo Crust: In a food processor, crush the Oreo cookies until they are finely ground. Alternatively, place them in a zip-top bag and crush them using a rolling pin.
2. Combine Crust Ingredients: In a bowl, mix the crushed Oreos with the melted butter until well combined. The mixture should resemble wet sand.
3. Assemble the Base: Divide the Oreo mixture evenly among individual serving cups or jars, pressing down firmly to create a solid crust layer.
4. Make the Cheesecake Filling: In a large bowl, beat the softened cream cheese with an electric mixer until smooth and creamy. Pаuse to scrape the sides of the bowl as needed.
5. Add Sugar and Vanilla: Gradually mix in the powdered sugar and vanilla extract until fully incorporated, creating a rich and creamy cheesecake filling.
6. Whip the Cream: In a separate bowl, whip the heavy cream until stiff peaks form.
7. Combine Mixtures: Gently fold the whipped cream into the cream cheese mixture, being careful not to deflate it. This will ensure a light and airy texture.
8. Layer the Cups: Spoon the cheesecake filling over the Oreo crusts in each cup, filling them to the top. Smooth the surface with a spatula.
9. Chill: Cover the cups with plastic wrap and place them in the refrigerator to chill for at least 2-4 hours, or overnight for best results.
10. Garnish and Serve: Just before serving, garnish each cup with additional whipped cream, crushed Oreos, and a drizzle of chocolate syrup if desired.
These steps will guide you in creating the most delightful Oreo No-Bake Cheesecake Cups that everyone will love!
How to Serve
Serving Oreo No-Bake Cheesecake Cups can elevate the experience even more. Here are some tips to ensure they look and taste their best:
1. Chilled Delight: Serve the cheesecake cups chilled for the best flavor and texture. This makes them refreshing, especially on warm days.
2. Garnish Creatively: Enhance the appearance by adding a dollop of whipped cream and crumbled Oreos on top. A drizzle of chocolate syrup adds an extra indulgent touch.
3. Individual Servings: Keep the servings in individual cups or jars for a trendy, modern presentation. This also makes it easy for guests to grab and enjoy.
4. Pair with Beverages: Consider serving with a cold glass of milk, coffee, or a dessert wine for an added gourmet touch that complements the flavors.
5. Themed Decorative Touches: If you’re serving these cups for a special occasion, consider adding themed decorations like sprinkles or themed cups.
With these serving tips, your Oreo No-Bake Cheesecake Cups will not only taste amazing but also look stunning on the dessert table. Enjoy indulging with every delightful bite!
Additional Tips
– Use High-Quality Ingredients: For the best flavor, opt for full-fat cream cheese and fresh whipped cream. High-quality Oreos also add to the richness of the dessert.
– Chill for a Longer Time: For the best texture, refrigerate the cheesecake cups overnight. This will allow the flavors to meld beautifully.
– Experiment with Flavors: Don’t hesitate to try different flavors of Oreos, such as peanut butter or mint, for a unique twist on the classic recipe.
– Keep It Mess-Free: Use disposable piping bags for the cheesecake filling to make layering easier and cleaner.
– Customize Serving Sizes: Consider using smaller cups or mini jars for bite-sized delights that are perfect for parties.
Recipe Variation
Here are some fun variations to explore with your Oreo No-Bake Cheesecake Cups:
1. Peanut Butter Twist: Add creamy peanut butter to the cheesecake filling for a deliciously nutty flavor. Swirl it in before layering for a marbled effect.
2. Minty Fresh: Incorporate a few drops of mint extract into the filling. Use mint-flavored Oreos for an extra refreshing dessert.
3. Fruit-Infused: Layer in fresh fruit such as bananas or strawberries between the cheesecake and crust for a refreshing twist.
4. Chocolate Lovers Delight: Mix in mini chocolate chips into the cheesecake filling for added texture and a rich chocolate experience.
5. Caramel Drizzle: Add a drizzle of caramel sauce over the top of the cheesecake prior to serving for an extra sweet indulgence.
Freezing and Storage
– Storage: Store the Oreo No-Bake Cheesecake Cups covered in the refrigerator. They will last for about 4-5 days.
– Freezing: You can freeze the cheesecake cups for up to 2-3 months. Ensure they’re wrapped tightly to prevent freezer burn, and allow them to thaw in the refrigerator before serving.
Special Equipment
To create these delightful cheesecake cups, you’ll need a few essential tools:
– Food Processor or Rolling Pin: For crushing the Oreos into fine crumbs.
– Mixing Bowls: To mix the cheesecake filling and crust.
– Electric Mixer: For smoothly blending the cream cheese and whipping the cream.
– Individual Serving Cups/Jars: These add a beautiful presentation and make serving a breeze.
– Spatula: For smoothing the cheesecake filling and layering the cups.
Frequently Asked Questions
Can I use low-fat cream cheese?
Yes, but the texture may be slightly less creamy. For the best flavor, use full-fat cream cheese.
How long can I keep these cups in the fridge?
They’re best eaten within 4-5 days stored in the refrigerator.
Can I make these without gluten?
Absolutely! Use gluten-free Oreos and confirm other ingredients are gluten-free.
What if I don’t have a food processor?
You can place Oreos in a zip-top bag and crush them with a rolling pin. It takes a little longer, but it works just as well!
Can these cheesecake cups be made vegan?
Yes! Substitute the cream cheese with vegan cream cheese, use coconut whipped cream, and choose dairy-free Oreos.
Conclusion
Oreo No-Bake Cheesecake Cups are an easy and satisfying dessert that combines the beloved flavors of chocolate and cheesecake without the hassle of baking. They’re perfect for any occasion, from casual gatherings to more festive celebrations. With their deliciously creamy filling, crunchy Oreo crust, and endless customization possibilities, these cups are sure to be a hit. Prepare to wow your family and friends with this delightful, no-bake treat that will have everyone asking for the recipe!
Oreo No-Bake Cheesecake Cups: An Amazing Ultimate Dessert Recipe
- Total Time: 17 minute
Ingredients
– 24 Oreo cookies (plus extra for garnish)
– 5 tablespoons unsalted butter, melted
– 8 oz cream cheese, softened
– 1 cup powdered sugar
– 1 teaspoon vanilla extract
– 1 ½ cups heavy whipping cream
– Fresh whipped cream, for topping (optional)
– Chocolate syrup, for drizzling (optional)
Instructions
Creating your Oreo No-Bake Cheesecake Cups is simple and enjoyable! Follow these easy steps to bring your dessert to life:
1. Prepare the Oreo Crust: In a food processor, crush the Oreo cookies until they are finely ground. Alternatively, place them in a zip-top bag and crush them using a rolling pin.
2. Combine Crust Ingredients: In a bowl, mix the crushed Oreos with the melted butter until well combined. The mixture should resemble wet sand.
3. Assemble the Base: Divide the Oreo mixture evenly among individual serving cups or jars, pressing down firmly to create a solid crust layer.
4. Make the Cheesecake Filling: In a large bowl, beat the softened cream cheese with an electric mixer until smooth and creamy. Pаuse to scrape the sides of the bowl as needed.
5. Add Sugar and Vanilla: Gradually mix in the powdered sugar and vanilla extract until fully incorporated, creating a rich and creamy cheesecake filling.
6. Whip the Cream: In a separate bowl, whip the heavy cream until stiff peaks form.
7. Combine Mixtures: Gently fold the whipped cream into the cream cheese mixture, being careful not to deflate it. This will ensure a light and airy texture.
8. Layer the Cups: Spoon the cheesecake filling over the Oreo crusts in each cup, filling them to the top. Smooth the surface with a spatula.
9. Chill: Cover the cups with plastic wrap and place them in the refrigerator to chill for at least 2-4 hours, or overnight for best results.
10. Garnish and Serve: Just before serving, garnish each cup with additional whipped cream, crushed Oreos, and a drizzle of chocolate syrup if desired.
These steps will guide you in creating the most delightful Oreo No-Bake Cheesecake Cups that everyone will love!
- Prep Time: 15 minutes
- Cook Time: N/A
Nutrition
- Serving Size: 6-8 cups
- Calories: 300 kcal
- Fat: 20g
- Protein: 3g