How to Make a Barbie Cake Without a Pan: Step-by-Step Guide
Creating a Barbie cake without a specialized pan might seem challenging, but it’s surprisingly simple when you know how to improvise. With a little creativity, basic tools, and some patience, you can craft a gorgeous, dress-shaped cake that looks just like the classic version. This guide breaks down every step, from baking and assembling to decorating, so you can create a showstopper for any celebration. Let’s dive in!
Understanding the Concept of a Barbie Cake
What is a Barbie Cake?
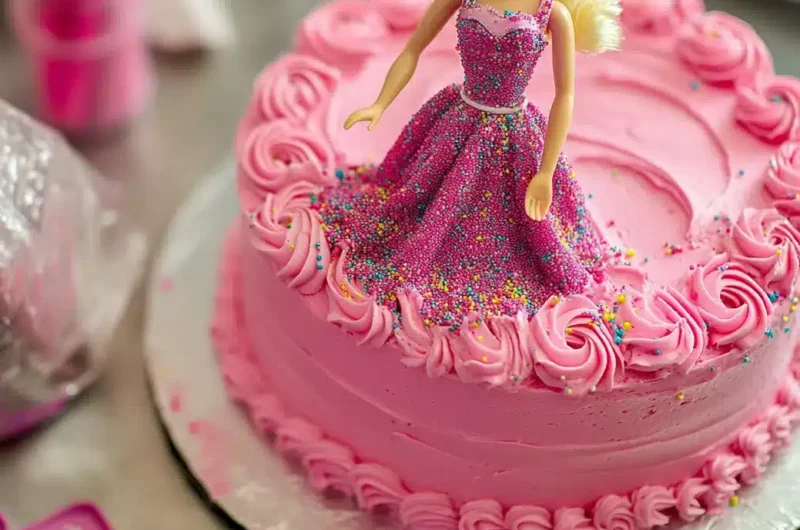
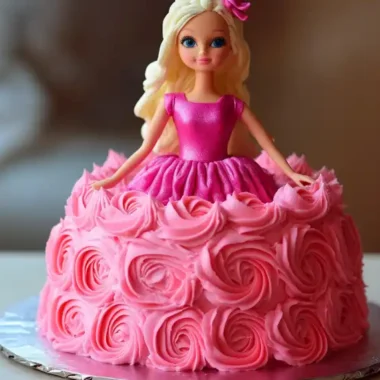
A Barbie cake is a visually stunning dessert that features a doll inserted into a cake shaped like a flowing gown. It’s often the centerpiece of birthday parties, especially for children, because it blends the magic of Barbie with the sweetness of cake. The design allows endless customization, from elegant princess themes to modern, funky styles.
Why Make a Barbie Cake Without a Pan?
You might wonder why you’d skip using a traditional pan. Well, sometimes you don’t have the specialized dome-shaped pans on hand, or you want to try an alternative method that uses basic kitchen items. Either way, it’s a fun and resourceful approach that lets you create a unique dessert without needing extra equipment.
How to Achieve the Gown Shape Without a Pan
The good news? Achieving that iconic flowing gown shape doesn’t require fancy tools. By stacking differently sized round cakes, carving them into a tapered design, and using frosting to smooth the surface, you can replicate the dome-shaped look with ease. Plus, improvising often sparks creativity, allowing you to experiment with shapes and styles you wouldn’t try otherwise.
(Linked Resource: Discover creative cake designs at Wilton.)
Benefits of Homemade Barbie Cakes
Making a homemade Barbie cake isn’t just cost-effective—it’s also a deeply personal and rewarding project. You get to choose the flavors, colors, and decorations, tailoring the cake to fit the occasion perfectly. Additionally, it’s an excellent way to practice and showcase your baking skills, even if you’re a beginner.
Necessary Tools and Ingredients
Before diving into the baking process, it’s crucial to gather all the tools and ingredients you’ll need. Fortunately, you don’t need any specialized equipment to make a Barbie cake without a pan—just a few basic items and a bit of resourcefulness.
Essential Tools for a Barbie Cake
Even without a dome-shaped pan, creating a Barbie cake is straightforward when you have the right tools on hand:
- Mixing Bowls or Standard Cake Pans:
Oven-safe bowls in various sizes or regular round cake pans can replicate the layered, tapered skirt shape effectively. - Serrated Knife:
Perfect for trimming and carving the cake layers into a smooth, gown-like design. - Offset Spatula:
A handy tool for spreading and smoothing frosting evenly across the cake. - Cake Board or Base:
Provides a sturdy surface for assembling and decorating the cake. - Piping Bags and Tips:
Useful for creating intricate dress details, ruffles, and other decorative elements. - Plastic Wrap or Aluminum Foil:
To wrap the doll’s lower half and keep it clean when inserted into the cake. - Dowels or Straws:
Helps stabilize the cake, especially if it’s tall or has multiple layers.
Key Ingredients You’ll Need
The ingredients for a Barbie cake are simple, but their quality can make a significant difference in taste and appearance:
- Cake Batter:
Whether homemade or store-bought, opt for flavors like vanilla, chocolate, or strawberry. Multiple layers may require a double batch. - Buttercream or Fondant:
Buttercream is ideal for frosting and base decoration, while fondant works well for creating smooth, polished finishes and intricate details. - Food Coloring:
Adds vibrancy to your cake and helps you match specific themes or party colors. - Edible Decorations:
Think sugar pearls, sprinkles, edible glitter, or flowers to elevate the design. - Clean Barbie Doll or Similar-Sized Doll:
The centerpiece of your creation, wrapped in food-safe material before insertion.
Pro Tip:
Having all your tools and ingredients ready beforehand ensures a smooth process and eliminates interruptions. Plus, using fresh, high-quality ingredients guarantees that your Barbie cake will not only look amazing but taste incredible too!
Preparing the Cake Layers
Now that you’ve gathered everything, it’s time to bake the cake layers that will form Barbie’s gown. Since you’re working without a dome-shaped pan, this part involves a bit of creativity to achieve the desired shape. But don’t worry—with these steps, you’ll be set for success.
Step 1: Choosing the Right Bakeware
If you’re using mixing bowls, pick ones that are oven-safe and vary in size to create a natural tapering effect. Alternatively, stack smaller and larger round cake pans to mimic the graduated layers of a dress.
Step 2: Baking the Layers
- Preheat the Oven:
Set your oven to the recommended temperature for your chosen cake recipe. Accurate preheating ensures even baking. - Prepare the Pans or Bowls:
Grease the pans or bowls with butter or non-stick spray and line them with parchment paper to prevent sticking. - Divide the Batter:
Pour the cake batter into each pan or bowl, filling them no more than halfway to allow for even rising. - Bake and Check for Doneness:
Bake each layer for the recommended time, testing with a toothpick. If it comes out clean, your cakes are ready.
Step 3: Cooling the Cakes
Allow the cakes to cool in their pans for about 10 minutes. Then, carefully transfer them to a wire rack to cool completely. This step is crucial—decorating warm cakes can lead to melting frosting and structural instability.
Step 4: Trimming and Leveling
- Trim the Tops:
Use a serrated knife to level the tops of your cake layers, ensuring they stack evenly. - Shape the Layers:
Begin carving the cooled cakes into a gradual, gown-like shape, starting with the widest layer at the base and working upward.
Assembling the Cake Structure
With your beautifully baked and shaped cake layers ready, it’s time to assemble the structure of your Barbie cake without a pan. This step is crucial for achieving stability and ensuring the design stays intact throughout the decorating process. Let’s dive into assembling and securing your cake.
– Prepare the Base
Start by placing the largest cake layer on a sturdy cake board or base. Using a solid base prevents the cake from shifting, especially if it will be transported. Secure the base layer with a small dollop of buttercream to keep it in place.
– Stack the Layers
- Spread Frosting Between Layers:
As you stack each layer, add a generous layer of buttercream frosting in between. This acts as glue, holding the layers together securely. - Align the Layers:
Ensure the layers are centered as you stack them. Adjust their position if needed to create the tapered gown shape. - Smooth the Layers:
After stacking, use a serrated knife to refine the skirt’s shape further, carving away any uneven edges to achieve a smooth, flowing gown silhouette.
– Insert the Doll
- Wrap the Doll:
Wrap the lower half of the Barbie doll in plastic wrap or aluminum foil to keep it clean and food-safe. - Create an Opening:
Use a knife or dowel to carefully carve a hole in the center of the topmost cake layer. This hole should be just wide enough to fit the wrapped doll snugly. - Insert the Doll:
Gently insert the doll into the cake, ensuring it stands upright. If the doll wobbles, use extra frosting around the base for added stability.
– Stabilize the Structure
If your cake is tall or has multiple layers, insert dowels or straws into the lower layers for support. This step prevents the cake from leaning or collapsing during transport or serving.
With your cake fully assembled and the doll securely in place, you’re ready to move on to the exciting part—decorating!
Decorating the Barbie Cake
Now comes the most enjoyable part: turning your stacked cake into a stunning masterpiece. Decorating a Barbie cake allows you to unleash your creativity, transforming simple frosting and embellishments into an elegant gown. Follow these steps to bring your vision to life.
– Apply a Crumb Coat
- What is a Crumb Coat?
A crumb coat is a thin layer of frosting applied to seal in any loose crumbs and create a smooth base for the final decoration. - How to Apply It:
Spread a thin layer of buttercream evenly across the entire cake, including the doll’s base. Use an offset spatula for precision. - Chill the Cake:
Refrigerate the crumb-coated cake for about 30 minutes to firm up the frosting and prepare it for the final layer.
– Frost the Cake
- Add the Base Layer:
Apply a thicker layer of frosting over the crumb coat, smoothing it out with an offset spatula. This creates the foundation for decorating. - Choose a Gown Color:
Use food coloring to match the frosting to your desired theme. Pastel pinks, blues, and purples are popular choices for Barbie-themed cakes.
– Create Dress Details
- Piping Techniques:
Use piping bags with different tips to add intricate details like ruffles, pleats, or lace to the gown. Swirl patterns and rosettes work beautifully for a flowing dress effect. - Fondant Embellishments:
Roll out fondant to craft bows, sashes, or even flower appliqués. Place them strategically on the dress for added elegance. - Add Texture:
Incorporate edible glitter, sugar pearls, or sprinkles to give the dress a sparkling finish. These accents make the cake stand out as a showstopper.
– Finishing Touches
- Accessorize the Doll:
Style the Barbie doll with edible jewelry, a tiara, or a fondant scarf to enhance her look. - Smooth Transitions:
Blend the frosting around the doll’s waist seamlessly into the gown to make it appear natural and polished.
Incorporating Personal Touches
One of the best things about making a Barbie cake without a pan is the opportunity to personalize it. By adding unique details and creative elements, you can make the cake stand out and reflect the personality of the guest of honor. Here are some ideas to ensure your cake is as special as the occasion itself.
Customizing the Gown Design
The dress is the centerpiece of your Barbie cake, and customizing it allows you to match the theme of the celebration perfectly.
- Theme-Based Colors and Patterns:
Use food coloring to match the dress to the party’s theme. For example, pastel pinks and purples work well for princess parties, while bold reds or blues are perfect for superhero-inspired designs. Adding ombre effects or stripes can create a unique, dynamic look. - Handmade Details:
Craft small, intricate decorations using fondant or modeling chocolate. Flowers, butterflies, or geometric shapes can add a personal touch to the design. - Personalized Messages:
Pipe the birthday person’s name, age, or a short message onto the cake base or on a fondant sash draped across the gown.
Adding Edible Decorations
Using edible decorations not only enhances the visual appeal of the cake but also ensures every part is safe to eat.
- Edible Glitter and Sprinkles:
These add sparkle and texture, creating a magical, eye-catching finish. - Candy and Chocolates:
Incorporate small candies or chocolate pieces as accents for the gown or as decorative elements around the cake’s base. - Sugar Pearls and Sequins:
These can mimic the look of real jewelry, giving the gown a luxurious and glamorous feel.
Matching the Cake to the Celebration
To make the cake feel like a cohesive part of the event, align its design with other elements of the party. For example:
- Use the same color palette as the party decorations.
- Incorporate similar motifs or themes from the invitation, like stars or floral patterns.
- Create a backdrop with the same theme to enhance the cake’s presentation.
(Linked Resource: Find more inspiration for creative cake designs at Wilton.)
Pro Tip:
Don’t hesitate to involve the guest of honor in the design process! Letting them choose colors, decorations, or patterns makes the cake even more personal and memorable.
Troubleshooting Common Issues
No matter how carefully you plan, challenges can arise when making a Barbie cake without a pan. But don’t worry—most issues have simple solutions. Let’s address some common problems and how to fix them, ensuring your cake turns out perfect.
Uneven Layers
Stacked layers that lean or appear uneven can disrupt the overall design.
- How to Avoid It:
Trim each layer using a serrated knife to ensure they are level before stacking. Use a cake turntable to make this process easier. - Quick Fix:
If you’ve already stacked uneven layers, add more frosting between them to fill gaps and even out the surface.
Crumbly or Dry Cake
A crumbly cake can make carving and shaping difficult, while a dry cake impacts taste and texture.
- Prevention:
Avoid overbaking by checking for doneness with a toothpick. Ensure the batter is well-mixed but not overbeaten, as too much air can cause dryness. - Fixing Dryness:
Brush the cake layers with a simple syrup (made from sugar and water) before frosting. This adds moisture and enhances flavor.
Collapsing Structure
A tall Barbie cake can collapse if it isn’t properly stabilized.
- Prevention:
Use dowels or straws as supports for added stability, especially if the cake has multiple layers. Ensure the frosting between layers is firm enough to hold the structure together. - Emergency Fix:
If the cake starts leaning, refrigerate it immediately to firm up the frosting. Reassemble as needed and reinforce with additional dowels.
Melting Frosting
Warm conditions can cause frosting to soften or melt, ruining the decoration.
- Prevention:
Work in a cool environment, and refrigerate the cake between decorating steps. Buttercream frosting tends to hold up better than whipped cream in warmer conditions. - Fixing Melted Frosting:
If frosting begins to slide or lose shape, refrigerate the cake for 10–15 minutes to allow it to firm up. Then, smooth and reapply frosting as needed.
Uneven Carving
Achieving a smooth, gown-like shape can be tricky without the right tools.
- Prevention:
Use a serrated knife for precise carving and go slowly, trimming small sections at a time. - Fixing Mistakes:
Cover any uneven areas with additional frosting or fondant to smooth them out. Decorative ruffles or piping can also hide imperfections effectively.
Frequently Asked Questions (FAQs)
1. Barbie Cake Recipe?
A Barbie cake recipe is a step-by-step guide to creating a stunning cake featuring a doll as the centerpiece. It typically involves baking layers of cake, assembling them into a dome shape resembling a gown, and decorating with buttercream or fondant. You can follow the detailed recipe in this article to make your own Barbie cake, even without a specialized pan.
2. Can You Use a Bundt Pan for a Barbie Cake?
Yes, a bundt pan is an excellent alternative for making a Barbie cake. The central hole in a bundt pan is perfect for inserting the doll, and the naturally flared shape mimics a dress. For added height or shape, you can stack additional round cake layers beneath or on top of the bundt cake.
3. How Do I Make a Barbie Cake Without a Pan?
You can use oven-safe bowls or standard round cake pans in varying sizes to create the tapered skirt shape. Stack and carve the baked layers to resemble a flowing gown. This method is resourceful, easy, and doesn’t require a specialized dome pan.
4. What Tools Do I Need to Make a Barbie Cake?
To make a Barbie cake, you’ll need:
- Oven-safe mixing bowls or round cake pans
- Serrated knife for carving
- Offset spatula for smoothing frosting
- Piping bags for decorations
- A clean Barbie doll
- Plastic wrap to protect the doll
5. What Frosting Works Best for a Barbie Cake?
Buttercream is the most popular choice for frosting a Barbie cake because it’s easy to spread and pipe. For a smoother and more polished look, you can use fondant for the outer layer while keeping buttercream underneath for flavor.
6. How Do I Stabilize a Tall Barbie Cake?
To stabilize a tall Barbie cake, use wooden dowels or plastic straws as internal supports. These will prevent the layers from shifting or collapsing. Additionally, chill the cake during assembly to firm up the frosting and structure.
Conclusion
Making a Barbie cake without a pan is not just about crafting a dessert; it’s about creating a magical centerpiece that adds joy and excitement to any celebration. By following these detailed steps, you’ve learned how to improvise with basic kitchen tools, assemble and shape a stunning cake, and decorate it with flair and creativity.
Whether you’ve chosen an elegant princess theme, a modern minimalist style, or a playful design filled with personal touches, the cake you’ve created is a reflection of your creativity and effort. From baking and carving to adding those final sparkling details, every step has contributed to a one-of-a-kind masterpiece.
What makes this process even more special is the thought and care you’ve poured into it. A homemade Barbie cake isn’t just a treat; it’s a memory in the making—a symbol of love, celebration, and creativity.
Now it’s time to showcase your cake proudly, watch the delight on your guests’ faces, and savor the sweet reward of your hard work. So, grab your tools, let your imagination soar, and bring your next Barbie cake vision to life!


