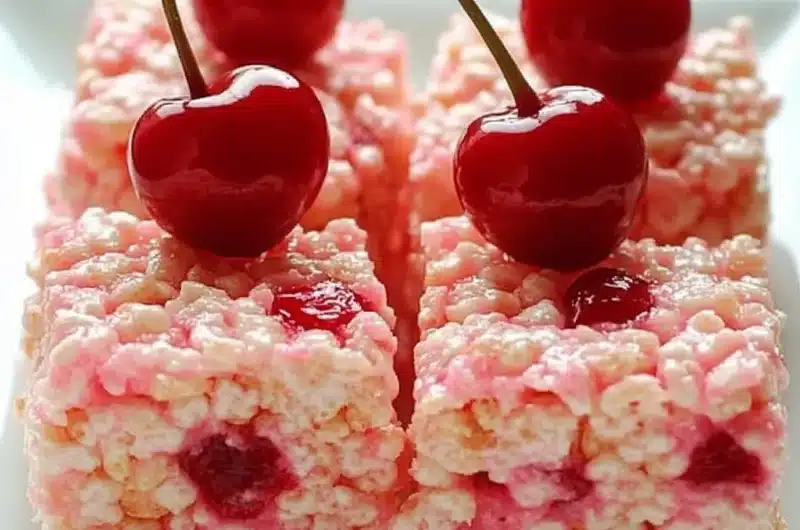
Cherry Rice Krispie Treats are a delightful twist on a classic favorite, perfect for any occasion. Bursting with the sweet-tart flavor of cherries, these treats elevate the simple Rice Krispie creation into something truly special. Whether you’re preparing them for a party, a family gathering, or just a fun snack at home, they are sure to impress with their unique flavor and appealing appearance.
The moment you take a bite of Cherry Rice Krispie Treats, the soft, chewy texture mixed with the fruity punch will create a delightful explosion of flavors. They are not just snacks; they are sweet memories waiting to be made and shared with friends and family. This guide will help you dive into the world of Cherry Rice Krispie Treats, detailing why they are loved by many, the ease of making them, and tips for serving.
If you’ve ever enjoyed a Rice Krispie treat, you’ll be pleasantly surprised to find that adding cherries transforms the ordinary into the extraordinary. The incorporation of cherries not only adds a vibrant color but also a deliciously fresh taste that compliments the cereal perfectly. In this article, you’ll discover why this recipe deserves a spot in your dessert repertoire, the necessary ingredients, clear instructions, and serving suggestions to make your treats unforgettable. Now, let’s embark on an incredible journey of flavor with Cherry Rice Krispie Treats!
Why You’ll Love This Recipe
Cherry Rice Krispie Treats offer a combination of incredible taste and nostalgic feelings that will have you falling in love at first bite. Here are a few reasons why this recipe stands out:
1. Delightfully Unique Flavor: The tartness of cherries perfectly balances the sweetness of marshmallows, creating a harmonious flavor.
2. Easy to Make: Just a few simple ingredients and steps make these treats accessible to anyone, regardless of their cooking skills.
3. Perfect for Any Occasion: These treats are fantastic for parties, potlucks, or even as an afternoon snack, providing something different from traditional desserts.
4. Visually Appealing: The bright red cherries integrated into the creamy white marshmallow mix create a stunning contrast, making them a feast for the eyes.
5. Customizable: You can easily tweak the recipe by adding your favorite nuts or chocolate chips for added texture and flavor.
6. Memorable Treat: The unique flavor combination is bound to leave a lasting impression on everyone who tries them.
With these wonderful features, it’s no wonder that Cherry Rice Krispie Treats are becoming a beloved favorite in kitchens everywhere. Each bite ensures an exciting blend that sparks joy and brings a smile to your face.
Preparation and Cooking Time
Creating Cherry Rice Krispie Treats is efficient and manageable. Here’s a simple breakdown of the time required:
– Preparation Time: 10 minutes
– Cooking Time: 10 minutes
– Setting Time: 30 minutes
In total, you’ll need about 50 minutes to have these sweet treats ready to serve. The process involves a few straightforward steps, allowing you to enjoy the results quickly.
Ingredients
– 4 cups Rice Krispies cereal
– 2 cups mini marshmallows
– 3 tablespoons unsalted butter
– 1 cup chopped cherries (fresh or canned)
– ½ teaspoon vanilla extract
– A pinch of salt
– Optional: Red or pink food coloring (for enhanced color)
Step-by-Step Instructions
Making Cherry Rice Krispie Treats is a straightforward process that anyone can follow. Here are the simple steps:
1. Prepare the Pan: Grease a 9×13 inch baking dish with butter or non-stick spray and set aside.
2. Melt Butter: In a large saucepan, melt the butter over low heat.
3. Add Marshmallows: Once the butter is melted, add the mini marshmallows to the saucepan. Stir continuously until the marshmallows are completely melted and smooth.
4. Incorporate Vanilla: Remove the saucepan from heat and stir in the vanilla extract and a pinch of salt.
5. Add Food Coloring: If desired, add a few drops of red or pink food coloring at this stage to enhance the treat’s color.
6. Mix in Rice Krispies: Gradually add the Rice Krispies cereal to the melted mixture, stirring until all the cereal is well-coated.
7. Fold in Cherries: Gently fold in the chopped cherries, being careful not to break them too much.
8. Transfer to Pan: Pour the mixture into the prepared baking dish. Press it down evenly and firmly with a spatula or your hands.
9. Let Set: Allow the treats to cool at room temperature for about 30 minutes. Once set, they can be cut into squares.
10. Serve and Enjoy: Bring them to parties or enjoy them at home with family and friends!
By following these simple steps, you’ll have a delightful treat that will please everyone’s taste buds.
How to Serve
Serving Cherry Rice Krispie Treats is as enjoyable as making them. Consider these tips for a great presentation:
1. Cutting: Use a sharp knife to cut the treats into small squares or rectangles for easy serving. Smaller bites can help keep portions controlled!
2. Garnish: Consider sprinkling additional chopped cherries or a dusting of powdered sugar on top for an extra touch.
3. Accompaniments: Pair with a scoop of vanilla ice cream for a delightful dessert experience.
4. Festive Touch: For holidays or special occasions, use colorful plates or wrappers to enhance the visual appeal.
5. Pack for On-the-Go: Package them individually in clear bags tied with colorful ribbons for fun party favors or snacks for special events.
With these serving suggestions, Cherry Rice Krispie Treats can transform into a centerpiece of joy and deliciousness, making every moment spent enjoying them memorable. Enjoy creating and sharing these delightful treats as they bring smiles and flavor to your gatherings!
Additional Tips
– Experiment with Cherry Varieties: Different types of cherries, such as Bing or tart cherries, can alter the taste and sweetness of your treats.
– Include Other Mix-Ins: Consider adding mini chocolate chips, chopped nuts, or even coconut flakes for an extra crunch and flavor.
– Utilize Leftover Treats: If you have extras, try layering them with ice cream or crumbling them over yogurt for a fun dessert twist.
Recipe Variation
There are numerous ways to make Cherry Rice Krispie Treats your own. Here are a few ideas to consider:
1. Chocolate Cherry Treats: Incorporate cocoa powder into the melted marshmallow mixture for a chocolatey twist or drizzle melted chocolate over the top.
2. Tropical Cherry Treats: Mix in some shredded coconut and swap out cherries for pineapple for a delightful tropical variation.
3. Peanut Butter Swirl: Stir in some peanut butter to the marshmallow mixture for a rich, nutty flavor, pairing beautifully with the cherries.
Freezing and Storage
– Storage: These treats can be stored in an airtight container at room temperature for up to one week. Ensure they are kept in a cool, dry place to maintain freshness.
– Freezing: For longer storage, you can freeze Cherry Rice Krispie Treats. Wrap them tightly in plastic wrap, then place them in a freezer-safe bag. They can be frozen for up to three months. Thaw at room temperature before serving.
Special Equipment
While Cherry Rice Krispie Treats don’t require specialized equipment, having a few essentials on hand makes preparation easier:
– Large saucepan: This is necessary for melting the butter and marshmallows.
– Spatula or wooden spoon: Useful for mixing the ingredients and pressing the mixture into the baking dish.
– 9×13 inch baking dish: A standard size for setting your treats.
– Baking spray or butter: For greasing the pan to prevent sticking.
Frequently Asked Questions
Can I substitute other cereals for Rice Krispies?
Yes, you can try other crispy rice cereals or even cornflakes for a new texture.
What if I can’t find fresh cherries?
Canned cherries work perfectly in this recipe. Just make sure to drain and chop them beforehand.
How do I ensure my treats aren’t too sticky?
Allow them to cool for the recommended setting time, and be sure to grease your pan well to avoid stickiness.
Can I make these treats vegan?
Yes, substitute the mini marshmallows with vegan marshmallows and use plant-based butter.
How can I make these gluten-free?
Check that the Rice Krispies are labeled gluten-free, as some varieties may contain gluten.
Conclusion
Cherry Rice Krispie Treats are more than just a twist on a classic; they’re a delightful combination of taste and nostalgia. With their vibrant color and sweet-tart flavor, these treats are sure to become a family favorite. Whether you stick to the traditional route or experiment with variations, the joy of making and sharing these delicious bites will enhance any occasion. Embrace the fun and creativity that comes with these Cherry Rice Krispie Treats and let your culinary skills shine!
Cherry Rice Krispie Treats: An Amazing Ultimate Recipe
- Total Time: 25 minutes
Ingredients
– 4 cups Rice Krispies cereal
– 2 cups mini marshmallows
– 3 tablespoons unsalted butter
– 1 cup chopped cherries (fresh or canned)
– ½ teaspoon vanilla extract
– A pinch of salt
– Optional: Red or pink food coloring (for enhanced color)
Instructions
Making Cherry Rice Krispie Treats is a straightforward process that anyone can follow. Here are the simple steps:
1. Prepare the Pan: Grease a 9×13 inch baking dish with butter or non-stick spray and set aside.
2. Melt Butter: In a large saucepan, melt the butter over low heat.
3. Add Marshmallows: Once the butter is melted, add the mini marshmallows to the saucepan. Stir continuously until the marshmallows are completely melted and smooth.
4. Incorporate Vanilla: Remove the saucepan from heat and stir in the vanilla extract and a pinch of salt.
5. Add Food Coloring: If desired, add a few drops of red or pink food coloring at this stage to enhance the treat’s color.
6. Mix in Rice Krispies: Gradually add the Rice Krispies cereal to the melted mixture, stirring until all the cereal is well-coated.
7. Fold in Cherries: Gently fold in the chopped cherries, being careful not to break them too much.
8. Transfer to Pan: Pour the mixture into the prepared baking dish. Press it down evenly and firmly with a spatula or your hands.
9. Let Set: Allow the treats to cool at room temperature for about 30 minutes. Once set, they can be cut into squares.
10. Serve and Enjoy: Bring them to parties or enjoy them at home with family and friends!
By following these simple steps, you’ll have a delightful treat that will please everyone’s taste buds.
- Prep Time: 15 minutes
- Cook Time: 10 minutes
Nutrition
- Serving Size: 12 squares
- Calories: 150 kcal
- Fat: 5g
- Protein: 1g