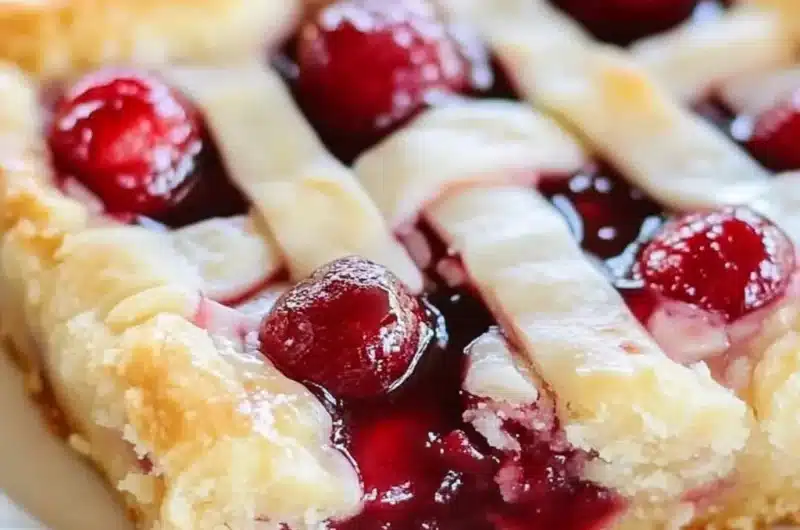
Cherry Pie Bars are a delightful dessert that captivates both the eyes and the taste buds. These bars bring all the amazing flavors of traditional cherry pie, packaged in a convenient, portable form. Imagine biting into a sweet, buttery crust filled with vibrant, tart cherries, and a hint of almond—it’s simply irresistible! As you enjoy these bars, you’ll find they encapsulate the comforting essence of homemade desserts, making them perfect for family gatherings or a cozy day at home.
If you’re a cherry lover or simply someone who appreciates a good dessert, Cherry Pie Bars are a must-try. They seamlessly blend the nostalgic elements of cherry pie with the convenience of bars, letting you enjoy this classic treat any time. In this guide, you’ll discover the reasons why this recipe stands out, the preparation and cooking time, a concise list of ingredients, and step-by-step instructions to create these delightful treats.
As you delve into this incredible recipe, you’ll realize that Cherry Pie Bars are more than just dessert—they’re a sweet experience, inviting you to share moments of joy and satisfaction with loved ones. Let’s explore what makes these bars a favorite and how you can easily whip them up in your own kitchen.
Why You’ll Love This Recipe
Cherry Pie Bars have a special charm that makes them appealing to a wide range of dessert enthusiasts. Here are a few reasons why you’ll fall in love with this amazing recipe:
1. Easy to Prepare – With simple ingredients and straightforward steps, this recipe is friendly for novice bakers.
2. Versatile Flavor Profile – The sweet yet tart flavor of cherries combined with a buttery crust is a timeless classic, perfect for all seasons.
3. Portable – Unlike traditional pie, you can easily cut these into bars and serve them as finger food.
4. Make Ahead – These bars can be made in advance and stored, making them convenient for parties or family gatherings.
5. Crowd-Pleasing – Their delicious flavor and attractive appearance will impress family and friends alike.
6. Great for Any Occasion – Whether it’s a holiday celebration or a random Tuesday treat, these bars fit right in.
With such enticing attributes, it’s no wonder that Cherry Pie Bars have become a beloved choice for many bakers. Every bite is an explosion of flavor that brings comfort and joy.
Preparation and Cooking Time
Creating these Cherry Pie Bars requires minimal time in the kitchen, letting you enjoy the sweet rewards sooner. Here’s how the timing breaks down:
– Preparation Time: 20-25 minutes
– Cooking Time: 35-40 minutes
– Cooling Time: 15-20 minutes
Overall, plan for about 1 hour and 10 minutes to whip up these delicious Cherry Pie Bars. These times may vary slightly based on your level of experience, but it provides a solid estimate for timing.
Ingredients
– 2 cups all-purpose flour
– 1 cup granulated sugar
– ½ cup unsalted butter, softened
– 1 large egg
– 1 tsp vanilla extract
– 1 tsp almond extract
– 1 tsp baking powder
– ½ tsp salt
– 2 cups pitted cherries (fresh or frozen)
– 1 tbsp cornstarch
– 1 tbsp lemon juice
– Powdered sugar (for dusting, optional)
Step-by-Step Instructions
Creating these delightful Cherry Pie Bars is straightforward if you follow these steps:
1. Preheat the Oven: Begin by preheating your oven to 350°F (175°C). Grease a 9×13-inch baking pan or line it with parchment paper.
2. Prepare the Crust Mixture: In a large mixing bowl, cream together the softened butter and granulated sugar until light and fluffy. This should take about 2-3 minutes.
3. Add Egg and Extracts: Mix in the egg, vanilla extract, and almond extract until thoroughly combined.
4. Combine Dry Ingredients: In another bowl, whisk together flour, baking powder, and salt. Gradually add this dry mixture to the wet ingredients until combined.
5. Press the Crust: Take two-thirds of the crust mixture and press it evenly into the prepared baking pan to form the base layer.
6. Prepare the Cherry Filling: In a medium bowl, combine the pitted cherries, cornstarch, and lemon juice. Toss gently to coat the cherries with the mixture.
7. Spread Cherry Filling: Evenly distribute the cherry filling over the pressed crust in the baking pan.
8. Add Topping: Crumble the remaining crust mixture on top of the cherries to create a streusel-like topping.
9. Bake: Place the pan in the preheated oven and bake for 35-40 minutes or until the top is golden brown and the cherry filling is bubbly.
10. Cool Down: Remove the pan from the oven and let it cool in the pan on a wire rack for 15-20 minutes. Once cooled, you can lift the bars out of the pan and slice them into squares.
With these steps, you’re well on your way to enjoying your own delicious Cherry Pie Bars!
How to Serve
When it’s time to present your Cherry Pie Bars, consider the following tips to enhance the experience:
1. Presentation: Arrange the bars on a decorative platter or cake stand for an appealing display.
2. Garnish: Dust the tops with powdered sugar for added sweetness and visual appeal.
3. Accompaniments: Serve with a scoop of vanilla ice cream or a dollop of whipped cream for an indulgent twist.
4. Storage Tips: If you have leftovers, store them in an airtight container at room temperature for up to 3 days or in the fridge for longer freshness.
By following these serving suggestions, you’ll elevate the enjoyment of your Cherry Pie Bars, making them an unforgettable treat for any occasion. Enjoy every delicious bite!
Additional Tips
– Use Fresh Cherries: If possible, opt for fresh cherries for the best flavor. They elevate the sweetness and tartness of the bars.
– Experiment with Spices: You can enhance the flavor by adding a pinch of cinnamon or nutmeg to the crust mixture for a warm, aromatic touch.
– Taste Test the Filling: Before spreading the cherry filling, taste a few cherries mixed with the sugar and cornstarch. Adjust the sweetness according to your preference.
– Slice While Warm: For cleaner cuts, let the bars cool slightly but slice them while they are still warm. This can help avoid crumbling.
Recipe Variation
There are plenty of ways to customize your Cherry Pie Bars. Here are some exciting variations:
1. Mixed Berry Bars: Substitute cherries with a mix of berries like blueberries and raspberries for a colorful twist.
2. Nutty Addition: Stir in chopped nuts, such as walnuts or pecans, into the crust mixture for an added crunch.
3. Chocolate Drizzle: Drizzle melted chocolate over the top before serving for an indulgent chocolate-covered cherry experience.
4. Gluten-Free Option: Use a gluten-free all-purpose flour blend instead of regular flour for a gluten-free version of these bars.
Freezing and Storage
– Storage: Keep your Cherry Pie Bars in an airtight container at room temperature for up to three days. For longer freshness, refrigerate them for up to a week.
– Freezing: To freeze, ensure the bars are completely cooled. Cut them into squares, wrap them tightly in plastic wrap, and then place them in a freezer-safe container. They can be frozen for up to three months. Thaw them overnight in the refrigerator before serving.
Special Equipment
Having the right tools can make your baking experience smoother. Here’s what you’ll need:
– Mixing Bowls: For mixing the crust and cherry filling.
– Electric Mixer: Useful for creaming butter and sugar together efficiently.
– Measuring Cups and Spoons: To accurately measure your ingredients.
– 9×13-inch Baking Pan: Essential for baking the bars evenly.
– Parchment Paper: Helpful for easy removal of the bars from the pan.
Frequently Asked Questions
Can I use canned cherries for the filling?
Yes, canned cherries can be used. Be sure to drain them thoroughly before mixing with the sugar and cornstarch.
What if I don’t have almond extract?
If you don’t have almond extract, you can substitute it with additional vanilla extract or simply omit it for a different flavor.
How do I know when the bars are done baking?
Look for a golden brown topping and bubbling cherry filling. A toothpick inserted into the bars should come out clean or with just a few crumbs.
Can I cut the recipe in half?
Absolutely! If you prefer a smaller batch, simply halve all the ingredients and use a smaller baking dish.
Are Cherry Pie Bars suitable for a picnic?
Yes! Their portable nature makes them perfect for picnics or gatherings where you want to share a delicious treat.
Conclusion
Cherry Pie Bars are an extraordinary dessert that offers the perfect balance of sweet and tart flavors. Their delightful buttery crust and luscious cherry filling create a moment of bliss in every bite. With simple ingredients and easy preparation, they are ideal for bakers of all skill levels. Whether you’re serving them at a family gathering or enjoying a quiet evening at home, these bars are sure to impress. Experience the joy that comes with making and sharing Cherry Pie Bars, and indulge in the sweet memories they create!
Cherry Pie Bars: An Incredible Ultimate Recipe That Will Amaze You
- Total Time: 11 minute
Ingredients
– 2 cups all-purpose flour
– 1 cup granulated sugar
– ½ cup unsalted butter, softened
– 1 large egg
– 1 tsp vanilla extract
– 1 tsp almond extract
– 1 tsp baking powder
– ½ tsp salt
– 2 cups pitted cherries (fresh or frozen)
– 1 tbsp cornstarch
– 1 tbsp lemon juice
– Powdered sugar (for dusting, optional)
Instructions
Creating these delightful Cherry Pie Bars is straightforward if you follow these steps:
1. Preheat the Oven: Begin by preheating your oven to 350°F (175°C). Grease a 9×13-inch baking pan or line it with parchment paper.
2. Prepare the Crust Mixture: In a large mixing bowl, cream together the softened butter and granulated sugar until light and fluffy. This should take about 2-3 minutes.
3. Add Egg and Extracts: Mix in the egg, vanilla extract, and almond extract until thoroughly combined.
4. Combine Dry Ingredients: In another bowl, whisk together flour, baking powder, and salt. Gradually add this dry mixture to the wet ingredients until combined.
5. Press the Crust: Take two-thirds of the crust mixture and press it evenly into the prepared baking pan to form the base layer.
6. Prepare the Cherry Filling: In a medium bowl, combine the pitted cherries, cornstarch, and lemon juice. Toss gently to coat the cherries with the mixture.
7. Spread Cherry Filling: Evenly distribute the cherry filling over the pressed crust in the baking pan.
8. Add Topping: Crumble the remaining crust mixture on top of the cherries to create a streusel-like topping.
9. Bake: Place the pan in the preheated oven and bake for 35-40 minutes or until the top is golden brown and the cherry filling is bubbly.
10. Cool Down: Remove the pan from the oven and let it cool in the pan on a wire rack for 15-20 minutes. Once cooled, you can lift the bars out of the pan and slice them into squares.
With these steps, you’re well on your way to enjoying your own delicious Cherry Pie Bars!
- Prep Time: 15 minutes
- Cook Time: 35-40 minutes
Nutrition
- Serving Size: 16 bars
- Calories: 180 kcal
- Fat: 7g
- Protein: 2g