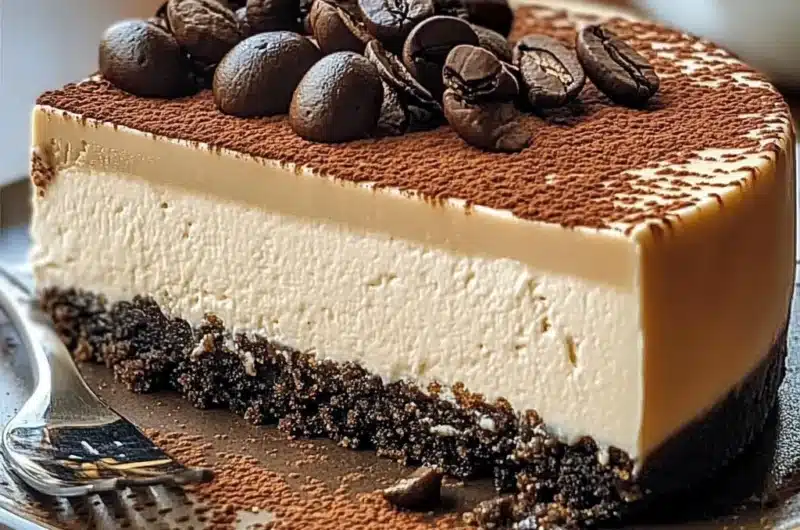
Creamy Coffee Cheesecake is the ultimate dessert that will delight every coffee lover’s heart. If you’re someone who finds joy in the rich, aromatic taste of coffee, this cake is crafted especially for you. Imagine each slice bursting with the perfect balance of creamy, sweet, and coffee-infused flavors. This cheesecake doesn’t just satisfy your sweet tooth; it pays homage to the beloved coffee experience, making it a delightful treat for any occasion.
This luscious dessert features a buttery graham cracker crust topped with a velvety smooth filling. The combination of cream cheese, sugar, and just the right amount of coffee creates an indulgent layer of flavor that is incredibly satisfying. This dessert is perfect for celebrating special occasions, impressing guests, or simply indulging yourself after a long day.
From the moment you take a bite, the rich coffee essence and creamy texture will remind you why this cheesecake is a must-have treat. It’s not just a dessert; it’s an experience that unites coffee lovers with the joy of sweets. In this guide, we will explore why this recipe is so special, how to make it step by step, and perfect ways to serve it to your family and friends.
Why You’ll Love This Recipe
Creamy Coffee Cheesecake combines the best elements of cheesecake with the heavenly taste of coffee, ensuring that each bite is rewarding. Whether you’re a novice baker or seasoned chef, here are compelling reasons why you should try making this heavenly dessert:
1. Rich Flavor Profile: The blend of cream cheese and coffee creates an exquisite flavor that will leave you wanting more.
2. Simple Ingredients: Most ingredients can be found in your pantry, making it easy to whip up this delicious cheesecake.
3. Impressive Presentation: With its smooth, creamy layers and rich coffee hue, this cake is visually stunning and perfect for special occasions.
4. Versatile Topping Options: You can enhance the cheesecake with a chocolate ganache, whipped cream, or a sprinkle of cocoa powder for added flair.
5. Perfect for Any Gathering: Whether it’s a holiday celebration, birthday, or a cozy family dinner, this cheesecake is always a hit.
6. Easy to Follow Instructions: The step-by-step directions make this recipe approachable and fun for everyone.
With these enticing features, it’s easy to see why Creamy Coffee Cheesecake captures the hearts—and taste buds—of coffee aficionados everywhere!
Preparation and Cooking Time
Creating this creamy masterpiece does take some time, but every minute is worth the delicious results. Here’s a general breakdown of the time needed:
– Preparation Time: 30 minutes
– Cooking Time: 60 minutes
– Cooling Time: 4 hours (or overnight for best results)
In total, you can expect to spend around 5 hours preparing and cooling the cheesecake. Plan accordingly to ensure your cheesecake is perfectly set before serving!
Ingredients
– For the Crust:
– 1 ½ cups graham cracker crumbs
– ½ cup unsalted butter, melted
– ¼ cup granulated sugar
– For the Filling:
– 24 oz cream cheese, softened
– 1 cup granulated sugar
– 3 large eggs
– ½ cup sour cream
– ¼ cup brewed coffee, cooled
– 2 tablespoons coffee liqueur (optional)
– 1 teaspoon vanilla extract
– ½ teaspoon salt
– For the Topping:
– Whipped cream, for serving
– Cocoa powder, for dusting
– Chocolate shavings or espresso beans (optional)
Step-by-Step Instructions
Creating this stunning Creamy Coffee Cheesecake is easier than you might think! Just follow these simple steps:
1. Preheat Oven: Preheat your oven to 325°F (160°C).
2. Prepare the Crust:
– In a medium bowl, combine graham cracker crumbs, melted butter, and sugar.
– Mix until the crumbs are evenly coated.
– Press the mixture firmly into the bottom of a 9-inch springform pan.
3. Bake the Crust:
– Bake the crust in the preheated oven for about 10 minutes, or until lightly golden.
– Remove from the oven and let cool.
4. Make the Filling:
– In a large mixing bowl, combine softened cream cheese and sugar.
– Beat with an electric mixer until smooth and creamy.
– Add eggs one at a time, mixing well after each addition.
– Mix in sour cream, brewed coffee, coffee liqueur (if using), vanilla extract, and salt. Blend until fully incorporated and smooth.
5. Pour Filling Over Crust:
– Carefully pour the cream cheese mixture over the cooled crust, smoothing the top with a spatula.
6. Bake the Cheesecake:
– Place the springform pan in the oven and bake for 50-60 minutes.
– The center should be set but slightly jiggly.
7. Cool the Cheesecake:
– Turn off the oven and crack the door ajar.
– Let the cheesecake cool in the oven for 1 hour to avoid cracking.
– After cooling, transfer it to the refrigerator and chill for at least 4 hours, preferably overnight.
8. Prepare to Serve:
– Before serving, top with whipped cream, a dusting of cocoa powder, and chocolate shavings or espresso beans, if desired.
By following these steps, you’ll create a show-stopping Creamy Coffee Cheesecake that will impress everyone who tastes it!
How to Serve
To enhance your Creamy Coffee Cheesecake experience, keep these serving suggestions in mind:
1. Presentation Matters: Use a nice cake stand to showcase your cheesecake attractively. A simple decoration can enhance its appeal.
2. Garnishes: A dollop of fresh whipped cream on each slice adds a light touch. Dusting with cocoa powder or cocoa nibs can give an additional flair.
3. Pairing Suggestions: Serve slices with a steaming cup of coffee or a chilled glass of dessert wine. The pairings will elevate the flavor experience.
4. Slice Sizes: Offer generous slices, but don’t hesitate to make them slightly smaller to encourage seconds!
5. Storage: If you have leftovers, wrap them well and store them in the refrigerator. The flavors will deepen as it sits!
Following these tips will ensure your Creamy Coffee Cheesecake is not only delicious but also beautifully served, creating a memorable dining experience for everyone. Enjoy every delectable bite!
Additional Tips
– Use Room Temperature Ingredients: For a smooth filling, ensure your cream cheese and eggs are at room temperature before mixing. This prevents lumps in your cheesecake.
– Enhance Coffee Flavor: Opt for a high-quality coffee for brewing. The better the coffee, the deeper the flavor in your cheesecake.
– Let It Set: For the best texture, allow the cheesecake to chill overnight. This helps the flavors meld and ensures a creamier consistency.
– Experiment with Flavors: Add a hint of espresso powder to the filling for an extra coffee kick.
– Avoid Overmixing: When combining your ingredients, mix just until incorporated. Overmixing can introduce air bubbles, leading to cracking during baking.
Recipe Variation
Feel free to customize your Creamy Coffee Cheesecake! Here are a few variations to consider:
1. Mocha Delight: Add 2 tablespoons of unsweetened cocoa powder to the filling for a chocolate-coffee fusion.
2. Nutty Crunch: Incorporate crushed hazelnuts or walnuts into the crust for added texture and flavor.
3. Gluten-Free Option: Substitute graham crackers with gluten-free cookies and ensure all other ingredients are gluten-free.
4. Layered Cheesecake: Create a mocha layer by adding another layer of cheesecake filled with chocolate or coffee flavors.
Freezing and Storage
– Storage: Keep your cheesecake covered in the refrigerator. It will stay fresh for up to 5 days.
– Freezing: Wrapped tightly, slices of cheesecake can be stored in the freezer for up to 3 months. When ready to enjoy, thaw in the refrigerator until soft.
Special Equipment
To make your Creamy Coffee Cheesecake, you’ll need the following tools:
– 9-inch springform pan for easy releasing.
– Mixing bowls for combining ingredients.
– Electric mixer for a smooth filling.
– Spatula for spreading the filling evenly.
– Measuring cups and spoons for accurate ingredient measurement.
Frequently Asked Questions
Can I use instant coffee granules?
Yes, instant coffee granules can be dissolved in the brewed coffee for a stronger flavor.
How do I prevent cracks in my cheesecake?
Ensure that it bakes slowly and avoid opening the oven door. Cooling gradually helps minimize cracks.
Can I use a different crust?
Absolutely! A chocolate cookie crust or a vanilla wafer crust can add unique flavors to your cheesecake.
How do I tell if the cheesecake is done?
The edges should be set, while the center remains slightly jiggly. It will firm up as it cools.
Is it okay to add more eggs for extra fluffiness?
Stick to the original amount for the best texture. Excess eggs may alter the creaminess and result in a denser cheesecake.
Conclusion
Creamy Coffee Cheesecake is a delectable choice for coffee enthusiasts. With its rich flavor and creamy texture, this dessert stands out for any special occasion or gathering. Every slice captures the essence of coffee, paired perfectly with the smoothness of cheesecake. You’ll likely find yourself coming back for seconds!
Creamy Coffee Cheesecake – An Incredible 7-Layer Dessert for Coffee Lovers!
- Total Time: 1 hour 15 minutes
Ingredients
– For the Crust:
– 1 ½ cups graham cracker crumbs
– ½ cup unsalted butter, melted
– ¼ cup granulated sugar
– For the Filling:
– 24 oz cream cheese, softened
– 1 cup granulated sugar
– 3 large eggs
– ½ cup sour cream
– ¼ cup brewed coffee, cooled
– 2 tablespoons coffee liqueur (optional)
– 1 teaspoon vanilla extract
– ½ teaspoon salt
– For the Topping:
– Whipped cream, for serving
– Cocoa powder, for dusting
– Chocolate shavings or espresso beans (optional)
Instructions
Creating this stunning Creamy Coffee Cheesecake is easier than you might think! Just follow these simple steps:
1. Preheat Oven: Preheat your oven to 325°F (160°C).
2. Prepare the Crust:
– In a medium bowl, combine graham cracker crumbs, melted butter, and sugar.
– Mix until the crumbs are evenly coated.
– Press the mixture firmly into the bottom of a 9-inch springform pan.
3. Bake the Crust:
– Bake the crust in the preheated oven for about 10 minutes, or until lightly golden.
– Remove from the oven and let cool.
4. Make the Filling:
– In a large mixing bowl, combine softened cream cheese and sugar.
– Beat with an electric mixer until smooth and creamy.
– Add eggs one at a time, mixing well after each addition.
– Mix in sour cream, brewed coffee, coffee liqueur (if using), vanilla extract, and salt. Blend until fully incorporated and smooth.
5. Pour Filling Over Crust:
– Carefully pour the cream cheese mixture over the cooled crust, smoothing the top with a spatula.
6. Bake the Cheesecake:
– Place the springform pan in the oven and bake for 50-60 minutes.
– The center should be set but slightly jiggly.
7. Cool the Cheesecake:
– Turn off the oven and crack the door ajar.
– Let the cheesecake cool in the oven for 1 hour to avoid cracking.
– After cooling, transfer it to the refrigerator and chill for at least 4 hours, preferably overnight.
8. Prepare to Serve:
– Before serving, top with whipped cream, a dusting of cocoa powder, and chocolate shavings or espresso beans, if desired.
By following these steps, you’ll create a show-stopping Creamy Coffee Cheesecake that will impress everyone who tastes it!
- Prep Time: 15 minutes
- Cook Time: 60 minutes
Nutrition
- Serving Size: 12 slices
- Calories: 400 kcal
- Fat: 30g
- Protein: 7g