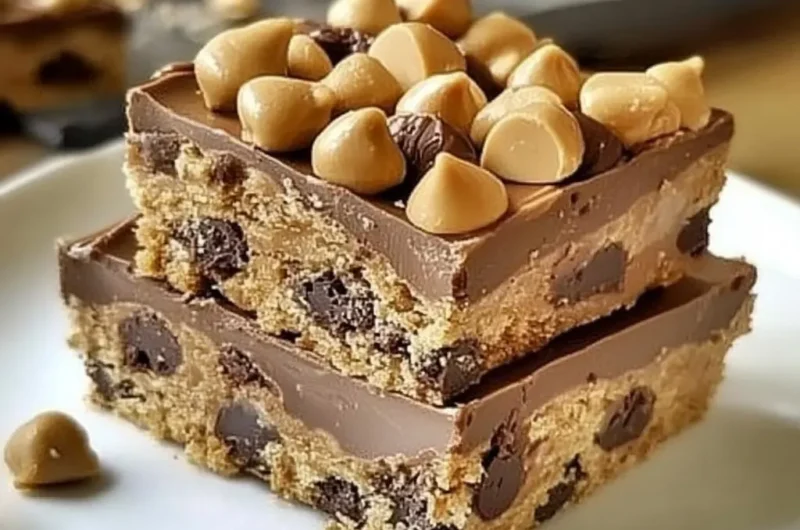
Reese’s Peanut Butter No-Bake Bars are an incredible treat that perfectly combines the creamy goodness of peanut butter and the delightful crunch of chocolate. These bars offer the ultimate indulgence for dessert lovers without requiring any baking. Their rich, decadent flavor will make your taste buds sing with joy. If you’re a fan of dessert and crave the classic combination of chocolate and peanut butter, then these bars are just what you need.
The best part about Reese’s Peanut Butter No-Bake Bars is their simplicity. You don’t need to preheat your oven or deal with complicated processes. Instead, these bars can be whipped up in a matter of minutes, making them an ideal choice for last-minute gatherings or simply satisfying a sweet craving. Each layer is thoughtfully crafted to ensure a harmonious blend of textures, making every bite a delightful experience.
Imagine taking out a pan of these creamy, chocolatey delights and sharing them with friends and family. Their rich taste and charming appearance are bound to impress anyone lucky enough to have a piece. As you read through this guide, you’ll discover why this recipe is a must-try, the ease of preparation, and how to serve them perfectly for a memorable experience.
Why You’ll Love This Recipe
Reese’s Peanut Butter No-Bake Bars offer a host of benefits that will leave you eager to make them time and time again. Here are some compelling reasons why you’ll instantly love this recipe:
1. Quick and Easy – The preparation requires minimal time and effort. If you’re short on time, this recipe is for you.
2. No Baking Required – Perfect for hot summer days when you don’t want to turn on the oven.
3. Rich Flavor Combination – The combination of creamy peanut butter, smooth chocolate, and a hint of crunch creates a delicious balance.
4. Customizable Options – Feel free to adjust the ingredients to suit your preferences, like adding different toppings or using dark chocolate.
5. Kid-Friendly Fun – This no-bake recipe is perfect for involving kids in the kitchen. They’ll love mixing and pressing down the layers.
6. Perfect for Any Occasion – Whether for parties, potlucks, or a sweet treat at home, these bars will always be a hit.
With these factors in mind, it’s easy to see why Reese’s Peanut Butter No-Bake Bars are adored by many. They provide a delightful balance of simplicity and flavor that makes every bite an indulgent experience.
Preparation and Cooking Time
Preparing Reese’s Peanut Butter No-Bake Bars is quick and rewarding. Here’s a breakdown of your time commitment:
– Preparation Time: 15 minutes
– Chilling Time: 1 hour
– Total Time: 1 hour and 15 minutes
This efficient timeframe means you can enjoy these delectable bars with minimal waiting time!
Ingredients
– 1 cup graham cracker crumbs
– ½ cup unsweetened cocoa powder
– ½ cup powdered sugar
– 1 cup creamy peanut butter
– ½ cup unsalted butter, melted
– 1 cup semi-sweet chocolate chips
– 2 tablespoons peanut butter (for topping)
– Optional: Sea salt for sprinkling
Step-by-Step Instructions
Creating Reese’s Peanut Butter No-Bake Bars is an enjoyable process. Just follow these simple steps:
1. Prepare Pan: Line an 8×8 inch baking pan with parchment paper, leaving some overhang for easy removal later.
2. Mix Dry Ingredients: In a large bowl, combine the graham cracker crumbs, cocoa powder, and powdered sugar. Stir until well mixed.
3. Add Wet Ingredients: Pour in the creamy peanut butter and melted butter. Mix well until the ingredients are fully combined and form a thick mixture.
4. Press Mixture: Transfer the mixture into the prepared baking pan. Use a spatula or your hands to press it down evenly into the bottom.
5. Melt Chocolate: In a microwave-safe bowl, combine the chocolate chips and two tablespoons of peanut butter. Microwave in 30-second increments, stirring in between until smooth and melted.
6. Spread Chocolate Layer: Once melted, pour the chocolate mixture over the peanut butter base. Spread it out evenly with a spatula.
7. Chill: Place the pan in the refrigerator for about 1 hour or until the bars are set.
8. Slice Bars: After chilling, lift the bars out of the pan using the parchment overhang. Place them on a cutting board and slice into squares.
9. Optional Garnish: Sprinkle a pinch of sea salt on top for an added touch of flavor.
10. Serve and Enjoy: Serve the bars immediately or store them in an airtight container in the fridge for later enjoyment.
These steps ensure that you can whip up these delicious treats with ease, making them a wonderful addition to any dessert repertoire.
How to Serve
Serving Reese’s Peanut Butter No-Bake Bars can be as simple or as stylish as you desire. Here are some ideas to enhance your serving experience:
1. Presentation Style: For a beautiful display, cut the bars into uniform squares and arrange them on a decorative plate.
2. Accompanying Treats: Consider pairing the bars with a scoop of vanilla ice cream or some fresh berries for a balanced dessert.
3. Individual Servings: Wrap individual squares in parchment paper and tie with twine for a charming gift-effect, perfect for parties or as a sweet gesture.
4. Chocolate Drizzle: For a more decadent touch, drizzle extra melted chocolate over the top just before serving.
5. Family Style: Serve the bars straight from the pan, encouraging guests to help themselves to this delightful treat.
By thinking creatively about how you present and serve these bars, you can elevate the overall experience, making it even more memorable for everyone involved. Enjoy these scrumptious Reese’s Peanut Butter No-Bake Bars with friends, family, or as a delicious reward for yourself!
# Additional Tips
– Use Quality Peanut Butter: For the best flavor and texture, select a creamy, high-quality peanut butter. This enhances the bars’ overall taste.
– Let the Chocolate Cool: Allow the chocolate to cool slightly before pouring it onto the peanut butter layer. This prevents the layers from mixing and maintains the distinct flavors.
– Customize with Toppings: Experiment with toppings like crushed nuts, mini chocolate chips, or even sprinkles for added texture and visual appeal.
# Recipe Variation
Feel free to experiment with the basic recipe! Here are a few variations you might enjoy:
1. Nutty Addition: Include chopped nuts, such as peanuts or almonds, in the peanut butter mixture for some extra crunch.
2. Flavored Chocolate: Use flavored chocolate chips, such as mint or butterscotch, in place of semi-sweet chocolate for a unique taste.
3. Healthy Twist: Substitute graham cracker crumbs with almond flour and sweeten with honey or maple syrup for a healthier version.
4. Fruit Layer: Add a layer of sliced bananas or strawberries on top of the peanut butter mixture before pouring the chocolate layer for a fruity surprise.
# Freezing and Storage
– Storage: Keep the bars in an airtight container in the refrigerator. They will stay fresh for about one week.
– Freezing: You can freeze these bars for up to three months. Make sure to slice them first and wrap each piece in plastic wrap, then place them in a resealable bag to prevent freezer burn.
# Special Equipment
To prepare Reese’s Peanut Butter No-Bake Bars, you will need:
– A large mixing bowl
– An 8×8 inch baking pan
– Parchment paper
– Microwave-safe bowl
– Spatula for spreading
– Measuring cups and spoons
# Frequently Asked Questions
Can I use natural peanut butter for this recipe?
Yes, natural peanut butter works well, but you may need to stir it well before using to ensure it’s creamy and smooth.
How should I cut the bars for the best results?
Use a sharp knife, and wipe it clean between cuts to achieve neat, even squares.
What can I substitute for graham cracker crumbs?
You can replace graham cracker crumbs with crushed cookies like Oreos or digestive biscuits for a different flavor.
Can these bars be made vegan?
Yes, substitute the butter with coconut oil and use dairy-free chocolate chips for a completely vegan-friendly treat.
How do I know when the bars are set?
The bars are set when you feel the chocolate layer firm up at the touch; they should not feel soft.
# Conclusion
Reese’s Peanut Butter No-Bake Bars are a delightful fusion of flavors that will surely satisfy your sweet tooth. Their rich, creamy, and crunchy texture makes them a perfect treat for any occasion, whether you’re hosting a gathering or just indulging yourself. This recipe’s simplicity and versatility invite endless creativity, ensuring you can enjoy an irresistible dessert again and again. So gather your ingredients and prepare to impress with this deliciously easy no-bake treat!
Reese’s Peanut Butter No-Bake Bars: An Incredible Ultimate Recipe for Everyone
- Total Time: 27 minute
Ingredients
– 1 cup graham cracker crumbs
– ½ cup unsweetened cocoa powder
– ½ cup powdered sugar
– 1 cup creamy peanut butter
– ½ cup unsalted butter, melted
– 1 cup semi-sweet chocolate chips
– 2 tablespoons peanut butter (for topping)
– Optional: Sea salt for sprinkling
Instructions
Creating Reese’s Peanut Butter No-Bake Bars is an enjoyable process. Just follow these simple steps:
1. Prepare Pan: Line an 8×8 inch baking pan with parchment paper, leaving some overhang for easy removal later.
2. Mix Dry Ingredients: In a large bowl, combine the graham cracker crumbs, cocoa powder, and powdered sugar. Stir until well mixed.
3. Add Wet Ingredients: Pour in the creamy peanut butter and melted butter. Mix well until the ingredients are fully combined and form a thick mixture.
4. Press Mixture: Transfer the mixture into the prepared baking pan. Use a spatula or your hands to press it down evenly into the bottom.
5. Melt Chocolate: In a microwave-safe bowl, combine the chocolate chips and two tablespoons of peanut butter. Microwave in 30-second increments, stirring in between until smooth and melted.
6. Spread Chocolate Layer: Once melted, pour the chocolate mixture over the peanut butter base. Spread it out evenly with a spatula.
7. Chill: Place the pan in the refrigerator for about 1 hour or until the bars are set.
8. Slice Bars: After chilling, lift the bars out of the pan using the parchment overhang. Place them on a cutting board and slice into squares.
9. Optional Garnish: Sprinkle a pinch of sea salt on top for an added touch of flavor.
10. Serve and Enjoy: Serve the bars immediately or store them in an airtight container in the fridge for later enjoyment.
These steps ensure that you can whip up these delicious treats with ease, making them a wonderful addition to any dessert repertoire.
- Prep Time: 15 minutes
- Cook Time: –
Nutrition
- Serving Size: 16 squares
- Calories: 250 kcal
- Fat: 16g
- Protein: 5g