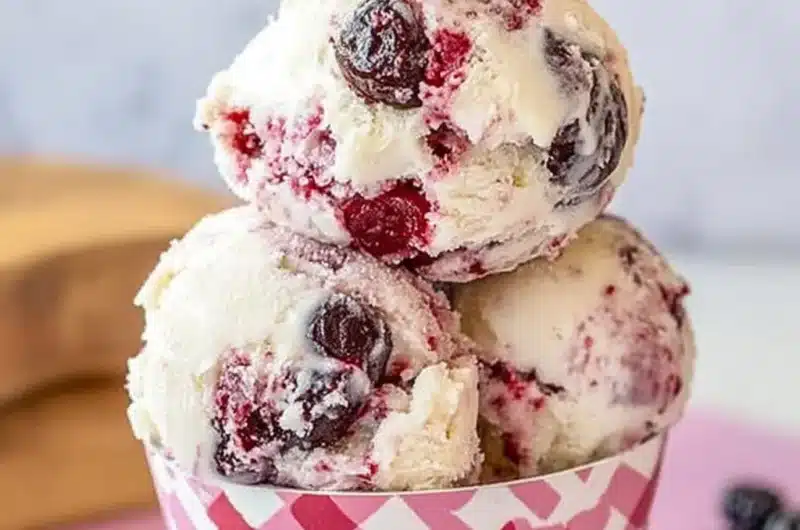
Cherry Vanilla Ice Cream is a delightful treat that can elevate any dessert experience. With its creamy texture and the sweet-tart burst of cherries, this ice cream is an amazing indulgence for hot summer days or cozy nights by the fire. The subtle notes of vanilla enhance the cherries, creating a perfect harmony of flavors that dance on your palate. Imagine scooping up a bowl of this indulgent dessert, enjoying the delightful blend of creamy vanilla with luscious cherry swirls. This recipe not only satisfies your sweet tooth but also provides a fun activity in the kitchen, especially if you’re looking to impress family and friends.
Creating Cherry Vanilla Ice Cream from scratch brings joy and a sense of accomplishment. As you combine the various ingredients, the anticipation builds, knowing a creamy, delicious dessert is on the way. Whether you serve this ice cream in homemade cones or in a bowl with fresh toppings, each scoop showcases a perfect mix of flavors and colors.
In this guide, you’ll discover why this Cherry Vanilla Ice Cream recipe is so special, how to make it, and tips on serving it beautifully. No matter if you are a novice or an experienced home cook, this amazing recipe will surely impress everyone around you. Let’s dive into the world of Cherry Vanilla Ice Cream and explore all it has to offer!
Why You’ll Love This Recipe
There are countless reasons to adore this Cherry Vanilla Ice Cream recipe. Here are six features that make it a standout:
1. Simple Ingredients: Most of the ingredients are pantry staples you likely have on hand.
2. Versatile Flavor: You can modify this recipe by adding different mix-ins or toppings to suit your personal taste.
3. Perfect for Any Season: While it’s a fantastic summer treat, it can also be enjoyed year-round.
4. Impressive Presentation: The vibrant colors make it eye-catching and impressive when served.
5. A Unique Flavor Combination: The classic blend of cherry and vanilla is timeless and beloved, appealing to all ages.
6. Easy to Follow Instructions: The steps are straightforward, ensuring that even beginner cooks can create this delicious ice cream.
With these highlights in mind, you can see why so many people fall in love with this Cherry Vanilla Ice Cream. Each scoop is not just a dessert; it’s a delightful experience that blends wonderful flavors and textures!
Preparation and Cooking Time
To prepare your Cherry Vanilla Ice Cream, you should set aside about 4 hours. Here’s a breakdown of the time required:
– Prep Time: 20 minutes
– Chill Time: 3 hours
– Churning Time: 30 minutes
These times can vary based on individual kitchen efficiency, but this framework will guide you in planning your ice cream-making adventure!
Ingredients
– 2 cups heavy cream
– 1 cup whole milk
– 3/4 cup granulated sugar
– 1 tablespoon pure vanilla extract
– 1/4 teaspoon salt
– 1 1/2 cups fresh or frozen cherries, pitted and chopped
– 1 tablespoon lemon juice
Step-by-Step Instructions
Making Cherry Vanilla Ice Cream is an enjoyable and straightforward process. Follow these steps for the best results:
1. Prepare the Cherry Mixture: In a medium bowl, combine the chopped cherries, lemon juice, and 1 tablespoon of sugar. Mix well and set aside for about 15 minutes to macerate.
2. Mix the Ice Cream Base: In a large mixing bowl, whisk together the heavy cream, milk, remaining sugar, vanilla extract, and salt until the sugar is dissolved.
3. Incorporate the Cherries: After the cherries have macerated, add them and their juice to the ice cream base. Stir gently to combine.
4. Chill the Mixture: Cover the bowl with plastic wrap and place it in the fridge for at least 2 hours to chill. This helps develop the flavors.
5. Churn the Ice Cream: Pour the chilled mixture into your ice cream maker. Churn according to the manufacturer’s instructions until the ice cream reaches a soft-serve consistency.
6. Transfer to a Container: Transfer the churned ice cream to an airtight container. Smooth the top with a spatula.
7. Freeze Until Firm: Place the container in the freezer for 2-3 hours or until the ice cream is hard.
8. Serve: Once fully frozen, your Cherry Vanilla Ice Cream is ready to enjoy!
By following these simple steps, you’ll create an incredible cherry vanilla ice cream that everyone will rave about.
How to Serve
Serving Cherry Vanilla Ice Cream can elevate the overall experience. Here are several tips to present this delightful dessert beautifully:
1. Presentation: Use elegant bowls or waffle cones to serve the ice cream. A cake stand can also make an attractive display.
2. Accompaniments: Enhance the flavor by serving with chocolate syrup, whipped cream, or even crushed nuts. Fresh mint leaves can add a pop of color.
3. Serving Size: Scoop generous portions, but consider offering smaller servings to encourage guests to come back for seconds.
4. Beverage Pairing: Consider pairing your ice cream with a refreshing lemonade or iced tea for a delightful warm-weather treat.
By thoughtfully presenting Cherry Vanilla Ice Cream, you create a memorable experience that will leave a lasting impression on your guests.
Additional Tips
– Choose Fresh Cherries: For the best flavor, opt for fresh cherries whenever possible. They add vibrant taste and texture that enhances your Cherry Vanilla Ice Cream.
– Chill Your Equipment: Pre-chill your mixing bowl and ice cream maker for better results. This helps to maintain the cold temperature of the mixture during churning.
– Experiment with Sweetness: Adjust the amount of sugar based on the sweetness of your cherries. If they are particularly sweet, you may want to reduce the sugar slightly.
Recipe Variation
Feel free to get creative! Here are some variations you can try with your Cherry Vanilla Ice Cream:
1. Chocolate Ripple: Swirl in some rich chocolate sauce for a chocolate-cherry combination.
2. Nutty Delight: Add crushed almonds or pistachios for a crunchy texture and nutty flavor.
3. Additional Fruits: Incorporate other fruits like strawberries or blueberries to create a mixed berry version.
4. Creamy Coconut: Mix in some coconut cream for a tropical twist that pairs beautifully with cherries.
5. Birthday Cake Version: Add sprinkles and cake pieces for a fun birthday cake-inspired ice cream.
Freezing and Storage
– Storage: Keep your homemade Cherry Vanilla Ice Cream in an airtight container to maintain its freshness. It will last up to two weeks in the freezer.
– Freezing Tips: To avoid ice crystals, ensure the mixture is well-churned and smoothed before sealing. For best texture, allow it to sit at room temperature for a few minutes before serving.
Special Equipment
To make the most of this Cherry Vanilla Ice Cream recipe, you’ll need the following tools:
– Ice cream maker: Essential for achieving a smooth and creamy texture.
– Mixing bowls: For combining ingredients easily.
– Whisk or spatula: For mixing your ice cream base and incorporating the cherries.
– Airtight containers: To store the finished product in the freezer.
Frequently Asked Questions
Can I use frozen cherries instead of fresh?
Yes, frozen cherries work well. Just be sure to thaw and drain any excess liquid before mixing.
How can I make this recipe dairy-free?
You can use coconut milk or almond milk in place of milk and cream. Ensure your mix-ins are also dairy-free.
Is there a way to make this lower in sugar?
Absolutely! Substitute granulated sugar with a sugar alternative or use fewer sweet cherries to reduce sugar content.
What should I do if my ice cream is too hard?
If your ice cream is too hard to scoop, let it sit at room temperature for about 5-10 minutes before serving.
Can I double the recipe?
Yes, this recipe can be doubled. Just ensure that your ice cream maker is large enough to handle the increased volume.
Conclusion
Creating Cherry Vanilla Ice Cream from scratch is a beautiful culinary experience. With its delightful combination of creamy vanilla and vibrant cherry flavors, this homemade treat is sure to please all who indulge. Whether you enjoy it on its own or with delicious toppings, every scoop will remind you of warm summer days and happy gatherings. Try out this amazing recipe and share your delightful creation with family and friends!
Cherry Vanilla Ice Cream: The Amazing Ultimate Recipe You Need
- Total Time: 45 minutes
Ingredients
– 2 cups heavy cream
– 1 cup whole milk
– 3/4 cup granulated sugar
– 1 tablespoon pure vanilla extract
– 1/4 teaspoon salt
– 1 1/2 cups fresh or frozen cherries, pitted and chopped
– 1 tablespoon lemon juice
Instructions
Making Cherry Vanilla Ice Cream is an enjoyable and straightforward process. Follow these steps for the best results:
1. Prepare the Cherry Mixture: In a medium bowl, combine the chopped cherries, lemon juice, and 1 tablespoon of sugar. Mix well and set aside for about 15 minutes to macerate.
2. Mix the Ice Cream Base: In a large mixing bowl, whisk together the heavy cream, milk, remaining sugar, vanilla extract, and salt until the sugar is dissolved.
3. Incorporate the Cherries: After the cherries have macerated, add them and their juice to the ice cream base. Stir gently to combine.
4. Chill the Mixture: Cover the bowl with plastic wrap and place it in the fridge for at least 2 hours to chill. This helps develop the flavors.
5. Churn the Ice Cream: Pour the chilled mixture into your ice cream maker. Churn according to the manufacturer’s instructions until the ice cream reaches a soft-serve consistency.
6. Transfer to a Container: Transfer the churned ice cream to an airtight container. Smooth the top with a spatula.
7. Freeze Until Firm: Place the container in the freezer for 2-3 hours or until the ice cream is hard.
8. Serve: Once fully frozen, your Cherry Vanilla Ice Cream is ready to enjoy!
By following these simple steps, you’ll create an incredible cherry vanilla ice cream that everyone will rave about.
- Prep Time: 15 minutes
- Cook Time: 30 minutes
Nutrition
- Serving Size: 8
- Calories: 250 kcal
- Fat: 14g
- Protein: 3g