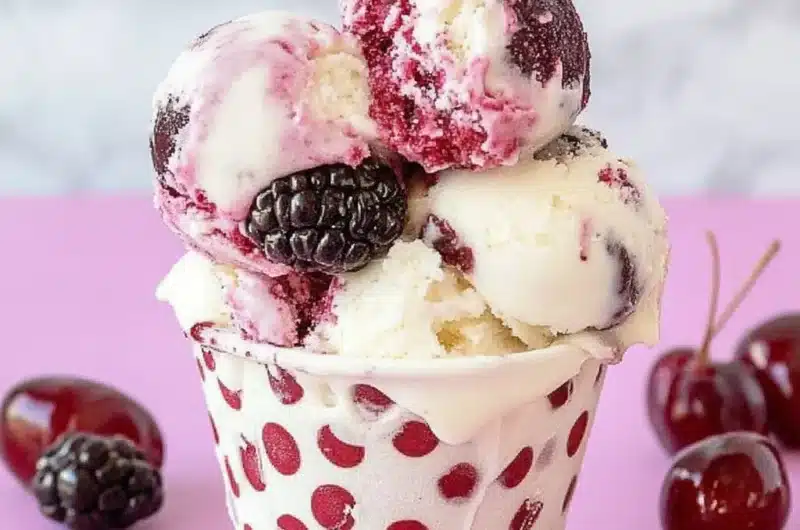
Cherry Vanilla Ice Cream is a delightful and refreshing treat that captures the essence of summer in every scoop. Its creamy texture combined with the vibrant flavors of cherry and vanilla makes it a truly unforgettable dessert. This perfect blend isn’t just a treat; it evokes memories of picnics, family gatherings, and lazy afternoons spent enjoying the sun. Whether served in a cone, a bowl, or as a topping for warm desserts, Cherry Vanilla Ice Cream is sure to become a favorite.
If you’ve never tasted Cherry Vanilla Ice Cream, you’re in for an amazing experience. The luscious, creamy base infused with real vanilla pairs wonderfully with rich, tart cherries. This combination creates an ice cream that’s both light and indulgent at the same time. In this guide, you will learn why this Cherry Vanilla Ice Cream recipe stands out, how easy it is to prepare, and tips for serving it perfectly. Whether you’re an ice cream aficionado or simply looking for a fun kitchen project, this recipe will leave a lasting impression.
Let’s dive into the sweet world of Cherry Vanilla Ice Cream and explore all the reasons why this recipe is a must-try.
Why You’ll Love This Recipe
This Cherry Vanilla Ice Cream recipe is not just any ordinary dessert; it offers a lot of delightful surprises. Here are some reasons why you will absolutely adore it:
1. Rich Flavor Profile: The sweet vanilla ice cream is perfectly complemented by the juicy tartness of cherries.
2. Homemade Goodness: Making this ice cream at home allows you to control the ingredients, ensuring freshness and quality.
3. Simple Ingredients: Most of the ingredients needed are likely already in your kitchen, making it easy to get started.
4. Customize It: You can easily adjust the sweetness or switch out cherries for other fruits like strawberries or blueberries.
5. Perfect for All Occasions: Whether it’s a summer barbecue or a cozy evening at home, this ice cream fits the bill.
6. Refreshing Dessert: This ice cream is a fantastic way to cool down on hot summer days while satisfying your sweet tooth.
With all these enticing qualities, it’s clear to see why this Cherry Vanilla Ice Cream will have everyone coming back for more!
Preparation and Cooking Time
Making this Cherry Vanilla Ice Cream is surprisingly quick and easy. Here’s a breakdown of the time you’ll need:
– Preparation Time: 15 minutes
– Chilling Time: 4 hours (or overnight for best results)
– Ice Cream Freezing Time: 30 minutes to 1 hour (depending on your ice cream maker)
In total, you can have this delicious ice cream ready to serve in about half a day, perfect for spontaneous dessert cravings!
Ingredients
– 2 cups heavy cream
– 1 cup whole milk
– 3/4 cup granulated sugar
– 1 tablespoon pure vanilla extract
– 1 cup fresh or frozen cherries, pitted and halved
– 1 tablespoon lemon juice
– Pinch of salt
Step-by-Step Instructions
Making Cherry Vanilla Ice Cream is a breeze if you follow these easy steps:
1. Prepare the Cherries: If using fresh cherries, wash, pit, and halve them. For frozen cherries, thaw and drain excess liquid.
2. Mix Base Ingredients: In a mixing bowl, combine the heavy cream, whole milk, sugar, lemon juice, vanilla extract, and a pinch of salt. Whisk until the sugar dissolves.
3. Chill the Base: Refrigerate the mixture for at least 2 hours. This helps the flavors meld and improves the ice cream’s consistency.
4. Blend the Cherries: If desired, mash a portion of the cherries with a fork for a chunky texture. Leave some cherries whole for an appealing look.
5. Churn the Ice Cream: Pour the chilled mixture into your ice cream maker and churn according to the manufacturer’s instructions, usually about 20-30 minutes.
6. Add Cherries: During the last few minutes of churning, add the prepared cherries to the ice cream base, ensuring they disperse evenly.
7. Transfer to Container: Once churned, transfer the ice cream to a freezer-safe container. Smooth the top with a spatula for even freezing.
8. Freeze: Freeze the ice cream for at least 3-4 hours, or until firm enough to scoop.
9. Serve: Once the ice cream is frozen, scoop out servings using an ice cream scoop or spoon.
These straightforward steps will guide you in creating your very own Cherry Vanilla Ice Cream effortlessly.
How to Serve
Serving Cherry Vanilla Ice Cream can enhance the overall experience. Here are some tips to make it unforgettable:
1. Garnish Creatively: Drizzle with chocolate sauce or caramel for an added layer of flavor. Fresh mint leaves can add a refreshing touch.
2. Pair with Toppings: Serve it alongside chopped nuts, whipped cream, or sprinkles for added texture and taste.
3. Presentation Matters: Use elegant dessert bowls or cones to create an appealing presentation. Adding colorful fruits or edible flowers can elevate the dish.
4. Accompaniments: Pair the ice cream with warm desserts like brownies, pies, or cobblers to offer a delightful contrast of temperatures.
5. Family-Friendly Fun: Encourage family members to create their own sundaes with a selection of toppings, making it a fun dessert experience.
By following these serving suggestions, you’ll not only delight your guests with flavor but also create a visual feast that adds to the overall enjoyment of your Cherry Vanilla Ice Cream.
Additional Tips
– Use Fresh Ingredients: Opt for the freshest cherries to ensure your Cherry Vanilla Ice Cream has a vibrant flavor. Fresh fruits often yield the best results.
– Experiment with Sweetness: Taste your base mixture before churning. Adjust the sugar to your preference for a sweeter or more tart ice cream.
– Chill the Bowl: For an extra creamy texture, chill your ice cream maker bowl in the freezer for a couple of hours before you start.
– Add Texture: Consider stirring in some crushed graham crackers or nuts for added crunch during the last minutes of churning.
– Serve Immediately: For the best texture, serve the ice cream right after churning. If it’s too soft, let it freeze a bit longer.
Recipe Variation
Change things up with these delightful variations of Cherry Vanilla Ice Cream:
1. Chocolate Cherry Vanilla: Swirl in some chocolate syrup during the last churning phase for a decadent twist.
2. Cherry Almond: Add a splash of almond extract for a nutty flavor that complements the cherry well.
3. Tropical Cherry: Mix in coconut cream instead of heavy cream for a tropical flair.
4. Boozy Version: Stir in a tablespoon of cherry liqueur during the mixing stage for an adult twist.
5. Vegan Alternative: Substitute heavy cream and milk with full-fat coconut milk and almond milk for a dairy-free version.
Freezing and Storage
– Storage: Keep the Cherry Vanilla Ice Cream in an airtight container in the freezer. It should stay fresh for about 2 weeks.
– Freezing: Ensure the ice cream is well-sealed to avoid ice crystals forming. If you notice ice crystals, simply stir the ice cream before serving to restore its creamy texture.
Special Equipment
You’ll need the following tools to create the perfect batch of Cherry Vanilla Ice Cream:
– Ice Cream Maker: A reliable ice cream maker simplifies the churning process.
– Mixing Bowls: Use various sizes for mixing your ingredients seamlessly.
– Whisk: Essential for incorporating air into the ice cream base, enhancing texture.
– Spatula: Perfect for smoothing the ice cream into a container for freezing.
Frequently Asked Questions
What if I don’t have an ice cream maker?
You can still make Cherry Vanilla Ice Cream! Pour the mixture into a shallow dish and place it in the freezer. Stir every 30 minutes until it reaches the desired consistency.
Can I use canned cherries?
Yes, but drain them thoroughly to avoid excess liquid. Fresh or frozen cherries usually yield better flavor.
How long does it take for the ice cream to harden?
It typically takes about 3-4 hours for the ice cream to freeze properly in the freezer after churning.
Can I add other fruits?
Definitely! While cherry is the star of this recipe, feel free to incorporate other fruits like strawberries or raspberries for a different flavor profile.
Is this recipe suitable for kids?
Yes! Cherry Vanilla Ice Cream is family-friendly. Just ensure there are no allergies to the ingredients used.
Conclusion
Cherry Vanilla Ice Cream is a refreshing and delightful dessert that’s perfect for any occasion. Its rich flavors and creamy texture make it a true classic that can easily become a family favorite. With the flexibility to adapt the recipe and serve it in various ways, this ice cream is sure to impress your guests and provide a sweet escape from the summer heat. So gather your ingredients, unleash your creativity, and enjoy every scoop of this delicious Cherry Vanilla Ice Cream!
Cherry Vanilla Ice Cream: An Incredible Ultimate Recipe to Try Today
- Total Time: 26 minute
Ingredients
– 2 cups heavy cream
– 1 cup whole milk
– 3/4 cup granulated sugar
– 1 tablespoon pure vanilla extract
– 1 cup fresh or frozen cherries, pitted and halved
– 1 tablespoon lemon juice
– Pinch of salt
Instructions
Making Cherry Vanilla Ice Cream is a breeze if you follow these easy steps:
1. Prepare the Cherries: If using fresh cherries, wash, pit, and halve them. For frozen cherries, thaw and drain excess liquid.
2. Mix Base Ingredients: In a mixing bowl, combine the heavy cream, whole milk, sugar, lemon juice, vanilla extract, and a pinch of salt. Whisk until the sugar dissolves.
3. Chill the Base: Refrigerate the mixture for at least 2 hours. This helps the flavors meld and improves the ice cream’s consistency.
4. Blend the Cherries: If desired, mash a portion of the cherries with a fork for a chunky texture. Leave some cherries whole for an appealing look.
5. Churn the Ice Cream: Pour the chilled mixture into your ice cream maker and churn according to the manufacturer’s instructions, usually about 20-30 minutes.
6. Add Cherries: During the last few minutes of churning, add the prepared cherries to the ice cream base, ensuring they disperse evenly.
7. Transfer to Container: Once churned, transfer the ice cream to a freezer-safe container. Smooth the top with a spatula for even freezing.
8. Freeze: Freeze the ice cream for at least 3-4 hours, or until firm enough to scoop.
9. Serve: Once the ice cream is frozen, scoop out servings using an ice cream scoop or spoon.
These straightforward steps will guide you in creating your very own Cherry Vanilla Ice Cream effortlessly.
- Prep Time: 15 minutes
- Cook Time: 30-60 minutes
Nutrition
- Serving Size: 6-8 servings
- Calories: 300 kcal (per serving)
- Fat: 23g
- Protein: 2g