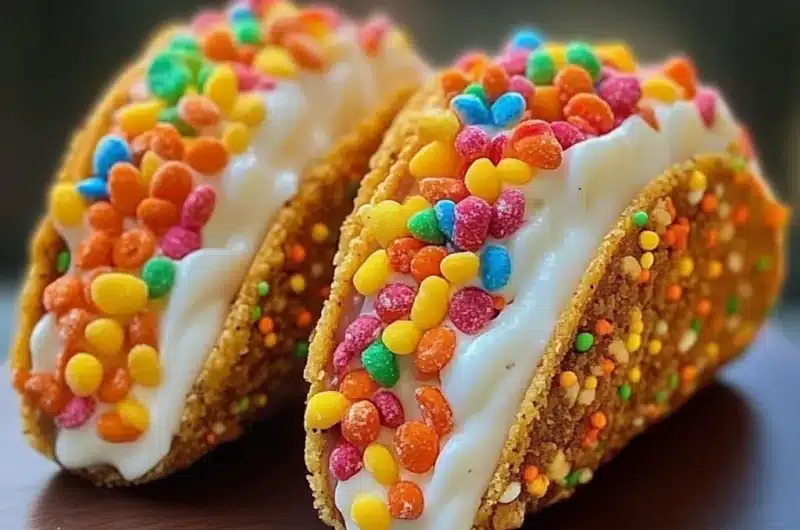
Fruity Pebbles Cheesecake Tacos are a delightful fusion of flavors and textures that will elevate your dessert game to new heights. Inspired by the classic retro cereal, these tacos add a playful twist to your dessert spread. Imagine a crunchy taco shell filled with a silky, creamy cheesecake mixture, topped with vibrant Fruity Pebbles for that colorful finish. This dessert is more than just a feast for the eyes; it’s a joyful burst of fruity flavor that leaves each bite extraordinarily satisfying.
The first moment you take a bite of these Fruity Pebbles Cheesecake Tacos, you’ll be met with an explosion of sweetness and nostalgia. The combination of the creamy cheesecake filling and the satisfying crunch of the taco shell creates an unforgettable experience. Perfect for parties, celebrations, or just as a sweet treat to indulge in at home, this recipe is bound to delight guests of all ages. Get ready to bring fun and flavor into your kitchen with this unique dessert!
In this article, you will explore a variety of reasons to love this incredible recipe, alongside preparation and cooking times, a simple ingredient list, step-by-step instructions, and tips on serving. With a little bit of creativity and effort, you can whip up these fantastic Fruity Pebbles Cheesecake Tacos that will impress family and friends.
Why You’ll Love This Recipe
There are countless reasons to fall in love with Fruity Pebbles Cheesecake Tacos. Here are just a few:
1. Nostalgic Flavor: Fruity Pebbles cereal evokes fond childhood memories, making this dessert a nostalgic treat.
2. Visually Stunning: The vibrant colors of Fruity Pebbles create an eye-catching dessert that’s sure to impress.
3. Versatile Presentation: These tacos can be served as individual desserts or part of a larger dessert table.
4. Easy to Make: Even novice bakers can easily follow this straightforward recipe.
5. Crowd-Pleaser: With their delightful mix of flavors and textures, these tacos are guaranteed to be a hit!
6. Creative Twist: Merging traditional cheesecake with taco form offers a delightful surprise for your guests.
With all these reasons combined, you can see why Fruity Pebbles Cheesecake Tacos are cherished by those who have tasted them. You’re bound to enjoy every step of creating and savoring this lively dessert!
Preparation and Cooking Time
Creating these Fruity Pebbles Cheesecake Tacos will take you a total of around 1 hour. Here’s a breakdown of the time required:
– Preparation Time: 30 minutes
– Cooking Time: 15 minutes
– Chilling Time: 15 minutes
This timeline should help you organize your kitchen schedule effectively. Remember that the chilling time is essential for the cheesecake filling to set correctly.
Ingredients
– 1 package of store-bought taco shells (or homemade)
– 8 ounces cream cheese, softened
– 1 cup powdered sugar
– 1 teaspoon vanilla extract
– 1 tablespoon lemon juice
– 1 cup whipped cream (or Cool Whip)
– 1 cup Fruity Pebbles cereal (plus extra for topping)
– Food coloring (optional, for added vibrancy)
Step-by-Step Instructions
Creating these Fruity Pebbles Cheesecake Tacos can be straightforward if you follow these simple steps:
1. Prepare Taco Shells: Preheat your oven to 350°F (175°C). Place taco shells on a baking sheet and toast them for about 5–7 minutes until they’re slightly crispy.
2. Make Cheesecake Filling: In a large bowl, use a mixer to combine the softened cream cheese, powdered sugar, vanilla extract, and lemon juice. Mix until smooth and creamy.
3. Incorporate Whipped Cream: Gently fold in the whipped cream until fully combined. This will give your filling a light and airy texture.
4. Add Fruity Pebbles: Stir in the 1 cup of Fruity Pebbles into the cheesecake mixture, allowing them to add both flavor and color.
5. Fill Taco Shells: Once the taco shells are cool, fill each shell with the cheesecake mixture, ensuring it’s packed full.
6. Chill Tacos: Place filled taco shells in the refrigerator for at least 15 minutes to allow the filling to firm up slightly.
7. Serve and Top: Before serving, add additional Fruity Pebbles on top of each cheesecake taco for that extra crunch and color.
8. Optional Decoration: If desired, use food coloring in your whipped cream for a colorful presentation.
These steps will guide you in creating Fruity Pebbles Cheesecake Tacos effortlessly.
How to Serve
Serving these fun desserts can enhance their appeal. Here are some tips:
1. Presentation Choices: Use colorful plates or platters to showcase the vibrant colors of the tacos.
2. Add Sauces: Drizzle chocolate or strawberry sauce on the plate for an added touch of flavor and elegance.
3. Accompaniments: Serve with ice cream or whipped cream on the side for those who want a little extra indulgence.
4. Garnishing: Consider adding edible glitter or sprinkles to make it even more festive, especially for celebrations.
5. Individual Servings: For parties, consider serving them on a dessert bar where guests can pick their tacos.
By thoughtfully considering your presentation and serving methods, you can create a spectacular dessert experience that everyone will remember!
Additional Tips
– Use Fresh Cream Cheese: Ensure your cream cheese is at room temperature for a smoother filling. It will blend more easily with the other ingredients.
– Don’t Overmix: When folding in the whipped cream, be gentle to maintain the airy texture. Overmixing can result in a denser cheesecake filling.
– Keep Tacos Crunchy: If you’re making the taco shells from scratch, try baking them until crisp to maintain their crunch after filling.
Recipe Variation
Feel free to experiment with these exciting variations of Fruity Pebbles Cheesecake Tacos:
1. Chocolate Drizzle: Add a drizzle of melted chocolate over the top before serving for an extra layer of flavor.
2. Alternate Cereals: Try substituting Fruity Pebbles with other colorful cereals like Trix or Froot Loops for a different taste and appearance.
3. Mini Taco Version: Use mini taco shells to create bite-sized versions perfect for parties and gatherings.
Freezing and Storage
– Storage: Place any leftover tacos in an airtight container. They will stay fresh in the refrigerator for up to 3 days.
– Freezing: You can freeze the filled tacos, but be aware the taco shells may lose their crunch. To freeze, wrap individually in plastic wrap for up to 2 months. Thaw in the fridge before serving.
Special Equipment
You don’t need a lot of special tools to make these Fruity Pebbles Cheesecake Tacos, but here’s a list of helpful equipment:
– Mixing bowls for your ingredients
– A hand mixer or standing mixer to blend the cheesecake filling smoothly
– A baking sheet for toasting taco shells
– A spatula for folding in the whipped cream
– A piping bag for easy filling of the taco shells, though a spoon will work as well
Frequently Asked Questions
Can I use low-fat cream cheese?
Yes, low-fat cream cheese works well, but it may yield a slightly less creamy texture.
Is there a gluten-free option for taco shells?
Absolutely! Look for gluten-free taco shells at your local grocery store or make your own from corn tortillas baked into a taco shape.
How can I make this recipe dairy-free?
You can substitute cream cheese with a dairy-free alternative and use coconut whipped cream in place of regular whipped cream.
Can I set these cheesecake tacos in the freezer?
While freezing is possible, it’s better to chill them in the fridge to preserve their texture. Freezing may cause the taco shells to become less crunchy.
What toppings can I use besides Fruity Pebbles?
Consider using sprinkles, crushed cookies, fresh fruit, or even a drizzle of caramel or chocolate sauce for added flair.
Conclusion
Fruity Pebbles Cheesecake Tacos offer a whimsical and delicious way to enjoy a classic dessert. Their vibrant colors and delightful textures are sure to captivate all who try them. With easy-to-follow instructions and variations to suit any palate, these delightful treats can become a signature dessert for any occasion. Indulge in these tasty tacos and watch as they steal the show at your next gathering!

Fruity Pebbles Cheesecake Tacos: An Incredible Recipe That’s Amazing
- Total Time: 30 minutes
Ingredients
– 1 package of store-bought taco shells (or homemade)
– 8 ounces cream cheese, softened
– 1 cup powdered sugar
– 1 teaspoon vanilla extract
– 1 tablespoon lemon juice
– 1 cup whipped cream (or Cool Whip)
– 1 cup Fruity Pebbles cereal (plus extra for topping)
– Food coloring (optional, for added vibrancy)
Instructions
Creating these Fruity Pebbles Cheesecake Tacos can be straightforward if you follow these simple steps:
1. Prepare Taco Shells: Preheat your oven to 350°F (175°C). Place taco shells on a baking sheet and toast them for about 5–7 minutes until they’re slightly crispy.
2. Make Cheesecake Filling: In a large bowl, use a mixer to combine the softened cream cheese, powdered sugar, vanilla extract, and lemon juice. Mix until smooth and creamy.
3. Incorporate Whipped Cream: Gently fold in the whipped cream until fully combined. This will give your filling a light and airy texture.
4. Add Fruity Pebbles: Stir in the 1 cup of Fruity Pebbles into the cheesecake mixture, allowing them to add both flavor and color.
5. Fill Taco Shells: Once the taco shells are cool, fill each shell with the cheesecake mixture, ensuring it’s packed full.
6. Chill Tacos: Place filled taco shells in the refrigerator for at least 15 minutes to allow the filling to firm up slightly.
7. Serve and Top: Before serving, add additional Fruity Pebbles on top of each cheesecake taco for that extra crunch and color.
8. Optional Decoration: If desired, use food coloring in your whipped cream for a colorful presentation.
These steps will guide you in creating Fruity Pebbles Cheesecake Tacos effortlessly.
- Prep Time: 15 minutes
- Cook Time: 15 minutes
Nutrition
- Serving Size: 12 tacos
- Calories: 300 kcal
- Fat: 15g
- Protein: 4g


