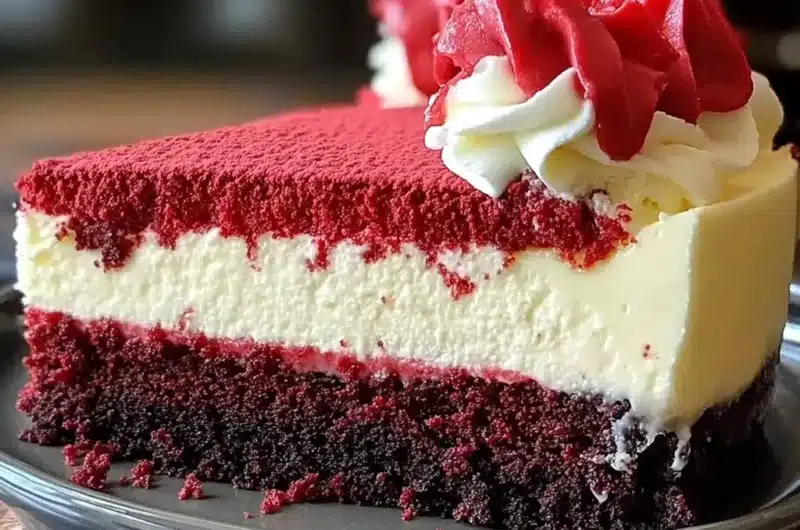
Red Velvet Cheesecake is a dessert that combines the classic flavors of the beloved red velvet cake with the creamy richness of cheesecake. This dessert is anything but ordinary; it transforms a simple gathering into an extravagant occasion. When serving this delightful treat, you want to evoke those feelings of nostalgia and joy while impressing your guests with its stunning appearance. It’s perfect for birthdays, anniversaries, or any celebration that deserves a show-stopping dessert.
If you’ve ever craved a dessert that hits all the right notes, a Red Velvet Cheesecake might just be what you’re looking for. Its vibrant red color and velvety texture make it a sight to behold, while the creamy cheesecake layer contrasts beautifully with the cake-like base. This dessert isn’t just about filling your stomach; it’s an experience that will make your taste buds sing and your heart smile. In this guide, you will learn how to create this amazing treat, ensuring it turns out perfectly every time.
From its unique combination of flavors to its impressive presentation, a Red Velvet Cheesecake is designed to stand out. But don’t fret; it’s easier to make than you might think. With a few simple ingredients and clear steps, you can elevate your baking skills and create a dessert that will have everyone asking for seconds. Let’s explore what makes this recipe special and how it can become a go-to in your culinary repertoire.
Why You’ll Love This Recipe
There are numerous reasons to adore this Red Velvet Cheesecake recipe. The following highlights make it a must-try for dessert lovers:
1. Unique Flavor Profile: The delightful mix of cocoa and cream cheese creates a rich and satisfying flavor that everyone will love.
2. Visual Appeal: The bold red color topped with cream cheese frosting is a showstopper, making it perfect for any festive occasion.
3. Layered Texture: The contrast between the smooth cheesecake layer and the fluffy red velvet cake delivers an incredible mouthfeel.
4. Easily Customizable: This recipe can be adjusted based on dietary preferences, such as gluten-free or reduced sugar options.
5. Simple Ingredients: You will find most ingredients readily available in your kitchen, making the prep easy.
6. Perfect for Sharing: This dessert is ideal for gatherings, providing ample servings that can easily be sliced for sharing.
With these amazing features in mind, it’s clear why Red Velvet Cheesecake is a beloved choice among dessert enthusiasts.
Preparation and Cooking Time
Creating the perfect Red Velvet Cheesecake will take some time, but it’s well worth the wait. Here’s a breakdown of what you can expect:
– Preparation Time: 30-40 minutes
– Cooking Time: 55-65 minutes
– Cooling Time: 1-2 hours
– Total Time: Approximately 2-3 hours (including cooling)
These times will vary slightly depending on your experience and kitchen equipment, but this provides a good estimate to ensure you’re well-prepared.
Ingredients
– 1 ½ cups all-purpose flour
– 1 cup granulated sugar
– 1 tablespoon unsweetened cocoa powder
– 1 teaspoon baking soda
– ½ teaspoon salt
– 1 cup vegetable oil
– 1 cup buttermilk
– 2 large eggs
– 2 tablespoons red food coloring
– 1 teaspoon vanilla extract
– 1 teaspoon white vinegar
– 16 oz cream cheese, softened
– 1 cup powdered sugar
– 1 teaspoon vanilla extract (for cheesecake layer)
– 1 cup heavy whipping cream (optional, for topping)
– Red velvet cake crumbs (for decoration, optional)
Step-by-Step Instructions
Follow these simple steps to create your mouthwatering Red Velvet Cheesecake:
1. Preheat the Oven: Preheat your oven to 350°F (175°C). Grease a 9-inch springform pan to prevent sticking.
2. Mix Dry Ingredients: In a mixing bowl, whisk together flour, sugar, cocoa powder, baking soda, and salt.
3. Combine Wet Ingredients: In another bowl, mix vegetable oil, buttermilk, eggs, red food coloring, vanilla extract, and vinegar until well blended.
4. Combine Mixtures: Gradually add the wet ingredients to the dry mixture, stirring until the batter is smooth and well-combined.
5. Bake: Pour the batter into the prepared springform pan. Bake for 25-30 minutes or until a toothpick inserted into the center comes out clean.
6. Cool: Allow the cake to cool in the pan for 15 minutes before transferring to a wire rack to cool completely.
7. Prepare Cheesecake Filling: In a separate bowl, mix the softened cream cheese with powdered sugar and vanilla extract until creamy and smooth.
8. Create the Cheesecake Layer: Spread the cream cheese mixture evenly over the cooled red velvet cake layer in the springform pan.
9. Create a Water Bath (Optional): To prevent cracking, you can place the springform pan in a larger pan filled with water before returning it to the oven.
10. Bake Cheesecake Layer: Return the cheesecake to the oven and bake for an additional 30-35 minutes. The center should be set but still slightly jiggly.
11. Cool Completely: Turn off the oven and leave the cheesecake inside for about an hour. Remove and let cool before refrigerating for at least 2 hours or overnight for best results.
12. Whip Cream (Optional): If desired, whip heavy cream until stiff peaks form. Use this to top your cheesecake for an extra layer of flavor.
13. Decorate: Once chilled, remove from the springform pan. You can pipe whipped cream around the top and sprinkle red velvet cake crumbs for decoration.
14. Slice and Serve: Carefully slice the chilled cheesecake into pieces for serving.
How to Serve
Presenting your Red Velvet Cheesecake beautifully can make a lasting impression. Here are some suggestions on how to serve it:
1. Layered Presentation: Use a cake stand or decorative platter to elevate the appeal of the cheesecake.
2. Garnishes: Consider topping each slice with fresh berries, chocolate shavings, or a drizzle of chocolate or caramel sauce for added flair.
3. Accompaniments: Serve with a side of fresh whipped cream or a scoop of vanilla ice cream for a delightful contrast in flavors.
4. Portion Size: Cut generous slices to tempt your guests, but also consider serving smaller portions to encourage seconds!
5. Drink Pairings: Offer coffee, dessert wines, or even a festive cocktail to enhance the dessert experience and complement the rich flavors.
This incredible Red Velvet Cheesecake is sure to be a hit, and with the right presentation, you will leave your guests wanting more! Enjoy creating this amazing dessert at your next gathering!
Additional Tips
– Use Quality Ingredients: The flavor of your Red Velvet Cheesecake will greatly benefit from high-quality cream cheese and cocoa powder. These are key components that enhance overall taste.
– Don’t Rush Cooling: Make sure to let the layers cool completely before assembling. This prevents melting the cheesecake filling and ensures a perfect set.
– Adjust Sweetness: If you prefer a less sweet cheesecake, you can decrease the amount of powdered sugar in the cheesecake filling to balance the flavors.
– Experiment with Flavor: Consider adding a splash of almond extract to the cheesecake filling for a unique twist that complements the chocolate.
– Proper Mixing: Ensure that both your wet and dry ingredients are well-mixed but avoid overmixing the batter to keep the texture light.
Recipe Variation
Feel free to switch things up! Here are a few variations to try:
1. Mini Cheesecakes: Bake miniature versions in muffin trays for individual servings that are perfect for parties.
2. White Chocolate Drizzle: Enhance the dessert by adding a drizzle of melted white chocolate over the top for an elegant touch.
3. Chocolate Ganache: Top with chocolate ganache instead of whipped cream for a richer texture.
4. Seasonal Flavor Twist: Incorporate seasonal flavors by adding a teaspoon of pumpkin spice for a fall-inspired dessert.
Freezing and Storage
– Storage: Keep your Red Velvet Cheesecake fully covered in the refrigerator. It can last for about 4-5 days, maintaining its delightful taste.
– Freezing: You can freeze slices of the cheesecake for up to 3 months. Ensure each slice is well-wrapped to prevent freezer burn. Thaw in the refrigerator overnight before serving.
Special Equipment
To prepare your Red Velvet Cheesecake successfully, you will need:
– 9-inch springform pan
– Mixing bowls
– Electric mixer or whisk for cream cheese mixture
– Rubber spatula for smooth mixing
– Measuring cups and spoons
– Cooling racks for cooling layers
Frequently Asked Questions
How do I know when the cheesecake is done baking?
Insert a toothpick into the center; the cheesecake should be set but still slightly jiggly in the center.
Can I make this cheesecake ahead of time?
Yes! Preparing it a day in advance allows the flavors to meld and enhances the overall taste.
Is this cheesecake suitable for dietary restrictions?
You can modify the recipe using gluten-free flour or a sugar substitute to accommodate various dietary needs.
Can I reduce the cream cheese for a lighter cheesecake?
While cream cheese is essential for texture, you can experiment with reduced-fat cream cheese for a lighter version without compromising flavor.
What should I do if my cheesecake cracks while baking?
To minimize cracking, avoid overbaking and consider using a water bath for baking. Persistent cracks can be concealed with whipped cream or toppings.
Conclusion
The Red Velvet Cheesecake is a delectable dessert that beautifully fuses the beloved flavors of red velvet with the richness of cheesecake. Its stunning appearance and delightful flavor profile make it an ideal treat for any celebration. With this recipe, you are equipped to impress your guests while enjoying the process of creating something truly special.
Red Velvet Cheesecake: An Incredible Ultimate Recipe for All Occasions
- Total Time: 48 minute
Ingredients
– 1 ½ cups all-purpose flour
– 1 cup granulated sugar
– 1 tablespoon unsweetened cocoa powder
– 1 teaspoon baking soda
– ½ teaspoon salt
– 1 cup vegetable oil
– 1 cup buttermilk
– 2 large eggs
– 2 tablespoons red food coloring
– 1 teaspoon vanilla extract
– 1 teaspoon white vinegar
– 16 oz cream cheese, softened
– 1 cup powdered sugar
– 1 teaspoon vanilla extract (for cheesecake layer)
– 1 cup heavy whipping cream (optional, for topping)
– Red velvet cake crumbs (for decoration, optional)
Instructions
Follow these simple steps to create your mouthwatering Red Velvet Cheesecake:
1. Preheat the Oven: Preheat your oven to 350°F (175°C). Grease a 9-inch springform pan to prevent sticking.
2. Mix Dry Ingredients: In a mixing bowl, whisk together flour, sugar, cocoa powder, baking soda, and salt.
3. Combine Wet Ingredients: In another bowl, mix vegetable oil, buttermilk, eggs, red food coloring, vanilla extract, and vinegar until well blended.
4. Combine Mixtures: Gradually add the wet ingredients to the dry mixture, stirring until the batter is smooth and well-combined.
5. Bake: Pour the batter into the prepared springform pan. Bake for 25-30 minutes or until a toothpick inserted into the center comes out clean.
6. Cool: Allow the cake to cool in the pan for 15 minutes before transferring to a wire rack to cool completely.
7. Prepare Cheesecake Filling: In a separate bowl, mix the softened cream cheese with powdered sugar and vanilla extract until creamy and smooth.
8. Create the Cheesecake Layer: Spread the cream cheese mixture evenly over the cooled red velvet cake layer in the springform pan.
9. Create a Water Bath (Optional): To prevent cracking, you can place the springform pan in a larger pan filled with water before returning it to the oven.
10. Bake Cheesecake Layer: Return the cheesecake to the oven and bake for an additional 30-35 minutes. The center should be set but still slightly jiggly.
11. Cool Completely: Turn off the oven and leave the cheesecake inside for about an hour. Remove and let cool before refrigerating for at least 2 hours or overnight for best results.
12. Whip Cream (Optional): If desired, whip heavy cream until stiff peaks form. Use this to top your cheesecake for an extra layer of flavor.
13. Decorate: Once chilled, remove from the springform pan. You can pipe whipped cream around the top and sprinkle red velvet cake crumbs for decoration.
14. Slice and Serve: Carefully slice the chilled cheesecake into pieces for serving.
- Prep Time: 30-40 minutes
- Cook Time: 55-65 minutes
Nutrition
- Serving Size: 12 servings
- Calories: 400 kcal (per slice)
- Fat: 25g
- Protein: 6g