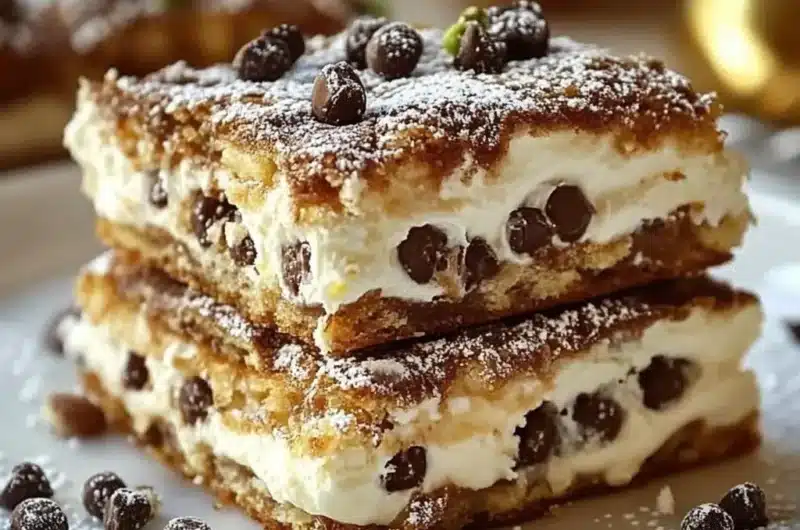
Classic Cannoli Squares are a delightful twist on the traditional Italian cannoli. This amazing treat captures all the rich, creamy flavors of the beloved pastry but in an easy-to-make bar form. With layers of sweet ricotta cheese, chocolate chips, and a crisp shell, these squares are sure to impress anyone who tries them. If you’ve ever dreamt of the perfect dessert that you can effortlessly prepare, these Classic Cannoli Squares will provide a satisfying experience that combines texture and flavor in the most delightful way.
When you take your first bite of Classic Cannoli Squares, you will be transported to an Italian bistro, surrounded by the aroma of fresh pastries and vibrant conversations. The layers of creaminess and crunch will create a symphony of flavors in your mouth. They are perfect for family gatherings, parties, or simply to enjoy at home on a cozy evening. In this guide, you will find comprehensive details on why this recipe is special, the preparation and cooking times, and step-by-step instructions for making these incredible squares.
With a combination of familiar ingredients and simple instructions, you will be ready to serve a beautiful dessert in no time. So, let’s dive deeper into what makes Classic Cannoli Squares a must-try dessert!
Why You’ll Love This Recipe
Classic Cannoli Squares bring together an exciting array of flavors and textures, making every bite a little celebration. Here’s why you will adore this recipe:
1. Simple and Accessible Ingredients – You likely have most of the necessary ingredients in your pantry. It makes shopping for this recipe a breeze.
2. Less Mess – Unlike traditional cannoli, which require piping, these squares eliminate the hassle, allowing you to enjoy your dessert without the mess.
3. Perfect for Sharing – These squares are easy to cut into portions, making them perfect for parties, potlucks, and family gatherings.
4. Rich Flavor Profile – The combination of creamy ricotta, sweet chocolate, and crispy cannoli shell creates an unbeatable flavor experience.
5. Visual Appeal – The dessert is not only delicious but also visually impressive, sure to be a conversation starter.
6. Customizable – You can easily modify the recipe to suit your taste preferences, such as by switching up the chocolate or adding nuts.
With so many wonderful aspects, it’s easy to see why Classic Cannoli Squares are gaining popularity. They are a treat everyone can enjoy!
Preparation and Cooking Time
Preparing Classic Cannoli Squares will take approximately 2 hours and 30 minutes from start to finish. Here’s the breakdown:
– Preparation Time: 30 minutes
– Cooking Time: 30 minutes
– Cooling Time: 1 hour
– Assembly Time: 30 minutes
While this may seem like a lengthy process, your efforts will be rewarded with a delicious dessert that feels far more complicated than it truly is!
Ingredients
– 1 cup all-purpose flour
– 1/4 cup granulated sugar
– 1/4 teaspoon salt
– 1/2 teaspoon ground cinnamon
– 1/4 cup unsalted butter, softened
– 1 large egg
– 1 cup ricotta cheese, drained
– 1/2 cup powdered sugar
– 1 teaspoon vanilla extract
– 1/2 teaspoon almond extract
– 1/2 cup mini chocolate chips
– 1 cup crushed cannoli shells or graham cracker crumbs (for the crust)
– Additional powdered sugar (for dusting)
Step-by-Step Instructions
These step-by-step instructions will guide you to create the amazing Classic Cannoli Squares effortlessly:
1. Preheat the Oven: Preheat your oven to 350°F (175°C). Grease and line an 8×8 inch baking pan with parchment paper.
2. Make the Cannoli Shell Crust: In a bowl, combine the crushed cannoli shells or graham cracker crumbs, all-purpose flour, sugar, salt, cinnamon, and softened butter. Mix until crumbly.
3. Press the Crust: Press the mixture evenly into the bottom of the prepared baking pan. This will form the crust for your squares.
4. Bake the Crust: Place the pan in the preheated oven and bake for about 10 minutes or until lightly golden. Remove from the oven and set aside to cool.
5. Prepare the Filling: In a mixing bowl, combine the ricotta cheese, powdered sugar, vanilla extract, almond extract, and mini chocolate chips. Blend until smooth and creamy.
6. Spread the Filling: Once the crust has cooled, evenly spread the ricotta filling over the crust using a spatula.
7. Bake Again: Return the pan to the oven and bake for an additional 20 minutes, or until the filling is set and slightly golden on top.
8. Cool Completely: Allow the pan to cool at room temperature for about 1 hour. Then, refrigerate for at least another hour to ensure the filling has set properly.
9. Slice the Squares: Once cooled and set, lift the dessert from the pan using the parchment paper overhang. Slice into squares.
10. Dust and Serve: Before serving, dust the squares with additional powdered sugar for a beautiful finish.
How to Serve
Serving Classic Cannoli Squares can elevate the dessert experience. Here are some tips to make your presentation memorable:
1. Chilled Versus Room Temperature: These squares can be served chilled or at room temperature, depending on your preference.
2. Garnishes: Top with whipped cream, a sprinkle of chocolate shavings, or chopped pistachios for a delightful touch.
3. Plating: Use a clean plate or dessert stand to elevate the squares. For an elegant touch, consider a decorative serving platter.
4. Beverage Pairing: Pair with a dessert wine, espresso, or a flavored coffee to complement the sweet flavors.
5. Preservation: Store leftovers in an airtight container in the refrigerator for up to 3 days for maximum freshness.
By putting thought into how you serve these Classic Cannoli Squares, you can create an experience that guests will talk about for a long time. Enjoy the delightful flavors, beautiful presentation, and the joy they bring!
Additional Tips
– Use Whole Milk Ricotta: For a creamier filling, opt for whole milk ricotta cheese instead of part-skim. This will enhance the flavor and texture of your Classic Cannoli Squares.
– Chill Before Serving: After slicing, let the squares chill in the refrigerator for at least 30 minutes. This allows the flavors to meld beautifully.
– Experiment with Citrus Zest: For a fresh twist, consider adding a teaspoon of lemon or orange zest to the ricotta filling.
– Drizzle Chocolate: Before serving, drizzle melted chocolate over the top of the squares for an elegant presentation and extra chocolaty goodness.
Recipe Variation
Classic Cannoli Squares can be adapted in various ways to suit your taste preferences:
1. Fruit Infusion: Add chopped fresh strawberries or blueberries into the filling for a fruity burst of flavor.
2. Nutty Flavor: Incorporate chopped pistachios or walnuts into the filling or sprinkle them on top for added crunch.
3. Different Shells: Swap out the crushed cannoli shells for crushed vanilla wafers or graham cracker crumbs for a unique flavor profile.
Freezing and Storage
– Storage: Keep your Classic Cannoli Squares in an airtight container in the refrigerator for up to 4 days. This will help maintain their freshness.
– Freezing: To freeze, wrap each square individually in plastic wrap and place them in a freezer-safe bag. They can be frozen for up to 2 months. Just remember to thaw them in the refrigerator before serving.
Special Equipment
Preparing Classic Cannoli Squares can be done with minimal equipment. Here’s what you’ll need:
– 8×8 inch baking pan
– Mixing bowls
– Spatula for spreading the filling
– Parchment paper for easy removal
– Whisk or electric mixer for mixing the filling
Frequently Asked Questions
Can I use store-bought cannoli shells for this recipe?
Yes, you can use store-bought cannoli shells instead of making your own. Just ensure they are crushed finely.
What can I serve this dessert with?
Classic Cannoli Squares pair wonderfully with coffee, espresso, or a dessert wine. For extra indulgence, try adding a dollop of whipped cream.
How do I know when the filling is set?
The filling is set when it appears slightly golden on top and no longer jiggles when you gently shake the pan.
Can I make this recipe dairy-free?
Yes, you can substitute dairy products with lactose-free options or use a dairy-free ricotta alternative.
Is it possible to make these squares gluten-free?
Absolutely! You can use gluten-free flour and make sure the cannoli shells or graham cracker crumbs are gluten-free as well.
Conclusion
Classic Cannoli Squares are a fantastic addition to any dessert repertoire. Combining the rich flavors of traditional cannoli with the simplicity of a bar dessert, this recipe is sure to impress. Each bite offers a delightful mix of creamy and crunchy textures, making it not only a delicious treat but also a visually appealing one. Whether you’re celebrating a special occasion or simply treating yourself, these squares are an excellent choice that is bound to become a favorite.

Classic Cannoli Squares: An Incredible Recipe with 5 Amazing Layers
- Total Time: 45 minutes
Ingredients
– 1 cup all-purpose flour
– 1/4 cup granulated sugar
– 1/4 teaspoon salt
– 1/2 teaspoon ground cinnamon
– 1/4 cup unsalted butter, softened
– 1 large egg
– 1 cup ricotta cheese, drained
– 1/2 cup powdered sugar
– 1 teaspoon vanilla extract
– 1/2 teaspoon almond extract
– 1/2 cup mini chocolate chips
– 1 cup crushed cannoli shells or graham cracker crumbs (for the crust)
– Additional powdered sugar (for dusting)
Instructions
These step-by-step instructions will guide you to create the amazing Classic Cannoli Squares effortlessly:
1. Preheat the Oven: Preheat your oven to 350°F (175°C). Grease and line an 8×8 inch baking pan with parchment paper.
2. Make the Cannoli Shell Crust: In a bowl, combine the crushed cannoli shells or graham cracker crumbs, all-purpose flour, sugar, salt, cinnamon, and softened butter. Mix until crumbly.
3. Press the Crust: Press the mixture evenly into the bottom of the prepared baking pan. This will form the crust for your squares.
4. Bake the Crust: Place the pan in the preheated oven and bake for about 10 minutes or until lightly golden. Remove from the oven and set aside to cool.
5. Prepare the Filling: In a mixing bowl, combine the ricotta cheese, powdered sugar, vanilla extract, almond extract, and mini chocolate chips. Blend until smooth and creamy.
6. Spread the Filling: Once the crust has cooled, evenly spread the ricotta filling over the crust using a spatula.
7. Bake Again: Return the pan to the oven and bake for an additional 20 minutes, or until the filling is set and slightly golden on top.
8. Cool Completely: Allow the pan to cool at room temperature for about 1 hour. Then, refrigerate for at least another hour to ensure the filling has set properly.
9. Slice the Squares: Once cooled and set, lift the dessert from the pan using the parchment paper overhang. Slice into squares.
10. Dust and Serve: Before serving, dust the squares with additional powdered sugar for a beautiful finish.
- Prep Time: 15 minutes
- Cook Time: 30 minutes
Nutrition
- Serving Size: 9 squares
- Calories: 220 kcal
- Fat: 10g
- Protein: 4g


