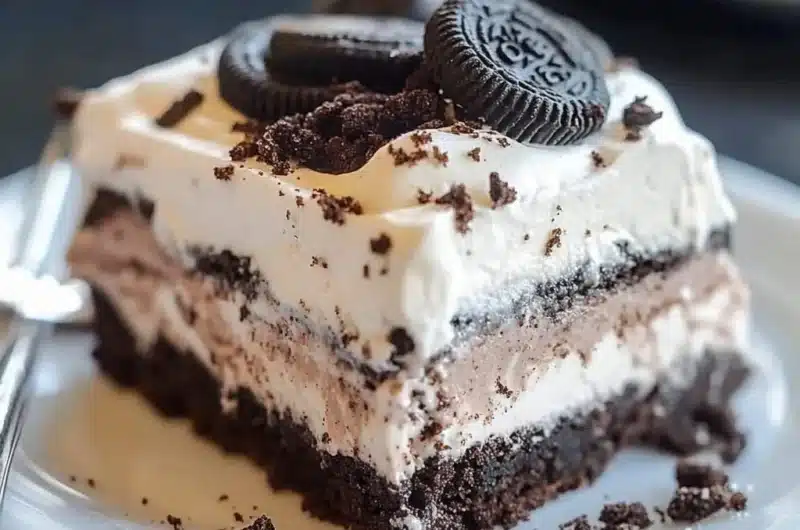
No Bake Heavenly Oreo Dessert is a delightful way to cool down while indulging your sweet tooth. This luscious dessert is easy to prepare and requires no baking, making it perfect for those busy days when you crave something delicious without a lot of fuss. If you’re a fan of Oreos, then you’re in for a treat. This dessert combines the classic chocolate cookie with rich cream layers, creating a heavenly experience that promises to satisfy your cravings.
Every bite of this amazing dessert is a wonderful blend of flavors and textures that will leave you and your guests wanting more. It’s versatile enough to serve on special occasions or simply as a treat to enjoy at home. If you’ve never experienced the joy of No Bake Heavenly Oreo Dessert, get ready for a revelation that will undoubtedly become a staple in your dessert rotation.
In this article, we will share the reasons why this recipe stands out, the preparation and cooking time you need to keep in mind, the list of ingredients, and step-by-step instructions to help you create this incredible dessert with ease. Let’s dive into the world of sweet indulgence!
Why You’ll Love This Recipe
There are countless reasons to fall in love with No Bake Heavenly Oreo Dessert. Here are just a few:
1. Simple Preparation: With no need for an oven, this dessert saves time and effort.
2. Decadent Flavor: The combination of Oreos, cream cheese, and whipped topping creates a rich flavor that is hard to resist.
3. Perfect for Any Gathering: Whether it’s a barbecue, potluck, or family dinner, this dessert is an instant crowd-pleaser.
4. Flexibility: You can easily adjust the layers or ingredients to suit your taste or dietary restrictions.
5. No Special Skills Required: This dessert is straightforward enough that anyone, regardless of their cooking expertise, can make it successful.
6. Make-Ahead Option: Ideal for busy schedules, you can prepare this dessert the night before and let it chill until it’s time to serve.
With these reasons in mind, it’s no wonder that No Bake Heavenly Oreo Dessert has a dedicated fan base. Once you try it, you’ll understand why so many people rave about its amazing taste and effortless preparation!
Preparation and Cooking Time
Creating this no-bake dessert requires minimal time, making it an excellent choice for those with hectic schedules. Below is a breakdown of the total time required for preparation and chilling:
– Preparation Time: 20-30 minutes
– Chilling Time: 4-6 hours (or overnight for best results)
In total, expect to dedicate around 4-6 hours to this dessert, primarily for chilling. This gives you time to focus on other activities while your dessert firms up beautifully in the refrigerator.
Ingredients
– 24 Oreo cookies (crushed)
– ½ cup unsalted butter (melted)
– 8 oz cream cheese (softened)
– 1 cup powdered sugar
– 2 cups whipped topping (like Cool Whip)
– 1 tsp vanilla extract
– 12 Oreo cookies (for the filling and topping)
– Optional: Chocolate syrup for garnish
Step-by-Step Instructions
Crafting your No Bake Heavenly Oreo Dessert is a straightforward process. Follow these easy steps to ensure success:
1. Prepare the Crust: In a medium bowl, combine the crushed Oreo cookies and melted butter. Mix until well combined and the mixture resembles wet sand.
2. Form the Crust: Press the Oreo mixture into the bottom of a 9×13-inch dish to form an even layer. Set aside.
3. Make the Cream Layer: In a large bowl, beat together the softened cream cheese and powdered sugar until smooth.
4. Add Whipped Topping: Gently fold in the whipped topping and vanilla extract into the cream mixture until everything is well combined and fluffy.
5. Layer the Cream: Spoon half of the cream mixture over the Oreo crust, spreading it evenly.
6. Add More Oreos: Roughly chop the 12 Oreo cookies and sprinkle them evenly over the cream layer.
7. Top It Off: Pour the remaining cream mixture over the chopped Oreos and spread it evenly.
8. Chill: Cover the dish with plastic wrap and refrigerate for at least 4-6 hours (or overnight) to allow the layers to set.
9. Serve: When ready to serve, drizzle with chocolate syrup if desired and cut into squares.
By following these steps, you’ll create a No Bake Heavenly Oreo Dessert that impresses both visually and in taste!
How to Serve
When it comes to serving your No Bake Heavenly Oreo Dessert, presentation and pairing can enhance the overall experience. Here are some tips to make this dessert extra special:
1. Presentation: Serve in a clear glass dish or platter to showcase the delightful layers. Garnish with additional crushed Oreos on top.
2. Portion Control: Cut into small squares for a bite-sized treat. This encourages guests to come back for seconds!
3. Accompaniments: Pair the dessert with a scoop of vanilla ice cream or a dollop of additional whipped cream for added indulgence.
4. Beverage Pairing: A cold glass of milk or a sweet coffee drink complements the dessert perfectly.
5. Storage Tips: If you have leftovers, store them in the refrigerator, covered with plastic wrap or in an airtight container.
With these serving suggestions, your No Bake Heavenly Oreo Dessert will be a delight to both the eyes and taste buds, leaving a lasting impression on your guests!
Additional Tips
– Use Quality Ingredients: Opt for fresh cream cheese and high-quality whipped topping to enhance the flavor of your No Bake Heavenly Oreo Dessert.
– Crush Oreos Well: Ensure that the Oreo cookies are crushed into fine crumbs for a smooth crust that holds together nicely.
– Chill Completely: For the best texture, allow ample chilling time. Overnight refrigeration is ideal for optimal flavor and firmness.
– Adjust Layers: Feel free to modify the number of layers according to your preferences. Creating more cream layers or adding additional Oreos can elevate the flavor.
Recipe Variation
Experiment with these fun variations to create your unique twist on the No Bake Heavenly Oreo Dessert:
1. Peanut Butter Bliss: Mix in peanut butter with the cream cheese for a nutty flavor that pairs beautifully with the Oreos.
2. Mint Chocolate Delight: Incorporate mint extract into the cream mixture for a refreshing minty twist that complements the chocolate.
3. Cookie Butter Layer: Swap in cookie butter for some of the cream cheese to create a rich, caramelized flavor that’s simply irresistible.
4. Fruit Layers: Add a layer of sliced strawberries or bananas between the cream and Oreo layers for a fruity surprise.
Freezing and Storage
– Storage: Keep your No Bake Heavenly Oreo Dessert covered in the refrigerator. Properly stored, it will stay fresh for about 4-5 days.
– Freezing: You can freeze portions of this dessert for up to 3 months. Wrap each piece well in plastic wrap, then in aluminum foil to avoid freezer burn.
Special Equipment
To prepare this No Bake Heavenly Oreo Dessert successfully, you will need the following essential tools:
– Mixing bowls for combining your ingredients.
– A 9×13-inch baking dish to layer and chill the dessert.
– An electric mixer for blending the cream cheese and sugar smoothly.
– A spatula or spoon for spreading the layers evenly.
Frequently Asked Questions
Can I make this dessert dairy-free?
Yes! Use dairy-free cream cheese and whipped topping to create a dairy-free version of this indulgent dessert.
How long does it take to set?
The dessert requires at least 4-6 hours of chilling time. For best results, let it sit overnight in the refrigerator.
Can I substitute other cookies?
Absolutely! Feel free to use your favorite cookie varieties like chocolate chip or ginger snaps for a unique flavor profile.
What if I don’t have whipped topping?
You can whip heavy cream and sweeten it to your liking as a substitute for whipped topping in the recipe.
How can I enhance the flavor?
Consider adding a splash of espresso or coffee to the cream mixture for a subtle, delicious depth to the flavor.
Conclusion
No Bake Heavenly Oreo Dessert is a creamy, sweet treat that combines the beloved flavors of Oreos with a luscious cream filling. It’s simple to prepare, making it a go-to dessert for any occasion. With its delightful textures and rich flavors, it’s bound to impress your family and friends. This dessert is not just easy—it’s unforgettable.

No Bake Heavenly Oreo Dessert: An Incredible Ultimate Recipe
- Total Time: 15 minutes
Ingredients
– 24 Oreo cookies (crushed)
– ½ cup unsalted butter (melted)
– 8 oz cream cheese (softened)
– 1 cup powdered sugar
– 2 cups whipped topping (like Cool Whip)
– 1 tsp vanilla extract
– 12 Oreo cookies (for the filling and topping)
– Optional: Chocolate syrup for garnish
Instructions
Crafting your No Bake Heavenly Oreo Dessert is a straightforward process. Follow these easy steps to ensure success:
1. Prepare the Crust: In a medium bowl, combine the crushed Oreo cookies and melted butter. Mix until well combined and the mixture resembles wet sand.
2. Form the Crust: Press the Oreo mixture into the bottom of a 9×13-inch dish to form an even layer. Set aside.
3. Make the Cream Layer: In a large bowl, beat together the softened cream cheese and powdered sugar until smooth.
4. Add Whipped Topping: Gently fold in the whipped topping and vanilla extract into the cream mixture until everything is well combined and fluffy.
5. Layer the Cream: Spoon half of the cream mixture over the Oreo crust, spreading it evenly.
6. Add More Oreos: Roughly chop the 12 Oreo cookies and sprinkle them evenly over the cream layer.
7. Top It Off: Pour the remaining cream mixture over the chopped Oreos and spread it evenly.
8. Chill: Cover the dish with plastic wrap and refrigerate for at least 4-6 hours (or overnight) to allow the layers to set.
9. Serve: When ready to serve, drizzle with chocolate syrup if desired and cut into squares.
By following these steps, you’ll create a No Bake Heavenly Oreo Dessert that impresses both visually and in taste!
- Prep Time: 15 minutes
- Cook Time: 0 minutes
Nutrition
- Serving Size: 12 servings
- Calories: 380 kcal
- Fat: 20g
- Protein: 4g