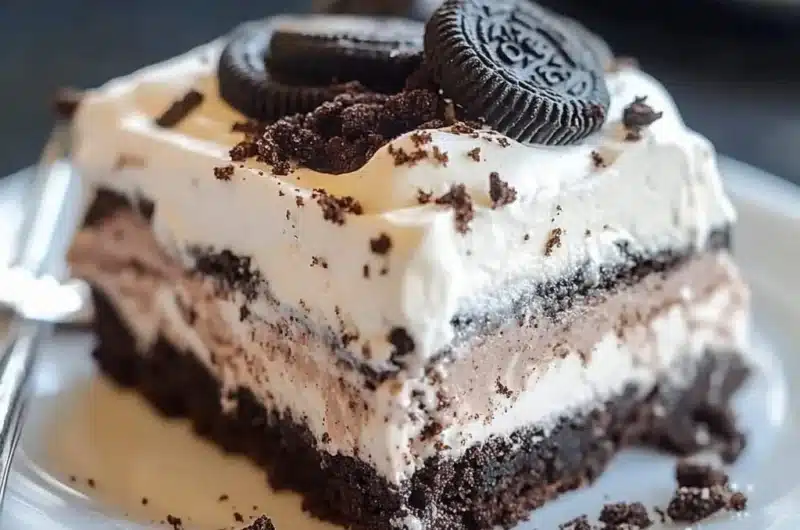
No Bake Heavenly Oreo Dessert is an amazing, indulgent treat that everyone should try. This dessert is not only quick and simple to prepare, but it also brings together an extraordinary mix of flavors and textures that dance in your mouth. With its layers of creamy filling, chocolate cookies, and luscious whipped topping, this recipe guarantees to impress at any gathering. Whether you’re hosting a barbecue or just want to satisfy your sweet tooth, this dessert is sure to be a hit.
Picture this: a delightful mix of crushed Oreos, creamy layers, and a cloud-like whipped topping. With each bite, you’ll experience the crunch of chocolate cookies paired beautifully with smooth and rich filling. This dessert isn’t just easy to make; it’s a wonderful way to bring joy to your family and friends. The combination of flavors will take you back to your childhood, making it a nostalgic experience as well.
Throughout this article, you will discover why No Bake Heavenly Oreo Dessert is a must-have recipe in your collection. We’ll cover the preparation and cooking time, list the ingredients, provide step-by-step instructions, and share tips on how to serve this stunning dessert. Get ready to impress your loved ones with this incredible treat that will leave everyone wanting more!
Why You’ll Love This Recipe
There are countless reasons to fall in love with No Bake Heavenly Oreo Dessert. Here are just a few:
1. Effortless Preparation – You don’t need to turn on the oven, making it perfect for warm days or when you’re short on time.
2. All Oreo Lovers Rejoice – If you’re a fan of Oreos, this dessert combines them in an incredible way.
3. Impressive Layers – The beautiful layers create an elegant presentation that will wow your guests.
4. Customize It – Feel free to mix in different flavors or toppings, such as add-ins like peanut butter or caramel.
5. Family-Friendly – Kids and adults alike will love the combination of flavors, making it great for any family gathering.
6. Make Ahead – Prepare it a day in advance, and it only gets better as it sits in the fridge.
By now, it’s easy to see why No Bake Heavenly Oreo Dessert has become a favorite for gatherings and family dinners. Each bite is a wonderful balance of creamy, sweet, and crunchy, making this treat unforgettable.
Preparation and Cooking Time
Making No Bake Heavenly Oreo Dessert is quick and straightforward. Here’s a breakdown of what to expect in terms of time:
– Preparation Time: 20 minutes
– Chill Time: 4 hours minimum, preferably overnight
Total time is approximately 4 hours and 20 minutes, but most of this is just chill time to allow the flavors to meld together.
Ingredients
– 24 Oreo cookies (crushed)
– ½ cup unsalted butter (melted)
– 2 cups cream cheese (softened)
– 1 cup powdered sugar
– 2 cups whipped topping (thawed)
– 1 teaspoon vanilla extract
– 1 cup chocolate syrup (for drizzling)
– Additional Oreos (for garnish)
Step-by-Step Instructions
Creating your No Bake Heavenly Oreo Dessert will be easy if you follow these simple steps:
1. Crush Oreos: In a large bowl, crush 24 Oreo cookies into fine crumbs.
2. Mix Crust: Combine the crushed Oreos with melted butter, stirring until fully mixed.
3. Prepare Pan: Press the mixture into the bottom of a 9×13-inch pan evenly. This will be your crust layer.
4. Mix Cream Cheese: In another bowl, blend softened cream cheese and powdered sugar until smooth and creamy.
5. Fold in Topping: Gently fold in the whipped topping and vanilla extract to the cream cheese mixture.
6. Layer Filling: Spread half of the cream cheese mixture over the Oreo crust evenly.
7. Add More Oreos: Layer another 12 crushed Oreos evenly on top of the cream cheese layer.
8. Repeat Filling: Spread the remaining cream cheese mixture over the crushed Oreos.
9. Final Layer: Top with chocolate syrup, drizzling it generously over the cream cheese layer.
10. Chill: Cover the dessert with plastic wrap and refrigerate for at least 4 hours, preferably overnight.
11. Serve: Before serving, garnish with additional crushed Oreos for extra crunch and decoration.
Follow these steps, and you will create a delicious treat that is sure to disappear fast!
How to Serve
When it comes to serving No Bake Heavenly Oreo Dessert, presentation and accompaniments are key. Here are some tips to elevate your serving experience:
1. Slice Neatly: Use a sharp knife to cut clean slices, revealing the beautiful layers inside.
2. Garnish: Add fresh whipped cream or chocolate shavings on top to enhance the visual appeal.
3. Pair with Coffee: This dessert pairs beautifully with a cup of coffee or a glass of milk, providing the perfect balance.
4. Chill Before Serving: Keep the dessert chilled until it’s time to serve, ensuring it maintains its freshness and flavor.
5. Family Style: Consider serving it in the pan for family-style gatherings, letting guests scoop their portions.
By following these serving suggestions, you will create a memorable dessert experience that will delight everyone at your gathering!
Additional Tips
– Use Quality Ingredients: For the best flavor, opt for original Oreos and ensure your cream cheese is fully softened.
– Chill for Maximum Flavor: Allowing the dessert to chill longer enhances the flavors, making it even more delicious.
– Experiment with Toppings: Consider adding crushed candy bars or fruits for a fun twist to the classic recipe.
– Use a Large Bowl: Since you will be mixing several layers, make sure to use a spacious bowl for ease of combining ingredients.
– Keep it Covered: When refrigerating, cover your dessert to prevent it from absorbing other odors in the fridge.
Recipe Variation
Feel free to experiment with these variations for a delightful twist on the classic No Bake Heavenly Oreo Dessert:
1. Mint Chocolate Version: Add a few drops of peppermint extract into the cream cheese mixture for a refreshing minty flavor.
2. Peanut Butter Delight: Incorporate peanut butter into your cream cheese mixture for a rich, nutty taste.
3. Strawberry Swirl: Layer fresh strawberries on top of the cream cheese mixture for a fruity and vibrant twist.
4. Caramel Drizzle: Instead of chocolate syrup, top your dessert with caramel sauce for a different flavor profile.
5. Cookies and Cream Twist: Include crushed Oreos in both the crust and the filling for an extra Oreo boost.
Freezing and Storage
– Storage: Keep the dessert covered in the refrigerator to maintain its freshness. It should last about 4 to 5 days, making it a great make-ahead option.
– Freezing: You can freeze the No Bake Heavenly Oreo Dessert for up to 3 months. Be sure to slice it and wrap individual portions well to prevent freezer burn. Thaw in the fridge before serving.
Special Equipment
To make No Bake Heavenly Oreo Dessert, you will require some essential tools:
– Mixing Bowls: At least two bowls for mixing the crust and the cream cheese filling.
– Electric Mixer: A handheld or stand mixer will help achieve a smooth cream cheese mixture.
– 9×13-Inch Baking Pan: This is the ideal size for layering your dessert.
– Spatula: A rubber spatula is handy for spreading the layers evenly.
– Plastic Wrap: To cover the dessert while it chills in the refrigerator.
Frequently Asked Questions
Can I use low-fat cream cheese?
Yes, low-fat cream cheese can be used as a substitute, but it may alter the texture slightly.
How long should I chill the dessert before serving?
For the best flavor and texture, chill it for at least 4 hours, though overnight is ideal.
Is this dessert gluten-free?
Since Oreos contain gluten, this recipe is not gluten-free. However, you can substitute gluten-free chocolate cookies in the crust.
Can I add other flavors to the cream cheese mixture?
Absolutely! You can experiment with different flavors such as almond extract or even a splash of coffee for a mocha twist.
How can I make this dessert more visually appealing?
You can add whipped cream on top, sprinkle crushed Oreos, or use chocolate shavings for a gourmet look.
Conclusion
The No Bake Heavenly Oreo Dessert is a delightful treat that’s not only quick to prepare but also creates a sensational symphony of flavors. The layers of creamy filling, crunchy Oreos, and luscious whipped topping offer a rich experience that will surely impress your family and friends. With possibilities for customization and easy prep, this dessert proves to be an irresistible choice for any occasion.

No Bake Heavenly Oreo Dessert: An Incredible 7-Layer Recipe
- Total Time: 14 minute
Ingredients
– 24 Oreo cookies (crushed)
– ½ cup unsalted butter (melted)
– 2 cups cream cheese (softened)
– 1 cup powdered sugar
– 2 cups whipped topping (thawed)
– 1 teaspoon vanilla extract
– 1 cup chocolate syrup (for drizzling)
– Additional Oreos (for garnish)
Instructions
Creating your No Bake Heavenly Oreo Dessert will be easy if you follow these simple steps:
1. Crush Oreos: In a large bowl, crush 24 Oreo cookies into fine crumbs.
2. Mix Crust: Combine the crushed Oreos with melted butter, stirring until fully mixed.
3. Prepare Pan: Press the mixture into the bottom of a 9×13-inch pan evenly. This will be your crust layer.
4. Mix Cream Cheese: In another bowl, blend softened cream cheese and powdered sugar until smooth and creamy.
5. Fold in Topping: Gently fold in the whipped topping and vanilla extract to the cream cheese mixture.
6. Layer Filling: Spread half of the cream cheese mixture over the Oreo crust evenly.
7. Add More Oreos: Layer another 12 crushed Oreos evenly on top of the cream cheese layer.
8. Repeat Filling: Spread the remaining cream cheese mixture over the crushed Oreos.
9. Final Layer: Top with chocolate syrup, drizzling it generously over the cream cheese layer.
10. Chill: Cover the dessert with plastic wrap and refrigerate for at least 4 hours, preferably overnight.
11. Serve: Before serving, garnish with additional crushed Oreos for extra crunch and decoration.
Follow these steps, and you will create a delicious treat that is sure to disappear fast!
- Prep Time: 15 minutes
- Cook Time: N/A
Nutrition
- Serving Size: 12
- Calories: 320 kcal
- Fat: 15g
- Protein: 4g