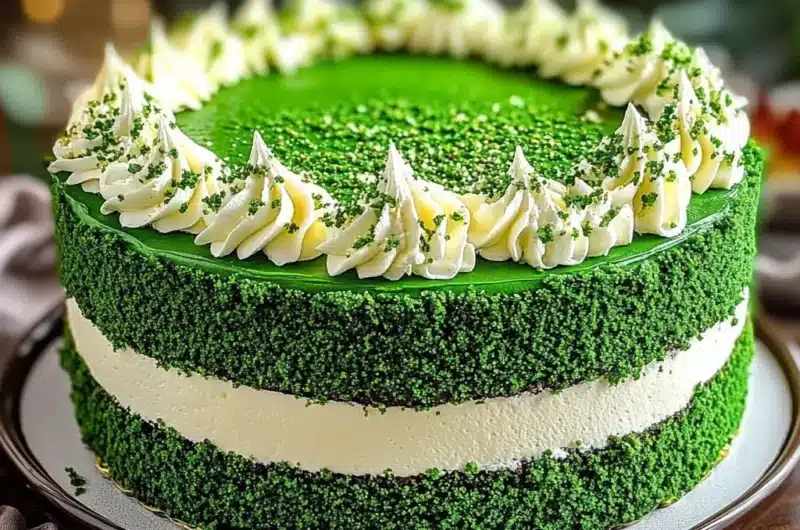
Green Velvet Cake Perfect for Celebrations is not just a dessert; it’s a showstopper that adds a vibrant touch to any occasion. This unique twist on the classic red velvet cake features a stunning green hue and a rich, moist texture that excites the senses. When it’s time to celebrate, nothing brings joy like a beautifully crafted cake that tastes as good as it looks.
Imagine cutting into this gorgeous cake, with layers of fluffy green sponge layered with luscious cream cheese frosting in between. It’s a beautiful centerpiece for birthdays, weddings, and holiday gatherings that will leave lasting memories. The combination of visual appeal and amazing flavor makes Green Velvet Cake an unforgettable addition to any festive table.
In this guide, you will discover why this recipe stands out, how to prepare it step-by-step, and expert tips for serving it perfectly. Whether you’re an experienced baker or a novice, the incredible experience that comes with making this cake will capture your heart and impress your guests. Let’s dive into this delightful recipe!
Why You’ll Love This Recipe
Green Velvet Cake is a celebration of flavor, texture, and color. Here are several reasons why you will adore this recipe:
1. Unique and Visually Striking – The striking green color makes it perfect for themed events and festive occasions.
2. Flavorful Yet Familiar – It combines the traditional velvety texture of classic cakes with a distinct twist, producing a wonderful taste experience.
3. Easy to Make – The straightforward instructions ensure that bakers of all skill levels can create this show-stopping cake successfully.
4. Perfect for Any Occasion – Whether it’s a birthday, anniversary, or holiday party, the Green Velvet Cake is versatile enough to fit any celebration.
5. Satisfying Cream Cheese Frosting – Each layer is complemented by a creamy, tangy frosting, making every bite a delight.
6. Impressive Layering – The seven layers create a stunning visual, elevating your dessert to new levels of elegance.
This cake not only satisfies your sweet tooth but also serves as the centerpiece for any celebration. Each slice tells a story of festivity and joy, making it a must-try.
Preparation and Cooking Time
Creating your Green Velvet Cake will take some time, but the delicious end result is worthwhile. Here’s how your time will break down:
– Preparation Time: 30 minutes
– Cooking Time: 30-35 minutes
– Cooling Time: 30 minutes
In total, you can expect to invest about 1.5 hours from start to finish. This timeframe allows for the careful preparation of batter, baking, and cooling, ensuring that your cake turns out perfectly.
Ingredients
– 2 ½ cups all-purpose flour
– 1 ½ cups granulated sugar
– ½ teaspoon baking soda
– 1 tablespoon baking powder
– ½ teaspoon salt
– 1 tablespoon unsweetened cocoa powder
– 1 ½ cups vegetable oil
– 1 cup buttermilk, at room temperature
– 3 large eggs, at room temperature
– 2 teaspoons vanilla extract
– 1 tablespoon green food coloring
– 1 cup cream cheese, softened
– 5 cups powdered sugar, sifted
– ½ cup unsalted butter, softened
– 1 teaspoon vanilla extract (for frosting)
Step-by-Step Instructions
Follow these straightforward steps to create your Green Velvet Cake:
1. Preheat your oven to 350°F (175°C) and grease seven 6-inch round cake pans.
2. Mix Dry Ingredients: In a large bowl, mix flour, sugar, baking soda, baking powder, salt, and cocoa powder together until well combined.
3. Combine Wet Ingredients: In another bowl, whisk together the oil, buttermilk, eggs, vanilla extract, and green food coloring until fully incorporated.
4. Combine Mixtures: Gradually add the wet ingredients to the dry mixture, mixing until just combined. Do not overmix.
5. Pour Batter: Divide the batter evenly among the prepared cake pans.
6. Bake: Bake for 30-35 minutes or until a toothpick inserted in the center comes out clean.
7. Cool: Remove from the oven and let the cakes cool in their pans for about 15 minutes. Once cool enough to handle, transfer each to a wire rack to cool completely.
8. Prepare the Frosting: In a large bowl, beat together the softened cream cheese and butter until smooth and creamy. Gradually add in the powdered sugar and continue beating until fluffy. Add the vanilla extract for flavor.
9. Assemble the Cake: Once the cake layers are cool, place one layer on a serving plate or cake stand. Spread a layer of cream cheese frosting on top. Repeat this process for all layers.
10. Frost the Outside: After stacking all the layers, apply a thin coat of frosting around the sides and top of the cake to seal in crumbs. Chill for 15 minutes, then add a final decorative layer of icing.
By following these steps, you’ll create an incredible Green Velvet Cake that’s perfect for any celebration!
How to Serve
Serving your Green Velvet Cake beautifully can enhance the overall experience, so consider the following tips:
1. Presentation: Use a decorative cake stand to showcase the layers and frosting. A simple touch can elevate the overall look.
2. Slice Size: Cut even slices to keep portions manageable. Smaller slices encourage guests to come back for seconds without regret.
3. Accompaniments: Serve alongside fresh berries, such as strawberries or raspberries, to add a tart contrast to the sweet cake.
4. Beverage Pairing: This cake pairs wonderfully with a glass of milk, tea, or even a sweet dessert wine, adding sophistication to your serving.
5. Garnish Options: Consider garnishing with mint leaves or additional fruit for an elegant touch.
By putting thought into how you present and serve your Green Velvet Cake, you create an unforgettable experience for you and your guests!
Additional Tips
– Use High-Quality Ingredients: For an exceptional flavor, opt for fresh, high-quality products, especially butter and cocoa powder.
– Be Mindful of Food Coloring: Use gel food coloring for a vibrant green hue without affecting the cake’s consistency.
– Level Your Cakes: Ensure even baking by leveling your cake layers with a serrated knife before frosting.
– Adjust for Altitude: If you live at a high altitude, modify baking times and temperatures accordingly to achieve the best results.
– Experiment with Flavors: Feel free to add a hint of almond extract along with vanilla for a new flavor dimension.
Recipe Variation
Enhance your Green Velvet Cake experience by trying out these variations:
1. Chocolate Chip Addition: Fold in semi-sweet chocolate chips into the batter for a delightful surprise.
2. Rainbow Layers: Alternate layers of green velvet with red or blue velvet for a festive multi-colored treat.
3. Citrus Twist: Add lemon zest to the batter for a refreshing citrus flavor that balances the cake’s sweetness.
4. Vegan Option: Substitute eggs for flax eggs and use plant-based butter to create a vegan-friendly version without compromising taste.
Freezing and Storage
– Storage: To maintain freshness, keep your Green Velvet Cake covered with plastic wrap or in an airtight container in the refrigerator. It will stay fresh for about 4-5 days.
– Freezing: For long-term storage, slice the cake and wrap pieces tightly in plastic wrap and foil. The frozen cake can last up to 3 months. Thaw overnight in the refrigerator when ready to serve.
Special Equipment
To create this stunning cake, you will need a few essential tools:
– Seven 6-inch round cake pans
– Large mixing bowls
– Electric mixer or stand mixer
– Spatula for frosting
– Wire racks for cooling
– Measuring cups and spoons
Frequently Asked Questions
How can I tell when the cake is fully baked?
Insert a toothpick into the center of a cake layer; if it comes out clean or with a few crumb clumps, the layers are done.
Can I prepare the cake ahead of time?
Definitely! You can bake the layers a day in advance. Just wrap and store them in the fridge until you’re ready to assemble.
Is the cake suitable for gluten-free diets?
You can easily substitute all-purpose flour with a gluten-free blend to accommodate gluten-free dietary needs.
Can I make this cake in a different size pan?
Yes, you can use a larger pan. Adjust the baking time accordingly, checking for doneness.
What is the best way to slice the cake?
Use a sharp serrated knife for the cleanest cuts. Wipe the knife between slices to keep edges tidy.
Conclusion
Green Velvet Cake Perfect for Celebrations is not just a cake; it’s a centerpiece that elevates any event with its striking appearance and delectable taste. Whether you celebrate a birthday, wedding, or holiday, this beautiful cake made with love will surely leave a lasting impression. With its unique flavor profile and impressive seven layers, every bite embodies joy and festivity. So gather your ingredients, follow the steps, and create a stunning Green Velvet Cake that will captivate and delight everyone at your celebration.
Green Velvet Cake Perfect for Celebrations: An Incredible 7-Layer Delight
- Total Time: 16 minute
Ingredients
– 2 ½ cups all-purpose flour
– 1 ½ cups granulated sugar
– ½ teaspoon baking soda
– 1 tablespoon baking powder
– ½ teaspoon salt
– 1 tablespoon unsweetened cocoa powder
– 1 ½ cups vegetable oil
– 1 cup buttermilk, at room temperature
– 3 large eggs, at room temperature
– 2 teaspoons vanilla extract
– 1 tablespoon green food coloring
– 1 cup cream cheese, softened
– 5 cups powdered sugar, sifted
– ½ cup unsalted butter, softened
– 1 teaspoon vanilla extract (for frosting)
Instructions
Follow these straightforward steps to create your Green Velvet Cake:
1. Preheat your oven to 350°F (175°C) and grease seven 6-inch round cake pans.
2. Mix Dry Ingredients: In a large bowl, mix flour, sugar, baking soda, baking powder, salt, and cocoa powder together until well combined.
3. Combine Wet Ingredients: In another bowl, whisk together the oil, buttermilk, eggs, vanilla extract, and green food coloring until fully incorporated.
4. Combine Mixtures: Gradually add the wet ingredients to the dry mixture, mixing until just combined. Do not overmix.
5. Pour Batter: Divide the batter evenly among the prepared cake pans.
6. Bake: Bake for 30-35 minutes or until a toothpick inserted in the center comes out clean.
7. Cool: Remove from the oven and let the cakes cool in their pans for about 15 minutes. Once cool enough to handle, transfer each to a wire rack to cool completely.
8. Prepare the Frosting: In a large bowl, beat together the softened cream cheese and butter until smooth and creamy. Gradually add in the powdered sugar and continue beating until fluffy. Add the vanilla extract for flavor.
9. Assemble the Cake: Once the cake layers are cool, place one layer on a serving plate or cake stand. Spread a layer of cream cheese frosting on top. Repeat this process for all layers.
10. Frost the Outside: After stacking all the layers, apply a thin coat of frosting around the sides and top of the cake to seal in crumbs. Chill for 15 minutes, then add a final decorative layer of icing.
By following these steps, you’ll create an incredible Green Velvet Cake that’s perfect for any celebration!
- Prep Time: 30 minutes
- Cook Time: 30-35 minutes
Nutrition
- Serving Size: 12
- Calories: 350 kcal
- Fat: 15g
- Protein: 4g