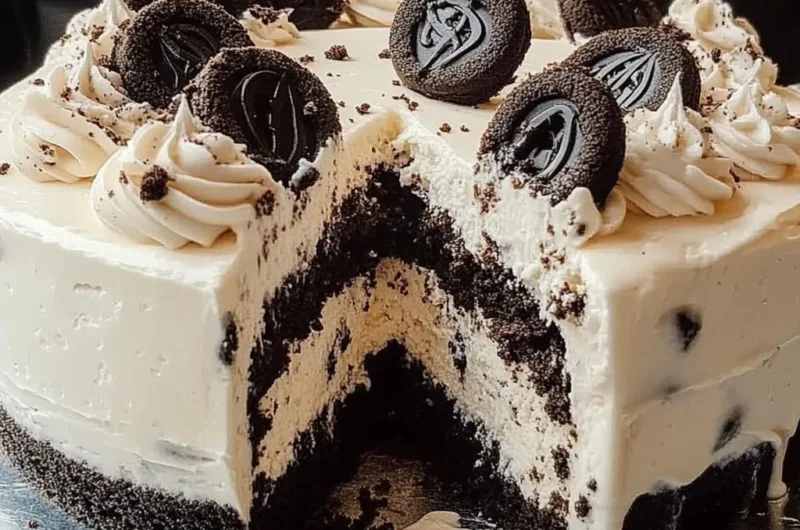
Decadent Cookies & Cream Ice Cream Cake is a delightful dessert that combines the classic flavors of cookies and cream with rich layers of ice cream and cookie crumbs. This cake delivers an unparalleled experience that will impress your guests and elevate any celebration. Imagine the moment when you slice into this creamy masterpiece, revealing beautiful layers of chocolate cookie crumbs interspersed between flavorful ice cream. It’s a fantastic way to celebrate birthdays, summer parties, or simply satisfy your sweet tooth.
Many people cherish the flavor of cookies and cream ice cream, and when you turn that into a cake, you create something truly extraordinary. Each bite offers a symphony of flavors that can make anyone feel nostalgic. This recipe is not only delicious; it’s also visually stunning and easy to prepare. In this article, you will discover why this recipe is worth your time and how to make this delightful dessert from scratch. Let’s dive into what makes the Decadent Cookies & Cream Ice Cream Cake a must-try!
Why You’ll Love This Recipe
The Decadent Cookies & Cream Ice Cream Cake is more than just dessert; it’s an event in itself! Here’s why you’ll love making this cake:
1. Irresistible Flavor: The harmonious blend of creamy vanilla ice cream and crunchy chocolate cookies creates a delightful texture that pleases the palate.
2. Eye-Catching Presentation: When you serve this cake, it’s all eyes on the stunning layers filled with cookie crumbs and ice cream. Perfect for impressing guests!
3. Great for Any Occasion: Whether celebrating a birthday, an anniversary, or a casual family gathering, this cake fits right in.
4. Easy to Customize: Feel free to mix it up with different flavors of ice cream or types of cookies. The possibilities are endless!
5. Kid-Approved: This cake is a hit with children and adults alike, making it a family favorite.
6. Make-Ahead Option: You can prepare the cake ahead of time and store it in the freezer, allowing stress-free entertaining.
With these benefits, it’s easy to see why so many home bakers are enchanted by this Decadent Cookies & Cream Ice Cream Cake!
Preparation and Cooking Time
Making this cake does require a bit of time, but the actual hands-on work is quite manageable. Here’s how your time breaks down:
– Preparation Time: 30 minutes
– Freezing Time: 4 hours
– Servings: This recipe yields about 10-12 servings depending on how large you cut the pieces.
In total, expect to spend around 4.5 hours from start to finish, but much of this time involves letting the cake freeze, so you can relax in between!
Ingredients
– 6 cups vanilla ice cream (softened, but not melted)
– 2 cups crushed chocolate sandwich cookies (plus more for garnish)
– 1 cup whipped cream (for topping)
– 1/2 cup cookie butter (optional, for layer between ice cream)
– 1/4 cup chocolate syrup (for drizzling)
– 1 box of chocolate cake mix (for base)
– 3 large eggs (for cake mix)
– 1 cup water (for cake mix)
– 1/2 cup vegetable oil (for cake mix)
Step-by-Step Instructions
Follow these simple steps to create your Decadent Cookies & Cream Ice Cream Cake:
1. Prepare the Cake Base: Preheat your oven to 350°F (175°C). Grease and flour a 9-inch round cake pan.
2. Mix Cake Batter: In a large bowl, combine the cake mix, eggs, water, and vegetable oil. Mix until smooth.
3. Bake the Cake: Pour the batter into the prepared cake pan. Bake for 25-30 minutes or until a toothpick comes out clean. Let it cool completely.
4. Prepare Ice Cream Layer: While the cake cools, remove the vanilla ice cream from the freezer to soften for about 15 minutes.
5. Layer Ice Cream: Once the cake has cooled, slice it horizontally in half to create two layers. Place the bottom layer back in the cake pan.
6. Add First Layer of Ice Cream: Spread 3 cups of the softened vanilla ice cream over the bottom slice. Even it out with a spatula.
7. Sprinkle Cookie Crumbs: Generously sprinkle half of the crushed chocolate sandwich cookies over the layer of ice cream.
8. Add Second Layer of Ice Cream: Spread the remaining ice cream over the cookie crumbs, smoothing it out nicely.
9. Layer Cake: Carefully place the top layer of the cake onto the ice cream. Press down gently to secure it.
10. Optional Layer: If desired, spread cookie butter here before adding the final ice cream layer.
11. Freeze Layered Cake: Cover the cake with plastic wrap and freeze for at least 4 hours, or until firm.
12. Prepare Whipped Cream: Just before serving, whip the cream until stiff peaks form.
13. Top Cake: Remove the cake from the freezer. Spread the whipped cream on top and sides of the cake.
14. Decorate: Drizzle chocolate syrup over the whipped cream and sprinkle the remaining cookie crumbs on top.
15. Slice and Serve: Carefully slice the cake with a warm knife for clean cuts.
How to Serve
To serve your Decadent Cookies & Cream Ice Cream Cake in the most delightful way, consider these tips:
1. Cake Stand: A decorative cake stand elevates the presentation and showcases the beauty of your creation.
2. Accompaniments: Pair cake slices with additional chocolate syrup, whipped cream, or even sprigs of mint for a pop of color.
3. Serving Size: Serve generous slices but keep them manageable to encourage guests to go for seconds!
4. Drink Pairings: This cake pairs well with milk, coffee, or even a scoop of gelato on the side for decadence.
By focusing on how you present and serve, you can enhance the entire experience for your guests, making your Decadent Cookies & Cream Ice Cream Cake not just a treat but a memorable event!
Additional Tips
– Use High-Quality Ingredients: The flavor of your Decadent Cookies & Cream Ice Cream Cake greatly depends on the quality of your ingredients. Opt for premium ice cream and cookies to enhance the taste.
– Soften Ice Cream Carefully: Make sure to soften your vanilla ice cream just enough to spread easily, but not so much that it melts. About 15 minutes at room temperature is usually perfect.
– Layering Technique: Ensure each layer is even to maintain a beautiful structure when you slice into the cake. Use an offset spatula for smoothing the ice cream layers.
– Chill Tools: Consider chilling your mixing bowls and beaters before whipping cream. This helps achieve thicker whipped cream quickly.
– Garnish Creatively: For an extra touch, sprinkle chocolate shavings or drizzle additional chocolate syrup over the top for a more decadent look.
Recipe Variation
There are plenty of ways to jazz up your Decadent Cookies & Cream Ice Cream Cake:
1. Cookie Swap: Use different sandwich cookies, like peanut butter or mint-flavored, to create unique flavor profiles.
2. Layered Flavors: Try using chocolate chip ice cream or allow for swirls of fudge or caramel within the layers for added richness.
3. Add Fruit: Incorporate layers of berries like raspberries or strawberries for a delightful contrast to the creamy layers.
4. Gluten-Free Version: Swap the chocolate cake mix for a gluten-free alternative to cater to dietary restrictions.
5. Unconventional Toppings: Consider toppings like crushed pretzels or toffee bits for a sweet and salty combination.
Freezing and Storage
– Storage: Keep the cake well-covered with plastic wrap or in an airtight container in the freezer. It can last up to 2-3 weeks.
– Slicing Tips: If you want to serve the cake in slices, use a warm knife to cut through the ice cream easily. This helps maintain the clean look of your slices.
– Thawing: When ready to serve, remove the cake from the freezer and let it sit at room temperature for a few minutes for easier slicing.
Special Equipment
You will need the following tools to prepare your Decadent Cookies & Cream Ice Cream Cake effectively:
– 9-inch round cake pans
– Mixing bowls
– Offset spatula (for smoothing ice cream layers)
– Electric mixer (for whipping cream)
– Plastic wrap or airtight container for freezing
– Knife (preferably warmed for slicing)
Frequently Asked Questions
How can I tell when my cake is fully baked?
You can check by inserting a toothpick into the center. If it comes out clean, the cake is done.
Is it possible to make this cake vegan?
You can substitute the eggs in the cake mix with applesauce or a vegan replacement, and use dairy-free ice cream for a vegan version.
Can I prepare the cake in advance?
Definitely! You can make the cake a day or two ahead of your event. Just ensure it is well-wrapped to avoid freezer burn.
What if I don’t have cookie butter?
If you don’t want to use cookie butter, simply skip that layer or replace it with another layer of ice cream or a different flavored spread.
Can this cake be decorated differently?
Absolutely! Get creative with your decorations. Use fruit, sprinkles, or edible flowers to add a personal touch.
Conclusion
The Decadent Cookies & Cream Ice Cream Cake is not just a dessert; it is an impressive centerpiece for your special occasions. With its rich layers of ice cream and cookie crunch, it melds flavor and nostalgia into an unforgettable treat. Whether you’re serving it for a birthday, holiday, or casual gathering, your guests are sure to be delighted by this visually stunning and delicious dessert. So, gather your ingredients, follow the steps, and enjoy the delightful journey of creating this extraordinary ice cream cake!
Decadent Cookies & Cream Ice Cream Cake: An Incredible 7-Layer Treat
- Total Time: 45 minutes
Ingredients
– 6 cups vanilla ice cream (softened, but not melted)
– 2 cups crushed chocolate sandwich cookies (plus more for garnish)
– 1 cup whipped cream (for topping)
– 1/2 cup cookie butter (optional, for layer between ice cream)
– 1/4 cup chocolate syrup (for drizzling)
– 1 box of chocolate cake mix (for base)
– 3 large eggs (for cake mix)
– 1 cup water (for cake mix)
– 1/2 cup vegetable oil (for cake mix)
Instructions
Follow these simple steps to create your Decadent Cookies & Cream Ice Cream Cake:
1. Prepare the Cake Base: Preheat your oven to 350°F (175°C). Grease and flour a 9-inch round cake pan.
2. Mix Cake Batter: In a large bowl, combine the cake mix, eggs, water, and vegetable oil. Mix until smooth.
3. Bake the Cake: Pour the batter into the prepared cake pan. Bake for 25-30 minutes or until a toothpick comes out clean. Let it cool completely.
4. Prepare Ice Cream Layer: While the cake cools, remove the vanilla ice cream from the freezer to soften for about 15 minutes.
5. Layer Ice Cream: Once the cake has cooled, slice it horizontally in half to create two layers. Place the bottom layer back in the cake pan.
6. Add First Layer of Ice Cream: Spread 3 cups of the softened vanilla ice cream over the bottom slice. Even it out with a spatula.
7. Sprinkle Cookie Crumbs: Generously sprinkle half of the crushed chocolate sandwich cookies over the layer of ice cream.
8. Add Second Layer of Ice Cream: Spread the remaining ice cream over the cookie crumbs, smoothing it out nicely.
9. Layer Cake: Carefully place the top layer of the cake onto the ice cream. Press down gently to secure it.
10. Optional Layer: If desired, spread cookie butter here before adding the final ice cream layer.
11. Freeze Layered Cake: Cover the cake with plastic wrap and freeze for at least 4 hours, or until firm.
12. Prepare Whipped Cream: Just before serving, whip the cream until stiff peaks form.
13. Top Cake: Remove the cake from the freezer. Spread the whipped cream on top and sides of the cake.
14. Decorate: Drizzle chocolate syrup over the whipped cream and sprinkle the remaining cookie crumbs on top.
15. Slice and Serve: Carefully slice the cake with a warm knife for clean cuts.
- Prep Time: 15 minutes
- Cook Time: 30 minutes
Nutrition
- Serving Size: 10-12 servings
- Calories: Approximately 350 kcal per slice
- Fat: 15g
- Protein: 5g