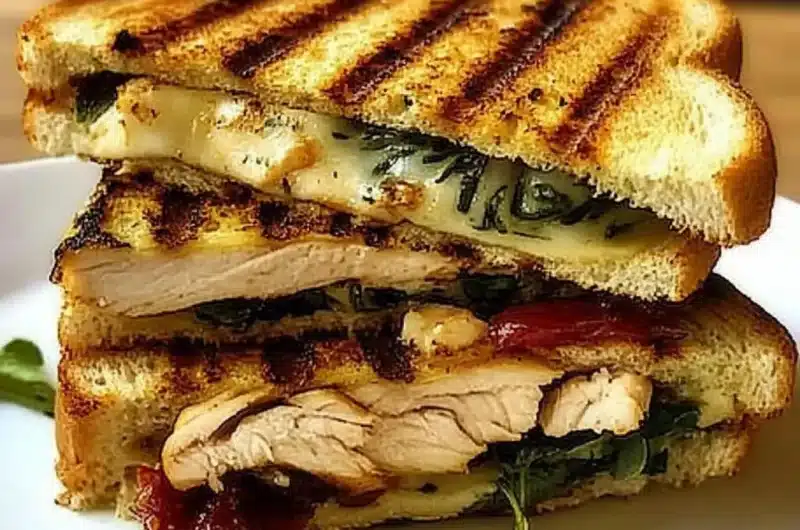
Grilled Chicken Panini Sandwich is a delicious and satisfying meal that can elevate your lunch or dinner experience. This sandwich combines tender grilled chicken, melted cheese, and fresh veggies, all encased in crispy, toasted bread. The flavors meld together beautifully, creating a culinary experience that is both comforting and invigorating. If you’re a fan of sandwiches that pack a flavorful punch, the Grilled Chicken Panini Sandwich is a must-try.
Imagine sinking your teeth into a warm, crispy panini, where the savory taste of grilled chicken meets the gooey goodness of melted cheese. It’s a sandwich that not only fills your belly but also warms your heart. Perfect for casual gatherings, picnic outings, or a simple meal at home, this panini is versatile and easy to prepare. You can customize it with your favorite ingredients, making it suitable for any palate.
In this article, you will learn why the Grilled Chicken Panini Sandwich is a fantastic recipe to have in your collection, along with preparation and cooking times, a comprehensive list of ingredients, and step-by-step instructions. Get ready to impress your family and friends with this incredible sandwich!
Why You’ll Love This Recipe
The Grilled Chicken Panini Sandwich is more than just a meal; it’s an experience. Here are some reasons why you’ll fall head over heels for this recipe:
1. Flavorful Ingredients: The combination of grilled chicken, fresh vegetables, and melted cheese creates a symphony of flavors that will tantalize your taste buds.
2. Quick and Easy: This recipe is straightforward, making it perfect for busy weeknights or last-minute gatherings.
3. Customizable: You can easily modify the ingredients to suit your preferences, whether you want to add more veggies or switch up the cheese.
4. Perfect for Meal Prep: Grilled Chicken Panini Sandwiches are great for meal prepping, allowing you to enjoy delicious lunches throughout the week.
5. Crowd-Pleaser: This sandwich is sure to impress your family and friends, making it ideal for entertaining or casual get-togethers.
6. Healthy Option: With lean grilled chicken and fresh vegetables, this sandwich can be a healthier alternative to many fast-food options.
With these benefits, it’s easy to see why the Grilled Chicken Panini Sandwich is a favorite among many home cooks!
Preparation and Cooking Time
Making the Grilled Chicken Panini Sandwich is quick and efficient. Here’s an overview of the time required:
– Preparation Time: 15 minutes
– Cooking Time: 10-15 minutes
– Total Time: 25-30 minutes
These times may vary slightly based on your cooking experience and equipment but provide a good estimate for planning your meal.
Ingredients
– 2 boneless, skinless chicken breasts
– 4 slices of ciabatta or focaccia bread
– 4 slices of mozzarella cheese (or cheese of choice)
– 1 medium tomato, sliced
– 1 cup fresh spinach or arugula
– 2 tablespoons olive oil
– 1 teaspoon Italian seasoning
– Salt and pepper to taste
– Optional: balsamic glaze for drizzling
Step-by-Step Instructions
Creating the Grilled Chicken Panini Sandwich is a breeze with these simple steps:
1. Preheat your grill or panini press: Set it to medium-high heat to ensure even cooking.
2. Prepare the Chicken: Season the boneless chicken breasts with olive oil, Italian seasoning, salt, and pepper.
3. Grill the Chicken: Place the chicken on the grill or in the panini press. Cook for 6-7 minutes on each side, or until the internal temperature reaches 165°F (75°C).
4. Let it Rest: Once cooked, remove the chicken from the grill and let it rest for a few minutes before slicing it thinly.
5. Assemble the Panini: Take two slices of ciabatta bread. Layer one slice with sliced grilled chicken, mozzarella cheese, tomato slices, and fresh spinach.
6. Top with Bread: Place the second slice of bread on top of the assembled ingredients.
7. Grill the Panini: Brush the outside of the sandwich with a little olive oil. Place the sandwich on the grill or panini press. Grill for about 3-5 minutes, pressing down gently until the bread is golden brown and the cheese is melted.
8. Slice and Serve: Once grilled, remove the panini from the heat. Slice it in half and drizzle with balsamic glaze if desired.
9. Repeat: If you’re making more sandwiches, repeat the process for the remaining ingredients.
10. Enjoy: Serve your delicious Grilled Chicken Panini Sandwich warm, with a side of chips or a fresh salad.
How to Serve
Serving your Grilled Chicken Panini Sandwich can enhance the overall dining experience. Here are some tips to make it memorable:
1. Presentation: Serve the panini on a wooden board or a colorful plate. A simple garnish of fresh herbs can elevate the presentation.
2. Accompaniments: Pair the sandwich with a side of crunchy potato chips, a fresh green salad, or sweet potato fries for a complete meal.
3. Dipping Sauces: Offer dipping sauces like garlic aioli, marinara, or pesto for an extra flavor kick.
4. Beverage Pairing: Consider pairing the sandwich with a refreshing iced tea, lemonade, or a glass of white wine for a delightful meal.
5. Serving Size: Slice the panini into halves or quarters for easy sharing, especially if you’re serving a group.
By thoughtfully considering how you serve the Grilled Chicken Panini Sandwich, you can create a delightful experience that your guests will remember!
Additional Tips
– Use Fresh Ingredients: The quality of the chicken and vegetables significantly affects the flavor. Always opt for fresh and organic produce when possible.
– Grill the Chicken Properly: To achieve the best flavor, ensure the grill is well-heated before placing the chicken. This helps to create a nice sear, locking in the juices.
– Experiment with Spices: Don’t hesitate to try different seasonings or marinades for the chicken. A touch of garlic powder or smoked paprika can add a delightful twist.
– Toast the Bread: For extra crunch, consider toasting the bread lightly before assembling the sandwich. This adds a wonderful texture and flavor.
– Serve Immediately: Paninis taste best when served right after grilling. The cheese is gooey, and the bread is perfectly crispy.
Recipe Variation
Feel free to customize your Grilled Chicken Panini Sandwich with these variations:
1. BBQ Chicken Panini: Instead of Italian seasoning, marinate the chicken in your favorite barbecue sauce before grilling. This adds a sweet and smoky flavor.
2. Mediterranean Twist: Add sliced olives, roasted red peppers, and feta cheese for a Mediterranean flair. Use pita bread instead of ciabatta for a different texture.
3. Spicy Kick: Incorporate jalapeños or pepper jack cheese for an extra kick of heat. This variation is perfect for spice lovers.
4. Caprese Style: Swap the spinach for fresh basil and add a drizzle of balsamic reduction. This variation highlights classic Caprese flavors.
5. Veggie-Loaded: Add extra vegetables like bell peppers, zucchini, or avocado to boost the nutritional value and flavor variety.
Freezing and Storage
– Storage: Keep the assembled panini in an airtight container in the refrigerator. They are best consumed within 1-2 days.
– Freezing: You can freeze the grilled chicken separately from the assembled sandwich. Wrap it tightly in plastic wrap or foil and store it in a freezer-safe bag for up to 3 months. When ready to eat, thaw the chicken in the refrigerator overnight before assembling and grilling the sandwich.
Special Equipment
To make the Grilled Chicken Panini Sandwich, consider using the following equipment:
– Panini Press: This is the ideal tool for grilling paninis evenly and achieving that perfect crispy texture.
– Grill Pan: If you don’t have a panini press, a grill pan works well. Just ensure to press down with a heavy skillet while cooking.
– Meat Thermometer: This tool helps ensure your chicken is cooked to the safe internal temperature of 165°F (75°C).
– Knife and Cutting Board: For slicing the chicken and assembling the sandwich, a sharp knife and sturdy cutting board are essential.
Frequently Asked Questions
Can I use leftover grilled chicken for the panini?
Absolutely! Leftover grilled chicken works perfectly for a quick and delicious panini.
What type of cheese works best?
While mozzarella is a classic choice, feel free to try provolone, gouda, or even cheddar for different flavor profiles.
Can I make a vegetarian version of this panini?
Yes, substitute chicken with grilled vegetables, such as zucchini, eggplant, or portobello mushrooms. Add some extra cheese for richness.
How can I make this sandwich gluten-free?
Simply use gluten-free bread options available in stores. Just ensure that all other ingredients are also gluten-free.
Can I add sauces to the panini?
Definitely! Adding sauces like pesto, aioli, or even a spicy mayo can enhance the flavor of your sandwich.
Conclusion
The Grilled Chicken Panini Sandwich is a versatile and delicious meal that can be tailored to suit any taste. With its combination of grilled chicken, fresh vegetables, and gooey cheese, it’s the perfect choice for lunch or dinner. Whether you’re entertaining friends or preparing a quick meal for yourself, this panini is sure to impress. By following the tips and variations provided, you can create a sandwich that is uniquely yours. Enjoy the experience of making and savoring this culinary delight!

Grilled Chicken Panini Sandwich: An Incredible Ultimate Recipe
- Total Time: 2 minute
Ingredients
– 2 boneless, skinless chicken breasts
– 4 slices of ciabatta or focaccia bread
– 4 slices of mozzarella cheese (or cheese of choice)
– 1 medium tomato, sliced
– 1 cup fresh spinach or arugula
– 2 tablespoons olive oil
– 1 teaspoon Italian seasoning
– Salt and pepper to taste
– Optional: balsamic glaze for drizzling
Instructions
Creating the Grilled Chicken Panini Sandwich is a breeze with these simple steps:
1. Preheat your grill or panini press: Set it to medium-high heat to ensure even cooking.
2. Prepare the Chicken: Season the boneless chicken breasts with olive oil, Italian seasoning, salt, and pepper.
3. Grill the Chicken: Place the chicken on the grill or in the panini press. Cook for 6-7 minutes on each side, or until the internal temperature reaches 165°F (75°C).
4. Let it Rest: Once cooked, remove the chicken from the grill and let it rest for a few minutes before slicing it thinly.
5. Assemble the Panini: Take two slices of ciabatta bread. Layer one slice with sliced grilled chicken, mozzarella cheese, tomato slices, and fresh spinach.
6. Top with Bread: Place the second slice of bread on top of the assembled ingredients.
7. Grill the Panini: Brush the outside of the sandwich with a little olive oil. Place the sandwich on the grill or panini press. Grill for about 3-5 minutes, pressing down gently until the bread is golden brown and the cheese is melted.
8. Slice and Serve: Once grilled, remove the panini from the heat. Slice it in half and drizzle with balsamic glaze if desired.
9. Repeat: If you’re making more sandwiches, repeat the process for the remaining ingredients.
10. Enjoy: Serve your delicious Grilled Chicken Panini Sandwich warm, with a side of chips or a fresh salad.
- Prep Time: 15 minutes
- Cook Time: 10-15 minutes
Nutrition
- Serving Size: 2 sandwiches
- Calories: 450 kcal
- Fat: 20g
- Protein: 40g