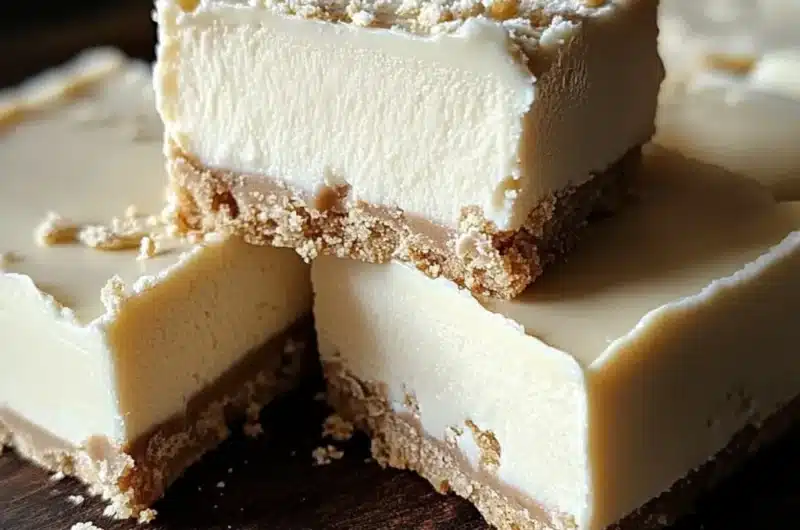
Creamy Cheesecake Fudge – a no-fail sweet treat that will leave your taste buds dancing with delight! This dessert combines the rich, creamy texture of classic cheesecake with the indulgent sweetness of fudge. It’s an amazing treat that is perfect for any occasion, whether you’re celebrating a special event or simply satisfying a craving. The best part? This recipe is simple and requires no baking, making it an accessible dessert for everyone, from novice cooks to seasoned bakers.
Imagine biting into a piece of this luscious fudge, where the flavors of cream cheese and vanilla blend harmoniously, creating a melt-in-your-mouth experience. It’s a dessert that not only looks stunning but also tastes phenomenal. In this article, you’ll discover why this Creamy Cheesecake Fudge is a must-try recipe, how to prepare it, and tips for serving it to impress your family and friends.
If you’ve ever struggled with making cheesecake or are apprehensive about baking, this fudge is your answer. With a few straightforward steps and easy-to-find ingredients, you can whip up a batch that rivals your favorite bakery treats. Let’s dive into what makes this recipe so special and how you can create your own creamy masterpiece!
Why You’ll Love This Recipe
Creamy Cheesecake Fudge brings together elements that make it irresistible. Here are some reasons why you will love making and sharing this recipe:
1. No-Bake Delight: This fudge requires no baking, making it an effortless option for any time of year.
2. Quick to Prepare: With just a few simple steps, you can have a delicious dessert ready in under an hour.
3. Rich and Creamy: The combination of cream cheese and sweetened condensed milk creates an incredibly smooth texture.
4. Versatile Flavors: You can easily customize this fudge by adding chocolate chips, fruit, or nuts.
5. Perfect for Sharing: Cut it into bite-sized pieces to share with friends, family, or coworkers.
6. A Showstopper: Its beautiful appearance makes it a fantastic centerpiece for any dessert table.
With these features, it’s no wonder that Creamy Cheesecake Fudge has become a favorite among dessert lovers everywhere. Each piece is not just a treat; it’s a moment of bliss!
Preparation and Cooking Time
Preparing Creamy Cheesecake Fudge is a breeze and can be done quickly. Here’s a breakdown of the time required:
– Preparation Time: 15 minutes
– Cooling Time: 2 hours (or until set)
In total, you’re looking at approximately 2 hours and 15 minutes from start to finish. This includes the time needed for the fudge to cool and firm up, ensuring that it’s perfectly cut and ready to be enjoyed.
Ingredients
– 8 oz cream cheese, softened
– 1 cup sweetened condensed milk
– 1 cup white chocolate chips
– 1 tablespoon vanilla extract
– 1/4 cup powdered sugar
– A pinch of salt
– Optional: fruit preserves or chocolate chips for topping
Step-by-Step Instructions
Creating Creamy Cheesecake Fudge is simple if you follow these easy steps:
1. Prepare the Pan: Line an 8×8 inch square baking dish with parchment paper, leaving some overhang to help with removal later.
2. Melt the Chocolate: In a microwave-safe bowl, combine white chocolate chips and melt in the microwave in 30-second intervals, stirring in between until smooth.
3. Mix Cream Cheese: In a large mixing bowl, beat the softened cream cheese until smooth and creamy.
4. Add Condensed Milk: Gradually add the sweetened condensed milk to the cream cheese, mixing until fully combined and smooth.
5. Incorporate Vanilla: Stir in the vanilla extract and a pinch of salt to enhance the flavors.
6. Combine Mixtures: Pour the melted white chocolate into the cream cheese mixture and mix until well combined.
7. Add Powdered Sugar: Sift in the powdered sugar and mix until smooth and creamy.
8. Transfer to Pan: Pour the fudge mixture into the prepared baking dish, spreading it evenly with a spatula.
9. Optional Topping: If desired, swirl in fruit preserves or sprinkle chocolate chips on top for added flavor and decoration.
10. Chill: Place the baking dish in the refrigerator for at least 2 hours, or until the fudge is fully set.
11. Cut and Serve: Once set, lift the fudge out of the pan using the parchment paper. Cut it into squares and enjoy!
These steps will guide you in creating this incredible fudge with ease and confidence.
How to Serve
To make the most of your Creamy Cheesecake Fudge, consider these serving suggestions:
1. Presentation: Arrange the fudge squares on a decorative platter or tiered stand for an appealing display.
2. Garnish: Top each piece with a dollop of whipped cream or a drizzle of chocolate sauce for an extra touch of indulgence.
3. Pairing Options: Serve with a side of fresh berries or a scoop of ice cream to balance the sweetness.
4. Gift Idea: Wrap individual pieces in colorful cellophane bags tied with ribbons for a sweet homemade gift.
5. Storing Leftovers: Store any leftovers in an airtight container in the refrigerator for up to a week.
By following these serving tips, you’ll not only enhance the presentation but also create a delightful experience for your guests. Enjoy sharing this delicious Creamy Cheesecake Fudge!
Additional Tips
– Use Quality Ingredients: The flavor of your Creamy Cheesecake Fudge will greatly benefit from using high-quality ingredients, especially the cream cheese and white chocolate. Fresh, full-fat cream cheese yields a creamier texture and better taste.
– Mix Thoroughly: Ensure that each ingredient is mixed well to achieve a smooth and creamy consistency. This step is crucial for a fudge that melts in your mouth.
– Experiment with Flavors: Don’t hesitate to add your favorite extracts or flavorings. Almond extract or a hint of lemon zest can elevate the fudge to new flavor heights.
– Cut with Care: Use a sharp knife to cut the fudge into squares for a clean presentation. Wipe the knife with a damp cloth between cuts for perfectly neat slices.
Recipe Variation
Feel free to customize your Creamy Cheesecake Fudge with these variations:
1. Chocolate Cheesecake Fudge: Substitute half of the white chocolate chips with semi-sweet chocolate chips for a rich chocolate flavor.
2. Berry Swirl Fudge: Incorporate a swirl of raspberry or strawberry preserves into the fudge mixture before chilling it for a fruity twist.
3. Nutty Delight: Add chopped nuts such as walnuts or pecans to the fudge for added texture and flavor.
4. Cookie Crumble Fudge: Sprinkle crushed graham crackers or your favorite cookies on top before chilling to add crunch and a touch of fun.
Freezing and Storage
– Storage: Keep your Creamy Cheesecake Fudge in an airtight container in the refrigerator. It can last up to one week, allowing you to enjoy it slowly.
– Freezing: For longer storage, you can freeze the fudge. Wrap it tightly in plastic wrap and then in aluminum foil. It will stay fresh in the freezer for up to three months.
– Thawing: When ready to enjoy, remove the fudge from the freezer and let it thaw in the refrigerator for several hours before serving.
Special Equipment
While you don’t need any specialized equipment to make Creamy Cheesecake Fudge, having the following tools will make the process easier:
– Microwave-Safe Bowl: For melting the white chocolate conveniently.
– Mixing Bowls: Use these for combining ingredients and mixing the fudge.
– Spatula: A rubber spatula helps in spreading the fudge evenly in the pan.
– Parchment Paper: Essential for lining the baking dish, making the fudge easy to remove.
– Sharp Knife: A good knife is necessary for cutting the fudge into neat squares.
Frequently Asked Questions
Can I use low-fat cream cheese?
While low-fat cream cheese can be used, it may alter the texture and creaminess of the fudge. For the best results, full-fat cream cheese is recommended.
How do you know when the fudge is set?
The fudge is set when it is firm to the touch and holds its shape when cut. If it still feels soft after chilling for two hours, give it more time in the refrigerator.
What if my fudge is too soft?
If your fudge does not set properly, it may need more time in the refrigerator. Alternatively, you can place it in the freezer for a short time to firm up.
Can I add flavors to the fudge?
Absolutely! You can incorporate various flavors, such as different extracts (like almond or coconut) or mix-ins (like chocolate chips or fruit).
Is this recipe gluten-free?
Yes, all the ingredients used in this Creamy Cheesecake Fudge are gluten-free, making it a great option for gluten-sensitive individuals.
Conclusion
Creamy Cheesecake Fudge is a delightful and versatile dessert that appeals to both cheesecake and fudge lovers alike. With its smooth texture and rich flavors, this no-fail sweet treat will surely impress anyone who tries it. Whether you choose to keep it simple or add your own unique twist, this fudge recipe is bound to become a favorite. So, gather your ingredients and prepare to enjoy an indulgent dessert that’s perfect for any occasion!
Creamy Cheesecake Fudge – An Incredible Ultimate Recipe!
- Total Time: 15 minutes
Ingredients
– 8 oz cream cheese, softened
– 1 cup sweetened condensed milk
– 1 cup white chocolate chips
– 1 tablespoon vanilla extract
– 1/4 cup powdered sugar
– A pinch of salt
– Optional: fruit preserves or chocolate chips for topping
Instructions
Creating Creamy Cheesecake Fudge is simple if you follow these easy steps:
1. Prepare the Pan: Line an 8×8 inch square baking dish with parchment paper, leaving some overhang to help with removal later.
2. Melt the Chocolate: In a microwave-safe bowl, combine white chocolate chips and melt in the microwave in 30-second intervals, stirring in between until smooth.
3. Mix Cream Cheese: In a large mixing bowl, beat the softened cream cheese until smooth and creamy.
4. Add Condensed Milk: Gradually add the sweetened condensed milk to the cream cheese, mixing until fully combined and smooth.
5. Incorporate Vanilla: Stir in the vanilla extract and a pinch of salt to enhance the flavors.
6. Combine Mixtures: Pour the melted white chocolate into the cream cheese mixture and mix until well combined.
7. Add Powdered Sugar: Sift in the powdered sugar and mix until smooth and creamy.
8. Transfer to Pan: Pour the fudge mixture into the prepared baking dish, spreading it evenly with a spatula.
9. Optional Topping: If desired, swirl in fruit preserves or sprinkle chocolate chips on top for added flavor and decoration.
10. Chill: Place the baking dish in the refrigerator for at least 2 hours, or until the fudge is fully set.
11. Cut and Serve: Once set, lift the fudge out of the pan using the parchment paper. Cut it into squares and enjoy!
These steps will guide you in creating this incredible fudge with ease and confidence.
- Prep Time: 15 minutes
- Cook Time: 0 minutes
Nutrition
- Serving Size: 16 squares
- Calories: 150 kcal
- Fat: 7g
- Protein: 2g