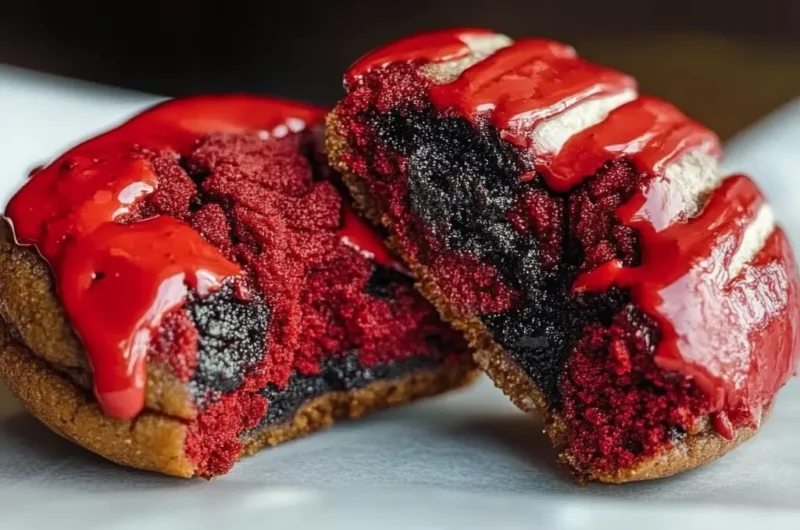
Chewy Red Velvet Oreo Cookies with Gooey Centers are a delightful treat that combines the rich flavors of red velvet with the satisfying crunch of Oreos. These cookies are not just visually stunning; they also boast an amazing taste that will make your taste buds dance with joy. With their vibrant color and luscious filling, these cookies are perfect for any occasion, whether it’s a celebration or just a cozy night in. If you’ve ever craved a cookie that’s both chewy and gooey, then this recipe is for you!
The moment you take a bite of these chewy red velvet Oreo cookies, you’ll be transported to a world of flavor and texture. The soft, red velvet base envelops a creamy center, making each bite an irresistible experience. Whether you’re baking for friends, family, or yourself, these cookies are sure to impress. In this article, we will explore the reasons why you’ll love this recipe, provide you with essential preparation details, and guide you through the step-by-step process to create these incredible cookies.
Let’s dive in and discover how to make Chewy Red Velvet Oreo Cookies with Gooey Centers that will leave everyone asking for more!
Why You’ll Love This Recipe
Chewy Red Velvet Oreo Cookies with Gooey Centers are a must-try for several reasons. Here’s why this recipe stands out:
1. Unique Flavor Combination – The blend of red velvet and Oreo creates a flavor profile that is both nostalgic and exciting.
2. Gooey Center – The creamy center adds an extra layer of indulgence, making these cookies a delightful treat.
3. Visual Appeal – The striking red color of the cookies makes them perfect for festive occasions or just to brighten up your dessert table.
4. Easy to Make – This recipe is straightforward, making it accessible for bakers of all skill levels.
5. Perfect for Sharing – With their delicious taste and beautiful presentation, these cookies are sure to please everyone.
6. Customizable – Feel free to experiment with different fillings or toppings to make them your own.
These factors contribute to why so many people rave about these cookies. Each bite is a celebration of flavor and texture that will leave you wanting more!
Preparation and Cooking Time
Creating Chewy Red Velvet Oreo Cookies with Gooey Centers requires some time, but it’s well worth the effort. Here’s a breakdown of the time needed:
– Preparation Time: 20 minutes
– Cooking Time: 12-15 minutes
– Cooling Time: 10 minutes
– Total Time: Approximately 45 minutes
These times may vary based on your experience and kitchen equipment, but this framework provides a good estimate for your baking adventure.
Ingredients
– 2 cups all-purpose flour
– 1 cup granulated sugar
– 1 cup brown sugar, packed
– ½ cup unsweetened cocoa powder
– 1 teaspoon baking soda
– ½ teaspoon salt
– 1 tablespoon vanilla extract
– 2 large eggs
– 1 cup unsalted butter, softened
– 1 tablespoon red food coloring
– 1 cup crushed Oreo cookies
– 1 cup cream cheese, softened
– ½ cup powdered sugar (for filling)
Step-by-Step Instructions
Making Chewy Red Velvet Oreo Cookies with Gooey Centers is simple and fun. Follow these steps to create your delicious cookies:
1. Preheat Oven: Preheat your oven to 350°F (175°C) and line a baking sheet with parchment paper.
2. Mix Dry Ingredients: In a large bowl, whisk together the flour, cocoa powder, baking soda, and salt until well combined.
3. Cream Butter and Sugars: In another bowl, cream the softened butter, granulated sugar, and brown sugar until light and fluffy.
4. Add Eggs and Flavoring: Beat in the eggs one at a time, mixing in the vanilla extract and red food coloring until fully incorporated.
5. Combine Mixtures: Gradually add the dry ingredients to the wet mixture, stirring until just combined. Be careful not to overmix.
6. Fold in Oreos: Gently fold in the crushed Oreo cookies, ensuring they are evenly distributed throughout the dough.
7. Prepare Filling: In a separate bowl, mix the softened cream cheese and powdered sugar until smooth. Set aside.
8. Form Cookies: Take a spoonful of the cookie dough and flatten it in your palm. Place a small dollop of the cream cheese filling in the center and wrap the dough around it. Roll into a ball and place it on the prepared baking sheet.
9. Bake: Bake the cookies in the preheated oven for 12-15 minutes, or until the edges are set but the centers look slightly underbaked.
10. Cool: Allow the cookies to cool on the baking sheet for 10 minutes before transferring them to a wire rack to cool completely.
By following these steps, you’ll create an incredible batch of Chewy Red Velvet Oreo Cookies with Gooey Centers that are sure to impress!
How to Serve
Serving Chewy Red Velvet Oreo Cookies with Gooey Centers can elevate your dessert experience. Here are some tips for making your presentation memorable:
1. Presentation: Arrange the cookies on a beautiful platter. You can stack them or display them in a single layer for an appealing look.
2. Accompaniments: Pair these cookies with a glass of cold milk, a scoop of vanilla ice cream, or a dollop of whipped cream for added indulgence.
3. Garnish: Consider garnishing with extra crushed Oreos or a drizzle of chocolate sauce to enhance the visual appeal.
4. Occasion: These cookies are perfect for birthdays, holidays, or any gathering, making them a delightful treat to share with friends and family.
5. Storage: If you have leftovers, store them in an airtight container to keep them fresh for several days.
By putting thought into how you serve these cookies, you create a delightful experience for yourself and your guests. Enjoy every gooey, chewy bite!
Additional Tips
– Use Quality Ingredients: For the best flavor, choose high-quality cocoa powder and fresh cream cheese. These will enhance the taste of your cookies.
– Chill the Dough: If you find the cookie dough too sticky, chill it in the refrigerator for about 30 minutes. This makes it easier to handle and shape.
– Add More Fillings: Feel free to mix in extra treats like mini chocolate chips or white chocolate chunks for added sweetness and texture.
– Experiment with Colors: Use different food colorings to create unique shades, making your cookies even more visually appealing for special occasions.
– Serve Warm: These cookies are best enjoyed warm, so consider popping them in the microwave for a few seconds before serving.
Recipe Variation
Feel free to switch things up! Here are a few variations to try:
1. Chocolate Lava Cookies: Add a piece of chocolate candy, like a chocolate truffle, in the center instead of the cream cheese filling for a molten chocolate experience.
2. Nutty Delight: Incorporate chopped pecans or walnuts into the dough for a nutty flavor that complements the red velvet base.
3. Minty Twist: Add some peppermint extract to the filling for a refreshing minty flavor that pairs beautifully with the chocolate.
4. Gluten-Free Option: Substitute the all-purpose flour with a gluten-free flour blend to make these cookies gluten-free without losing flavor.
Freezing and Storage
– Storage: Keep your cookies in an airtight container at room temperature. They can stay fresh for up to one week.
– Freezing: To freeze, place the cookies in a single layer on a baking sheet until solid, then transfer them to a freezer-friendly bag. They can be stored for up to three months. When ready to enjoy, thaw at room temperature or warm in the oven.
Special Equipment
You will need a few essential tools to prepare these cookies successfully:
– Mixing Bowls: For combining your ingredients effectively.
– Electric Mixer: A hand mixer or stand mixer will make creaming the butter and sugars easier.
– Baking Sheet: Ensure you have a good-quality baking sheet lined with parchment paper.
– Cookie Scoop: A cookie scoop helps ensure uniform size for your cookies, making for even baking.
– Parchment Paper: This will prevent the cookies from sticking and make cleanup a breeze.
Frequently Asked Questions
How do I know when the cookies are done baking?
Look for the edges to be set and the centers to look slightly underbaked. They will continue to cook as they cool.
Can I make these cookies ahead of time?
Absolutely! You can prepare the dough and refrigerate it for up to 48 hours before baking. Alternatively, you can bake them ahead and store them.
Is there a dairy-free option?
Yes, you can use dairy-free butter and cream cheese substitutes to make this recipe dairy-free.
Can I use other types of Oreos?
Definitely! Feel free to experiment with different Oreo flavors, such as mint or peanut butter, to create unique variations of these cookies.
What if my cookies spread too much while baking?
Ensure your butter is softened but not melted. If the dough seems too soft, chilling it for a bit before baking can help prevent excessive spreading.
Conclusion
Chewy Red Velvet Oreo Cookies with Gooey Centers are an irresistible treat that combines rich flavors and textures. From their stunning appearance to their delightful taste, they are perfect for any occasion. By following the provided tips and variations, you can customize these cookies to make them your own. Whether you enjoy them fresh out of the oven or share them with friends, these cookies are sure to be a hit!
Chewy Red Velvet Oreo Cookies with Gooey Centers: An Incredible Ultimate Recipe
- Total Time: 54 minute
Ingredients
– 2 cups all-purpose flour
– 1 cup granulated sugar
– 1 cup brown sugar, packed
– ½ cup unsweetened cocoa powder
– 1 teaspoon baking soda
– ½ teaspoon salt
– 1 tablespoon vanilla extract
– 2 large eggs
– 1 cup unsalted butter, softened
– 1 tablespoon red food coloring
– 1 cup crushed Oreo cookies
– 1 cup cream cheese, softened
– ½ cup powdered sugar (for filling)
Instructions
Making Chewy Red Velvet Oreo Cookies with Gooey Centers is simple and fun. Follow these steps to create your delicious cookies:
1. Preheat Oven: Preheat your oven to 350°F (175°C) and line a baking sheet with parchment paper.
2. Mix Dry Ingredients: In a large bowl, whisk together the flour, cocoa powder, baking soda, and salt until well combined.
3. Cream Butter and Sugars: In another bowl, cream the softened butter, granulated sugar, and brown sugar until light and fluffy.
4. Add Eggs and Flavoring: Beat in the eggs one at a time, mixing in the vanilla extract and red food coloring until fully incorporated.
5. Combine Mixtures: Gradually add the dry ingredients to the wet mixture, stirring until just combined. Be careful not to overmix.
6. Fold in Oreos: Gently fold in the crushed Oreo cookies, ensuring they are evenly distributed throughout the dough.
7. Prepare Filling: In a separate bowl, mix the softened cream cheese and powdered sugar until smooth. Set aside.
8. Form Cookies: Take a spoonful of the cookie dough and flatten it in your palm. Place a small dollop of the cream cheese filling in the center and wrap the dough around it. Roll into a ball and place it on the prepared baking sheet.
9. Bake: Bake the cookies in the preheated oven for 12-15 minutes, or until the edges are set but the centers look slightly underbaked.
10. Cool: Allow the cookies to cool on the baking sheet for 10 minutes before transferring them to a wire rack to cool completely.
By following these steps, you’ll create an incredible batch of Chewy Red Velvet Oreo Cookies with Gooey Centers that are sure to impress!
- Prep Time: 20 minutes
- Cook Time: 12-15 minutes
Nutrition
- Serving Size: 24 cookies
- Calories: 150 kcal per cookie
- Fat: 7g
- Protein: 2g