Baked apples are a delightful dessert that captures the essence of fall in every bite. This incredible recipe transforms simple apples into a warm, comforting dish that’s perfect for family gatherings or cozy evenings at home. Imagine the aroma of cinnamon and sugar wafting through your kitchen as the apples bake to perfection, their sweetness bubbling and caramelizing. Each bite offers a mix of tender fruit and crunchy topping, creating a wonderful treat that can be enjoyed on its own or paired with vanilla ice cream.
If you’ve never had baked apples before, you’re in for a treat. They not only taste amazing, but they’re also incredibly easy to make. This recipe is a crowd-pleaser that brings smiles and satisfaction to those who indulge in it. In this article, we’ll explore why this recipe is so special, how to prepare it, and tips for serving it perfectly. Whether you’re a seasoned baker or a beginner, you’ll find that baked apples are a delightful addition to your dessert repertoire.
As the weather cools and the leaves change color, there’s no better time to enjoy the comforting flavors of baked apples. This dish is not just a dessert; it’s a celebration of the season, evoking feelings of nostalgia and warmth. Let’s dive into what makes baked apples a must-try recipe for everyone!
Why You’ll Love This Recipe
Baked apples are cherished for many reasons, and here are some compelling ones that will make you fall in love with this recipe:
1. Simple Ingredients: You likely have most of the ingredients in your kitchen, making it easy to whip up this dessert anytime.
2. Healthy Option: Compared to many desserts, baked apples are a healthier choice, packed with vitamins and fiber.
3. Versatile Recipe: You can customize the filling to suit your taste, whether you prefer nuts, raisins, or different spices.
4. Perfect for Any Occasion: Whether it’s a holiday feast or a casual family dinner, baked apples fit right in.
5. Aromatic and Inviting: The delightful aroma of baking apples and spices fills your home, creating a warm atmosphere.
6. Easy to Follow Instructions: Even novice cooks can easily follow the steps to create a delicious dessert.
With these reasons in mind, it’s clear why baked apples are a beloved choice. Each bite is not only delicious but also brings a sense of comfort and joy that will have everyone asking for seconds.
Preparation and Cooking Time
Creating baked apples is a quick and enjoyable process. Here’s a breakdown of the time you’ll need to prepare this incredible dessert:
– Preparation Time: 15 minutes
– Cooking Time: 30-35 minutes
– Total Time: Approximately 50 minutes
These times may vary slightly based on your experience and kitchen tools, but this framework should give you a solid estimate to work with.
Ingredients
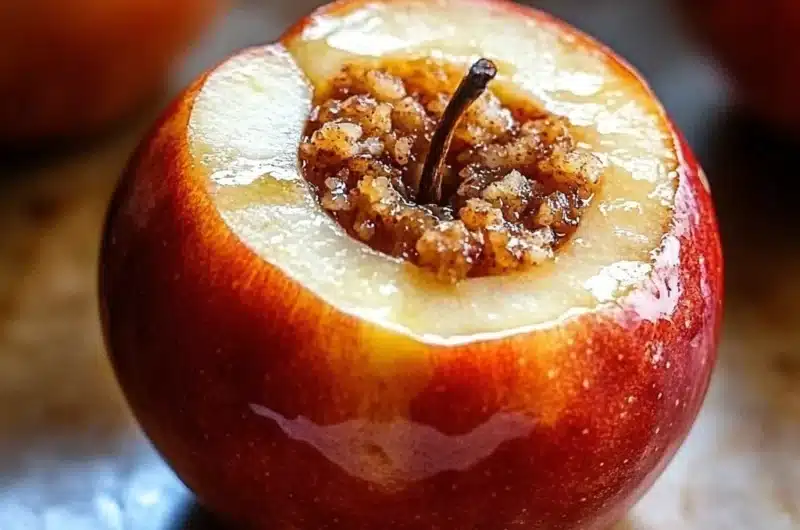
– 4 medium-sized apples (such as Granny Smith or Honeycrisp)
– 1/2 cup brown sugar
– 1/4 cup rolled oats
– 1/4 cup chopped nuts (walnuts or pecans)
– 1 teaspoon ground cinnamon
– 1/4 teaspoon ground nutmeg
– 1/4 cup unsalted butter, melted
– 1/4 cup raisins (optional)
– 1/2 cup apple juice or water (for baking)
Step-by-Step Instructions
Making baked apples is a simple process that can be broken down into a few easy steps:
1. Preheat the Oven: Preheat your oven to 350°F (175°C).
2. Prepare the Apples: Core the apples, creating a hollow center, but be careful not to pierce the bottom.
3. Make the Filling: In a bowl, combine brown sugar, rolled oats, chopped nuts, ground cinnamon, ground nutmeg, melted butter, and raisins (if using). Mix until well combined.
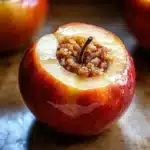
4. Fill the Apples: Spoon the filling mixture into the cavity of each apple, packing it tightly.
5. Place in Baking Dish: Arrange the filled apples in a baking dish. Pour the apple juice or water into the bottom of the dish to help steam the apples.
6. Bake: Cover the dish with aluminum foil and bake for 20 minutes. Remove the foil and bake for an additional 10-15 minutes, or until the apples are tender.
7. Check for Doneness: The apples are done when they are soft but still hold their shape. You can test this by gently poking them with a fork.
8. Serve Warm: Remove from the oven and let them cool slightly before serving.
These steps will guide you in creating delicious baked apples that will impress everyone at your table.
How to Serve
To elevate your baked apples experience, consider the following serving suggestions:
1. Presentation: Serve the baked apples in the baking dish or transfer them to individual serving bowls for an elegant touch.
2. Toppings: Drizzle with caramel sauce or a dollop of whipped cream for added decadence. A scoop of vanilla ice cream also pairs perfectly.
3. Garnish: Sprinkle with additional cinnamon or a few fresh mint leaves for a pop of color.
4. Beverage Pairing: Serve with a warm cup of spiced cider or a robust coffee to complement the flavors of the dish.
By considering these tips, you’ll create a memorable experience for your guests, making baked apples a highlight of your meal!
Additional Tips
– Use Fresh Apples: For the best flavor and texture, choose fresh, firm apples. They hold up better during baking.
– Experiment with Spices: Feel free to add other spices like ginger or allspice to the filling for a unique twist.
– Serve with Toppings: Don’t hesitate to top your baked apples with yogurt, ice cream, or even a drizzle of honey for added flavor.
Recipe Variation
There are countless ways to customize baked apples to suit your taste. Here are a few ideas:
1. Chocolate Lovers: Add chocolate chips to the filling for a decadent twist.
2. Crispy Topping: Use crushed graham crackers or a shortbread cookie crumble instead of oats for a different texture.
3. Maple Flavor: Substitute maple syrup for brown sugar in the filling for a rich, maple-infused flavor.
4. Add Citrus: Incorporate orange or lemon zest into the filling for a refreshing citrus note.
Freezing and Storage
– Storage: Baked apples can be stored in an airtight container in the refrigerator for up to 3-5 days.
– Freezing: You can freeze baked apples for up to 3 months. To do this, let them cool completely, then place them in a freezer-safe container. Thaw them in the refrigerator before reheating.
Special Equipment
You won’t need much in terms of special equipment, but having these items will make your baking experience smoother:
– Baking Dish: A 9×13 inch baking dish works well for this recipe.
– Apple Corer: This tool makes it easier to hollow out the apples without damaging them.
– Mixing Bowls: A couple of medium-sized bowls will help you mix your filling ingredients efficiently.
– Oven Mitts: Don’t forget a good pair of oven mitts to handle hot dishes safely!
Frequently Asked Questions
Can I use different types of apples?
Yes, you can use any variety of apples you prefer. Just ensure they are firm enough to hold their shape while baking.
How do I know when the apples are done?
The apples are done when they are soft to the touch but still hold their shape. A fork should easily pierce through, but they shouldn’t be mushy.
Is this recipe gluten-free?
You can make this recipe gluten-free by using gluten-free oats and ensuring that all other ingredients are certified gluten-free.
Can I prepare the filling in advance?
Absolutely! You can prepare the filling a day ahead and store it in the refrigerator until you’re ready to bake.
What can I do with leftovers?
Leftover baked apples can be used as a topping for pancakes, waffles, or yogurt. They also make a lovely addition to oatmeal.
Conclusion
Baked apples are a wonderful dessert that brings warmth and comfort to any occasion. Their delightful flavor, combined with the ease of preparation, makes them a favorite for both seasoned bakers and kitchen novices alike. With the ability to customize the filling and serve them in a variety of ways, baked apples are sure to impress. Whether you enjoy them on a chilly fall evening or as a sweet ending to a family meal, these delightful treats are bound to become a staple in your dessert repertoire.
Baked Apples: An Amazing Ultimate Recipe for Fall
- Total Time: 15 minute
Ingredients
– 4 medium-sized apples (such as Granny Smith or Honeycrisp)
– 1/2 cup brown sugar
– 1/4 cup rolled oats
– 1/4 cup chopped nuts (walnuts or pecans)
– 1 teaspoon ground cinnamon
– 1/4 teaspoon ground nutmeg
– 1/4 cup unsalted butter, melted
– 1/4 cup raisins (optional)
– 1/2 cup apple juice or water (for baking)
Instructions
Making baked apples is a simple process that can be broken down into a few easy steps:
1. Preheat the Oven: Preheat your oven to 350°F (175°C).
2. Prepare the Apples: Core the apples, creating a hollow center, but be careful not to pierce the bottom.
3. Make the Filling: In a bowl, combine brown sugar, rolled oats, chopped nuts, ground cinnamon, ground nutmeg, melted butter, and raisins (if using). Mix until well combined.
4. Fill the Apples: Spoon the filling mixture into the cavity of each apple, packing it tightly.
5. Place in Baking Dish: Arrange the filled apples in a baking dish. Pour the apple juice or water into the bottom of the dish to help steam the apples.
6. Bake: Cover the dish with aluminum foil and bake for 20 minutes. Remove the foil and bake for an additional 10-15 minutes, or until the apples are tender.
7. Check for Doneness: The apples are done when they are soft but still hold their shape. You can test this by gently poking them with a fork.
8. Serve Warm: Remove from the oven and let them cool slightly before serving.
These steps will guide you in creating delicious baked apples that will impress everyone at your table.
- Prep Time: 15 minutes
- Cook Time: 30-35 minutes
Nutrition
- Serving Size: 4
- Calories: 210 kcal
- Fat: 10g
- Protein: 1g