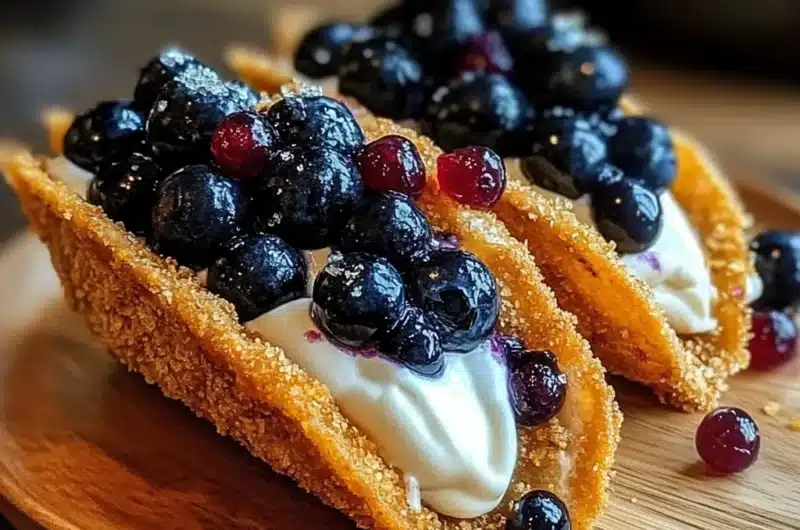
Blueberry Cheesecake Taco Shells are an amazing twist on traditional desserts that will leave your taste buds dancing with joy. Imagine a delightful blend of creamy cheesecake filling nestled in a crispy taco shell, topped with sweet blueberries. This dessert is not just a treat; it’s an experience that will impress anyone lucky enough to taste it. Whether you’re hosting a party, celebrating a special occasion, or simply indulging yourself, these taco shells bring a unique flair to your dessert table.
The moment you take your first bite of Blueberry Cheesecake Taco Shells, you’ll understand why they are quickly becoming a favorite among dessert lovers. The combination of textures—crunchy taco shell and smooth cheesecake—creates an incredible harmony that is both satisfying and delicious. This recipe is perfect for anyone who loves cheesecake but craves something a little different. In this guide, you’ll discover the reasons to love this recipe, how to make it, and tips for serving it perfectly.
Let’s dive into what makes Blueberry Cheesecake Taco Shells a must-try dessert that will have everyone asking for seconds!
Why You’ll Love This Recipe
There are many reasons why Blueberry Cheesecake Taco Shells should be on your dessert radar. Here are just a few:
1. Unique Flavor Combination: The sweet and tangy blueberries combined with creamy cheesecake create a flavor explosion.
2. Fun Presentation: The taco shell shape adds a playful element that makes these desserts visually appealing.
3. Easy to Make: With straightforward instructions, even novice bakers can create this dessert with ease.
4. Versatile Filling Options: While this recipe focuses on blueberries, you can easily substitute with other fruits or toppings.
5. Perfect for Any Occasion: These taco shells are suitable for birthdays, potlucks, and casual family dinners.
6. Impressive to Guests: The unique presentation and flavors will wow your friends and family.
With these enticing factors, it’s clear why Blueberry Cheesecake Taco Shells are a fantastic addition to your dessert repertoire!
Preparation and Cooking Time
Creating Blueberry Cheesecake Taco Shells is a delightful process that will take approximately 1 hour and 30 minutes. Here’s a breakdown of the time involved:
– Preparation Time: 30 minutes
– Cooking Time: 20 minutes
– Cooling Time: 30 minutes
– Assembly Time: 10 minutes
These times may vary slightly depending on your kitchen experience and equipment, but this schedule provides a solid framework for your cooking adventure.
Ingredients
– 1 cup all-purpose flour
– 1/4 cup granulated sugar
– 1/4 teaspoon salt
– 1/4 cup unsalted butter, melted
– 1 large egg
– 1/4 teaspoon vanilla extract
– 1 cup cream cheese, softened
– 1/2 cup powdered sugar
– 1 teaspoon lemon juice
– 1 teaspoon vanilla extract (for cheesecake filling)
– 1 cup fresh blueberries
– Optional: Whipped cream for topping
Step-by-Step Instructions
Creating Blueberry Cheesecake Taco Shells is simple if you follow these clear steps:
1. Preheat the Oven: Start by preheating your oven to 350°F (175°C).
2. Prepare Taco Shells: In a mixing bowl, combine flour, granulated sugar, and salt. Add melted butter, egg, and 1/4 teaspoon vanilla extract. Mix until a dough forms.
3. Shape the Shells: Roll the dough into small balls. Press each ball into a taco shape using a taco mold or your hands. Place the shaped dough on a baking sheet lined with parchment paper.
4. Bake the Shells: Bake in the preheated oven for 10-12 minutes or until golden brown. Remove from the oven and let them cool completely.
5. Make the Cheesecake Filling: In another bowl, beat the softened cream cheese until smooth. Gradually add powdered sugar, lemon juice, and 1 teaspoon vanilla extract. Mix until creamy and well combined.
6. Fill the Taco Shells: Once the taco shells have cooled, fill each shell with the cheesecake mixture using a piping bag or spoon.
7. Top with Blueberries: Generously top each filled taco shell with fresh blueberries.
8. Chill: Refrigerate the assembled taco shells for at least 30 minutes to set the filling.
9. Serve: If desired, top with whipped cream before serving for an extra touch of indulgence.
By following these steps, you’ll create an incredible dessert that is sure to impress!
How to Serve
Serving Blueberry Cheesecake Taco Shells can enhance the experience for your guests. Here are some tips to consider:
1. Presentation: Arrange the filled taco shells on a beautiful platter. Consider garnishing with additional blueberries or mint leaves for a pop of color.
2. Accompaniments: Serve with whipped cream or a drizzle of chocolate or caramel sauce for added flavor.
3. Portion Sizes: Since these taco shells are small and fun, consider serving several per person to encourage tasting and sharing.
4. Beverage Pairing: Pair with a refreshing beverage like lemonade, iced tea, or a light dessert wine to complement the flavors.
With these serving suggestions, you can ensure that your Blueberry Cheesecake Taco Shells are not only delicious but also visually appealing and enjoyable for your guests!
Additional Tips
– Use Fresh Blueberries: Opt for fresh blueberries for the best flavor and texture. Frozen berries can be used but may release more moisture.
– Experiment with Flavors: Don’t hesitate to add a hint of almond extract or a sprinkle of cinnamon to the cheesecake filling for a unique twist.
– Serve Immediately: For the best texture, serve the Blueberry Cheesecake Taco Shells soon after assembling. This keeps the shells crispy.
– Garnish Creatively: Consider garnishing with lemon zest or a mint leaf for a pop of color and freshness.
Recipe Variation
Feel free to get creative with your Blueberry Cheesecake Taco Shells! Here are some variations to try:
1. Mixed Berry Delight: Substitute blueberries with a mix of strawberries, raspberries, and blackberries for a colorful and fruity dessert.
2. Chocolate Drizzle: Drizzle melted chocolate over the assembled taco shells for a richer dessert experience.
3. Nutty Crunch: Add crushed nuts like pecans or almonds on top of the cheesecake filling for added texture.
4. Lemon Cheesecake Filling: Replace the blueberries with lemon curd for a zesty twist on the classic cheesecake flavor.
Freezing and Storage
– Storage: Store any leftover taco shells in an airtight container at room temperature for up to 2 days. The filled shells are best enjoyed fresh.
– Freezing: If you want to freeze the taco shells, do so before filling them. Place the cooled taco shells in a freezer-safe bag, and they can be stored for up to 3 months. When ready to use, simply thaw and fill with the cheesecake mixture.
Special Equipment
To create Blueberry Cheesecake Taco Shells, you will need a few essential tools:
– Mixing bowls for preparing the dough and filling
– Taco shell molds for shaping the shells (optional but helpful)
– Piping bag or plastic bag with the corner snipped off for filling the tacos
– Baking sheet lined with parchment paper to prevent sticking
Frequently Asked Questions
Can I use other fruits besides blueberries?
Yes, you can substitute blueberries with your favorite fruits, such as strawberries, peaches, or cherries.
Is this recipe gluten-free?
To make it gluten-free, use a gluten-free flour blend in place of all-purpose flour.
How can I make the taco shells crispier?
For crispier shells, bake a little longer, keeping a close eye to prevent burning.
Can I make the cheesecake filling in advance?
Yes, you can prepare the cheesecake filling a day in advance. Just store it in the refrigerator until you are ready to assemble.
Are there any dairy-free options available?
To make this recipe dairy-free, substitute cream cheese with a dairy-free cream cheese alternative and ensure your toppings are also dairy-free.
Conclusion
Blueberry Cheesecake Taco Shells are a delightful and innovative dessert that combines the classic flavors of cheesecake with the fun shape of a taco. Their unique presentation and delicious taste will surely impress your guests. Whether for a special occasion or a casual gathering, these treats are sure to be a hit!

Blueberry Cheesecake Taco Shells: An Incredible Ultimate Recipe
- Total Time: 35 minutes
Ingredients
– 1 cup all-purpose flour
– 1/4 cup granulated sugar
– 1/4 teaspoon salt
– 1/4 cup unsalted butter, melted
– 1 large egg
– 1/4 teaspoon vanilla extract
– 1 cup cream cheese, softened
– 1/2 cup powdered sugar
– 1 teaspoon lemon juice
– 1 teaspoon vanilla extract (for cheesecake filling)
– 1 cup fresh blueberries
– Optional: Whipped cream for topping
Instructions
Creating Blueberry Cheesecake Taco Shells is simple if you follow these clear steps:
1. Preheat the Oven: Start by preheating your oven to 350°F (175°C).
2. Prepare Taco Shells: In a mixing bowl, combine flour, granulated sugar, and salt. Add melted butter, egg, and 1/4 teaspoon vanilla extract. Mix until a dough forms.
3. Shape the Shells: Roll the dough into small balls. Press each ball into a taco shape using a taco mold or your hands. Place the shaped dough on a baking sheet lined with parchment paper.
4. Bake the Shells: Bake in the preheated oven for 10-12 minutes or until golden brown. Remove from the oven and let them cool completely.
5. Make the Cheesecake Filling: In another bowl, beat the softened cream cheese until smooth. Gradually add powdered sugar, lemon juice, and 1 teaspoon vanilla extract. Mix until creamy and well combined.
6. Fill the Taco Shells: Once the taco shells have cooled, fill each shell with the cheesecake mixture using a piping bag or spoon.
7. Top with Blueberries: Generously top each filled taco shell with fresh blueberries.
8. Chill: Refrigerate the assembled taco shells for at least 30 minutes to set the filling.
9. Serve: If desired, top with whipped cream before serving for an extra touch of indulgence.
By following these steps, you’ll create an incredible dessert that is sure to impress!
- Prep Time: 15 minutes
- Cook Time: 20 minutes
Nutrition
- Serving Size: 12 taco shells
- Calories: 220 kcal
- Fat: 9g
- Protein: 3g