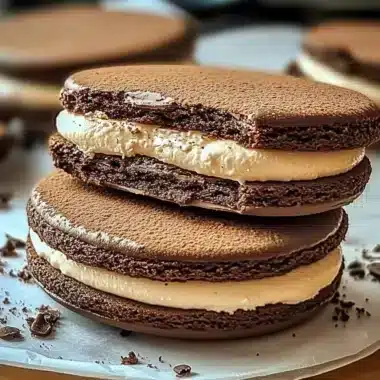
Oreo Truffles are a delightful treat that combines the beloved flavors of Oreo cookies with rich chocolate. These indulgent bites are a hit at parties and gatherings, making them an amazing dessert option for any occasion. If you’re a chocolate lover, you’ll find that these truffles offer a perfect blend of creamy filling and chocolate coating that is hard to resist. With just a few simple ingredients, you can create these delicious morsels that will surely impress your friends and family.
Imagine sinking your teeth into a rich, chocolatey truffle that melts in your mouth. The combination of the crunchy Oreo cookie and smooth cream cheese filling creates a flavor explosion that is nothing short of wonderful. Whether you’re celebrating a birthday, hosting a holiday party, or simply craving something sweet, Oreo Truffles are an excellent choice that will leave everyone wanting more.
In this guide, we will explore why you’ll love this recipe, the preparation and cooking times, a complete list of ingredients, and detailed step-by-step instructions. By the end of this article, you’ll be well-equipped to create these incredible treats in your kitchen. Let’s dive in!
Why You’ll Love This Recipe
Oreo Truffles are not just delicious; they are also incredibly easy to make. Here are some reasons why this recipe stands out:
1. Minimal Ingredients: You only need three main ingredients, making it a straightforward recipe.
2. No Baking Required: Unlike many desserts, these truffles require no baking, saving you time and effort.
3. Versatile Flavor Options: You can customize the truffles with various coatings or toppings, such as sprinkles or crushed nuts.
4. Perfect for Any Occasion: Whether it’s a birthday party, holiday celebration, or a simple treat for yourself, Oreo Truffles fit any event.
5. Impressive Presentation: They look elegant and are perfect for gifting or serving at gatherings.
6. Kid-Friendly Fun: Making these truffles can be a fun activity to do with kids, allowing them to get creative with coating designs.
With these appealing factors, it’s easy to see why Oreo Truffles are a crowd-pleaser. Each bite promises a delightful mix of flavors and textures that will leave you craving more!
Preparation and Cooking Time
Making Oreo Truffles requires minimal time but results in maximum satisfaction. Here’s a breakdown of the time you’ll need:
– Preparation Time: 20 minutes
– Chilling Time: 30 minutes
– Total Time: 50 minutes
This quick preparation time makes it feasible to whip up a batch of Oreo Truffles even on a busy day. Just set aside a little time, and you’ll have a treat that everyone will love.
Ingredients
– 1 package (15.35 oz) Oreo cookies
– 8 oz cream cheese, softened
– 2 cups semi-sweet chocolate chips
– Optional toppings: crushed Oreos, sprinkles, or cocoa powder
Step-by-Step Instructions
Creating Oreo Truffles is simple and requires just a few steps. Follow these instructions to make your own delicious truffles:
1. Crush the Oreos: Place the Oreo cookies in a food processor and pulse until they are fine crumbs. If you don’t have a food processor, you can place them in a zip-top bag and crush them with a rolling pin.
2. Mix with Cream Cheese: In a large mixing bowl, combine the crushed Oreos with softened cream cheese. Mix until well blended and smooth.
3. Form the Balls: Using a small cookie scoop or your hands, form the Oreo mixture into small balls, about 1 inch in diameter. Place them on a baking sheet lined with parchment paper.
4. Chill the Truffles: Place the baking sheet in the refrigerator for about 30 minutes, allowing the truffles to firm up.
5. Melt the Chocolate: While the truffles chill, melt the semi-sweet chocolate chips in a microwave-safe bowl. Heat in 30-second intervals, stirring in between until completely melted and smooth.
6. Coat the Truffles: Remove the chilled truffles from the refrigerator. Dip each truffle into the melted chocolate, using a fork to lift and let excess chocolate drip off. Place the coated truffles back on the parchment-lined baking sheet.
7. Add Toppings: If desired, sprinkle crushed Oreos, sprinkles, or cocoa powder on top of the chocolate-coated truffles before the chocolate sets.
8. Chill Again: Once all truffles are coated, place the baking sheet back in the refrigerator for another 15-30 minutes to let the chocolate harden.
9. Serve: Once the chocolate has set, your Oreo Truffles are ready to be enjoyed!
How to Serve
When it comes to serving Oreo Truffles, consider these tips to create an impressive presentation:
1. Decorative Platter: Arrange the truffles on a decorative platter or cake stand to elevate their appearance.
2. Gift Packaging: Place them in a decorative box or jar if you plan to give them as gifts. Add a ribbon for a personal touch.
3. Flavor Variety: Make different varieties by coating some in white chocolate or adding flavorings like peppermint extract to the cream cheese mixture.
4. Pairing Options: Serve with coffee or milk for a delightful pairing that complements the rich flavors of the truffles.
5. Storage: Store any leftovers in an airtight container in the refrigerator for up to a week, though they’re unlikely to last that long!
By following these serving suggestions, you can enhance the experience of enjoying Oreo Truffles, making them a memorable treat for you and your guests. Enjoy creating and sharing these incredible delights!
Additional Tips
– Use High-Quality Chocolate: For a more decadent flavor, opt for premium semi-sweet chocolate chips when coating your truffles.
– Experiment with Flavors: Feel free to add flavored extracts, like vanilla or almond, to the cream cheese mixture for a unique twist.
– Ensure Cream Cheese is Softened: Make sure your cream cheese is at room temperature for a smooth and easy blend with the Oreo crumbs.
– Use a Fork to Dip: To achieve a smooth coating, use a fork to dip each truffle into the melted chocolate and shake gently to remove excess.
– Keep Them Cool: Store your Oreo Truffles in the refrigerator to maintain their firmness and flavor.
Recipe Variation
You can easily customize Oreo Truffles to suit your taste! Here are a few fun variations:
1. Mint Oreo Truffles: Use Mint Oreo cookies instead of regular Oreos for a refreshing twist.
2. White Chocolate Coating: Swap semi-sweet chocolate for white chocolate for a sweeter flavor profile.
3. Peanut Butter Oreo Truffles: Mix in a tablespoon of peanut butter with the cream cheese for a delightful peanut butter flavor.
4. Coconut Oreo Truffles: Roll the finished truffles in shredded coconut for a tropical flair.
5. Fruity Additions: Incorporate crushed freeze-dried strawberries or raspberries for a fruity element.
Freezing and Storage
– Storage: Keep Oreo Truffles in an airtight container in the refrigerator. They can last for up to one week.
– Freezing: For longer storage, you can freeze the truffles. Place them in a single layer on a baking sheet until frozen, then transfer to a freezer-safe container. They can be frozen for up to three months. Thaw in the refrigerator before serving.
Special Equipment
To create these delightful Oreo Truffles, you will need the following equipment:
– Food processor or zip-top bag and rolling pin for crushing Oreos
– Large mixing bowl for combining ingredients
– Baking sheet lined with parchment paper for chilling
– Microwave-safe bowl for melting chocolate
– Fork for dipping and coating truffles
Frequently Asked Questions
Can I use a different type of cookie?
Yes! While Oreos are traditional, feel free to experiment with other chocolate sandwich cookies or even vanilla cookies.
How do I know when the chocolate coating is set?
The chocolate should be firm and not sticky to the touch. You can place them in the fridge to speed up the setting process.
Can I make these truffles ahead of time?
Absolutely! Oreo Truffles can be made a few days in advance and stored in the refrigerator until you are ready to serve.
What can I do with leftover truffles?
If you have any leftovers, they make a great snack or dessert for later. Just store them properly!
How do I make them more festive?
Add colorful sprinkles or themed toppings to match the occasion, such as red and green for Christmas or pastel colors for Easter.
Conclusion
Oreo Truffles are the ultimate indulgence for chocolate lovers everywhere. With their simple preparation and delightful flavors, these truffles make a fantastic treat for any gathering or a sweet snack for yourself. Whether you stick to the classic version or try one of the exciting variations, these treats are sure to impress. So gather your ingredients and get ready to create a batch of these irresistible Oreo Truffles!

Oreo Truffles: An Incredible Ultimate Recipe for Chocolate Lovers
- Total Time: 20 minutes
Ingredients
– 1 package (15.35 oz) Oreo cookies
– 8 oz cream cheese, softened
– 2 cups semi-sweet chocolate chips
– Optional toppings: crushed Oreos, sprinkles, or cocoa powder
Instructions
Creating Oreo Truffles is simple and requires just a few steps. Follow these instructions to make your own delicious truffles:
1. Crush the Oreos: Place the Oreo cookies in a food processor and pulse until they are fine crumbs. If you don’t have a food processor, you can place them in a zip-top bag and crush them with a rolling pin.
2. Mix with Cream Cheese: In a large mixing bowl, combine the crushed Oreos with softened cream cheese. Mix until well blended and smooth.
3. Form the Balls: Using a small cookie scoop or your hands, form the Oreo mixture into small balls, about 1 inch in diameter. Place them on a baking sheet lined with parchment paper.
4. Chill the Truffles: Place the baking sheet in the refrigerator for about 30 minutes, allowing the truffles to firm up.
5. Melt the Chocolate: While the truffles chill, melt the semi-sweet chocolate chips in a microwave-safe bowl. Heat in 30-second intervals, stirring in between until completely melted and smooth.
6. Coat the Truffles: Remove the chilled truffles from the refrigerator. Dip each truffle into the melted chocolate, using a fork to lift and let excess chocolate drip off. Place the coated truffles back on the parchment-lined baking sheet.
7. Add Toppings: If desired, sprinkle crushed Oreos, sprinkles, or cocoa powder on top of the chocolate-coated truffles before the chocolate sets.
8. Chill Again: Once all truffles are coated, place the baking sheet back in the refrigerator for another 15-30 minutes to let the chocolate harden.
9. Serve: Once the chocolate has set, your Oreo Truffles are ready to be enjoyed!
- Prep Time: 20 minutes
- Cook Time: 0 minutes
Nutrition
- Serving Size: 24 truffles
- Calories: 150 kcal
- Fat: 8g
- Protein: 2g