Apple Crisp Cheesecake is the ultimate fall dessert delight that combines two beloved treats into one. The crispiness of apple crumble marries beautifully with the rich, creamy cheesecake, creating an explosion of flavors that is simply amazing. This fusion not only tastes incredible but also looks stunning on any dessert table, making it perfect for your autumn gatherings or cozy family dinners.
Imagine slicing into a rich, velvety cheesecake topped with warm, spiced apples and a crunchy crumble topping. This dessert evokes the nostalgia of fall, with its cozy scents of cinnamon, nutmeg, and caramelized apples filling your kitchen. Apple Crisp Cheesecake invites you to indulge in the best of both worlds, and it’s an experience that will leave everyone asking for seconds.
Throughout this guide, we will explore why this recipe stands out, the ingredients you’ll need, the preparation steps, and how to serve this delightful dessert alongside your favorite holiday fare. Whether you are a baking novice or a seasoned pro, this incredible Apple Crisp Cheesecake will surely become a family favorite.
Why You’ll Love This Recipe
Apple Crisp Cheesecake is more than just a dessert; it’s an experience full of warmth and flavor. Here’s why you’ll fall in love with making and enjoying this delightful treat:
1. Irresistible Flavor Combination: The marriage of creamy cheesecake and crunchy apple crisp is a match made in heaven.
2. Seasonal Ingredients: The use of fresh apples and warm spices captures the essence of fall.
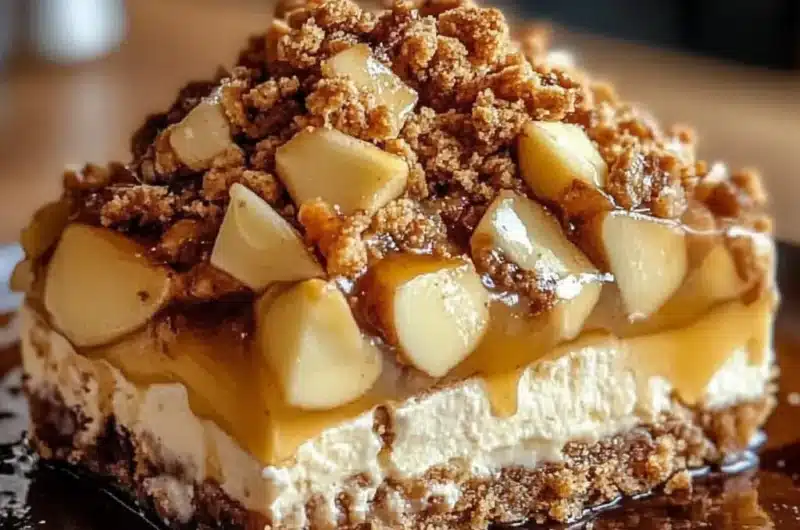
3. Visually Stunning: The layers of gooey apples and golden crumble add a beautiful touch to your dessert table.
4. Perfect for Any Occasion: Whether for Thanksgiving, Christmas, or a cozy gathering, this dessert fits the bill.
5. Easy to Follow Steps: Even if you’re not an experienced baker, the simple instructions make it a breeze to whip up.
6. Customizable: You can easily adjust the spices or sweetness to fit your personal taste.
With every bite of this wonderful dessert, you will be reminded of the comforting flavors that fall brings, making it an essential addition to your baking repertoire.
Preparation and Cooking Time
Creating this Apple Crisp Cheesecake will take approximately 2 hours from start to finish. Here’s a breakdown of the timing:
– Preparation Time: 30 minutes
– Cooking Time: 50–60 minutes
– Cooling Time: 30–45 minutes
This estimate ensures you can plan accordingly, and remember that patience pays off, especially when it comes to desserts like this one.
Ingredients
– For the Cheesecake Layer:
– 16 oz cream cheese, softened
– 1 cup granulated sugar
– 1 cup sour cream
– 3 large eggs
– 1 teaspoon vanilla extract
– 1 tablespoon lemon juice
– For the Apple Filling:
– 4 medium apples, peeled, cored, and sliced
– ½ cup brown sugar
– 1 tablespoon cinnamon
– 1 tablespoon lemon juice
– 1 tablespoon cornstarch
– For the Crisp Topping:
– 1 cup old-fashioned oats
– 1 cup all-purpose flour
– ½ cup brown sugar
– ½ teaspoon cinnamon
– 1/2 cup unsalted butter, melted
– A pinch of salt
Step-by-Step Instructions
Making Apple Crisp Cheesecake involves several straightforward steps. Here’s how to do it:
1. Preheat the Oven: Start by preheating your oven to 325°F (160°C). Prepare a 9-inch springform pan by greasing it lightly.
2. Prepare the Apple Filling:
– In a large bowl, combine the sliced apples with brown sugar, cinnamon, lemon juice, and cornstarch. Toss until well mixed, then set aside.
3. Make the Cheesecake Layer:
– In a mixing bowl, beat the softened cream cheese with granulated sugar until smooth.
– Add in sour cream, eggs (one at a time), vanilla extract, and lemon juice. Mix until the batter is completely smooth and creamy.
4. Combine the Layers:
– Pour half of the cheesecake batter into the prepared springform pan.
– Top with all of the apple filling, spreading it evenly.
– Carefully pour the remaining cheesecake batter over the apple layer.
5. Prepare the Crisp Topping:
– In a separate bowl, mix together the oats, flour, brown sugar, cinnamon, and salt.
– Pour the melted butter over the mixture and stir until crumbly.
6. Add the Topping: Sprinkle the crisp topping evenly over the cheesecake.
7. Bake: Place the cheesecake in the preheated oven and bake for 50 to 60 minutes until the center is set but still jiggly.
8. Cool: Remove the cheesecake from the oven and let it cool at room temperature for about 30 minutes. Then, transfer it to the refrigerator and chill for at least 2 hours, preferably overnight.
9. Serve: Once chilled, carefully remove the sides of the springform pan. Slice and serve with whipped cream or vanilla ice cream, if desired.
How to Serve
When it comes to serving your Apple Crisp Cheesecake, consider the following tips to make it a memorable experience:
1. Presentation: Use a beautiful cake stand to elevate the appearance of your cheesecake. A drizzle of caramel sauce on top adds a touch of elegance.
2. Accompaniments: Offer whipped cream, vanilla ice cream, or a sprinkle of chopped nuts for added texture and flavor.
3. Slice Size: Serve generous slices that allow your guests to truly enjoy the rich cheesecake and crunchy topping.
4. Beverage Pairings: A warm cup of spiced cider or a glass of sweet dessert wine pairs wonderfully with this cheesecake.
By taking a little extra time in your presentation and pairings, you will enhance the overall enjoyment of this delightful Apple Crisp Cheesecake, leaving your guests enchanted by this ultimate fall dessert!
Additional Tips
– Use Fresh Apples: For the best flavor, opt for fresh, crisp apples such as Granny Smith or Honeycrisp. These varieties hold their shape well and provide a nice contrast to the creamy cheesecake.
– Don’t Skimp on Spices: The warm spices like cinnamon and nutmeg not only enhance the flavor but also create that cozy aroma typical of fall. Adjust them according to your taste preference.
– Allow for Proper Cooling: Make sure to let the cheesecake cool completely, as this helps to firm up the texture and make it easier to slice.
– Garnish Thoughtfully: A sprinkle of cinnamon or a drizzle of caramel sauce can elevate the presentation and flavor profile of the cheesecake even further.
Recipe Variation
Feel free to get creative with your Apple Crisp Cheesecake! Here are some variations to try:
1. Caramel Apple Version: Add a layer of caramel sauce over the apple filling for an indulgent twist. This adds sweetness and decadence to each slice.
2. Nutty Crunch: Incorporate chopped nuts, such as walnuts or pecans, into the crisp topping for added flavor and crunch.
3. Cheesecake Flavor Swaps: Experiment with different flavors of cheesecake by adding pumpkin puree for a seasonal twist or chocolate chips for richness.
4. Maple Pecan: Replace brown sugar with pure maple syrup in the apple filling and topping for a unique flavor profile reminiscent of maple pecan pie.
Freezing and Storage
– Storage: Keep the Apple Crisp Cheesecake covered in the refrigerator. Properly stored, it will last about 5-7 days.
– Freezing: You can freeze the cheesecake for up to 3 months. To do this, wrap it tightly in plastic wrap and aluminum foil to prevent freezer burn. Thaw it in the refrigerator overnight before serving.
Special Equipment
To achieve the best results when making Apple Crisp Cheesecake, you will need a few essential tools:
– Mixing Bowls: A medium and large mixing bowl for the cheesecake and apple filling.
– Electric Mixer: For beating the cream cheese until smooth and creamy.
– 9-Inch Springform Pan: Essential for easy removal of the cheesecake once it’s set.
– Measuring Cups and Spoons: Accurate measurements are crucial for the success of this recipe.
– Spatula: Helpful for spreading the cheesecake mixture and apple filling evenly.
Frequently Asked Questions
Can I use frozen apples?
While fresh apples are recommended for the best texture, you can use thawed frozen apples in a pinch. Be sure to drain any excess moisture before using them.
What can I do if my cheesecake cracks?
If your cheesecake cracks while baking, it’s often due to sudden temperature changes. To minimize this, ensure you gradually cool the cheesecake after baking and avoid opening the oven door frequently.
How can I tell when my cheesecake is done?
The cheesecake is done when the edges are set, and the center has a slight jiggle. It will continue to firm up as it cools.
Is this recipe suitable for gluten-free diets?
Yes! You can easily make the recipe gluten-free by substituting all-purpose flour with a 1:1 gluten-free flour blend in the crisp topping.
Can I make this cheesecake in advance?
Absolutely! Preparing it the day before allows the flavors to meld together beautifully, enhancing the overall taste.
Conclusion
Apple Crisp Cheesecake is a delightful marriage of flavors that celebrates the essence of fall. Each bite boasts the creamy richness of cheesecake paired with a vibrant apple filling and a crunchy topping that adds texture and warmth. This dessert is not just a treat; it embodies the spirit of autumn gatherings with family and friends. Whether it’s a holiday celebration or a cozy family dinner, this cheesecake will surely become a cherished staple in your recipe collection.

Apple Crisp Cheesecake: The Ultimate Fall Dessert Delight
- Total Time: 15 minute
Ingredients
– For the Cheesecake Layer:
– 16 oz cream cheese, softened
– 1 cup granulated sugar
– 1 cup sour cream
– 3 large eggs
– 1 teaspoon vanilla extract
– 1 tablespoon lemon juice
– For the Apple Filling:
– 4 medium apples, peeled, cored, and sliced
– ½ cup brown sugar
– 1 tablespoon cinnamon
– 1 tablespoon lemon juice
– 1 tablespoon cornstarch
– For the Crisp Topping:
– 1 cup old-fashioned oats
– 1 cup all-purpose flour
– ½ cup brown sugar
– ½ teaspoon cinnamon
– 1/2 cup unsalted butter, melted
– A pinch of salt
Instructions
Making Apple Crisp Cheesecake involves several straightforward steps. Here’s how to do it:
1. Preheat the Oven: Start by preheating your oven to 325°F (160°C). Prepare a 9-inch springform pan by greasing it lightly.
2. Prepare the Apple Filling:
– In a large bowl, combine the sliced apples with brown sugar, cinnamon, lemon juice, and cornstarch. Toss until well mixed, then set aside.
3. Make the Cheesecake Layer:
– In a mixing bowl, beat the softened cream cheese with granulated sugar until smooth.
– Add in sour cream, eggs (one at a time), vanilla extract, and lemon juice. Mix until the batter is completely smooth and creamy.
4. Combine the Layers:
– Pour half of the cheesecake batter into the prepared springform pan.
– Top with all of the apple filling, spreading it evenly.
– Carefully pour the remaining cheesecake batter over the apple layer.
5. Prepare the Crisp Topping:
– In a separate bowl, mix together the oats, flour, brown sugar, cinnamon, and salt.
– Pour the melted butter over the mixture and stir until crumbly.
6. Add the Topping: Sprinkle the crisp topping evenly over the cheesecake.
7. Bake: Place the cheesecake in the preheated oven and bake for 50 to 60 minutes until the center is set but still jiggly.
8. Cool: Remove the cheesecake from the oven and let it cool at room temperature for about 30 minutes. Then, transfer it to the refrigerator and chill for at least 2 hours, preferably overnight.
9. Serve: Once chilled, carefully remove the sides of the springform pan. Slice and serve with whipped cream or vanilla ice cream, if desired.
- Prep Time: 15 minutes
- Cook Time: 50–60 minutes
Nutrition
- Serving Size: 12 slices
- Calories: 350 kcal
- Fat: 18g
- Protein: 5g