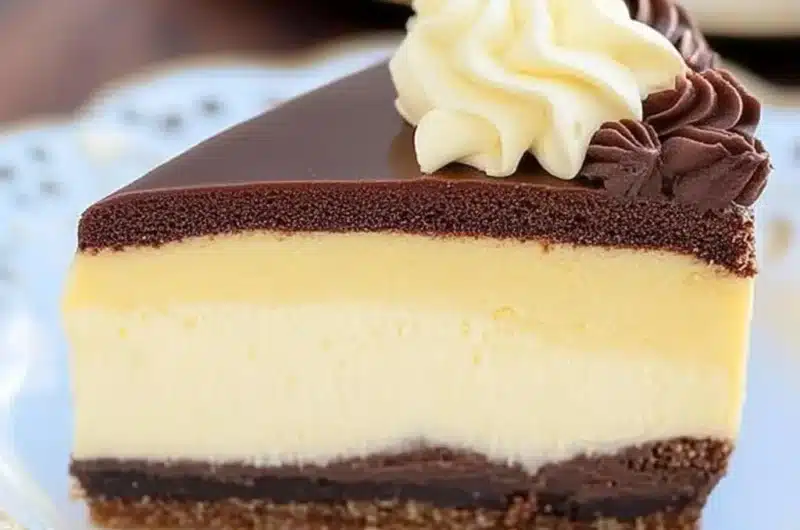
Boston Cream Pie Cheesecake is a dessert that combines the best of two worlds—an indulgent cheesecake and a Boston cream pie. This amazing dessert features a rich, creamy cheesecake layer, topped with a velvety chocolate ganache, all sitting atop a fluffy cake base. It offers a delightful mix of flavors and textures that will leave your taste buds tingling with joy. Perfect for parties, gatherings, or just as a weekend treat, this incredible creation makes for an unforgettable dessert experience.
If you’re unfamiliar with Boston Cream Pie, you might be surprised to know that it isn’t a pie at all! Instead, it is a cake, traditionally filled with vanilla custard and topped with a chocolate glaze. When paired with the rich creaminess of cheesecake, it transforms into something truly special. Imagine the creamy goodness enveloping your tongue, harmonizing with the sweet chocolate and the comforting notes of vanilla—simply divine!
In this guide, we will delve into why this Boston Cream Pie Cheesecake will quickly become your favorite dessert, along with all the necessary information to make it perfectly every time. Whether you’re a baking novice or an experienced professional, this ultimate recipe will walk you through each step, ensuring a successful outcome every time you try it.
Why You’ll Love This Recipe
Here are some compelling reasons why you’ll be head over heels for this Boston Cream Pie Cheesecake:
1. Decadent Flavor Combination: The blend of creamy cheesecake, soft cake, and rich chocolate ganache creates a symphony of flavors that is hard to resist.
2. Eye-Catching Presentation: This dessert is not just about taste; it’s also visually stunning, making it a perfect centerpiece for any table.
3. Versatile Serving Options: You can enjoy it plain, topped with whipped cream, or served with fresh fruits—perfect for all kinds of occasions.
4. Make Ahead: This cheesecake can be made a day in advance, making it an ideal choice for stress-free entertaining.
5. Easily Customized: Feel free to get creative! Add seasonal fruits or experiment with different flavored toppings to make it uniquely yours.
6. Satisfies Everyone: It’s a dessert that pleases all—whether you’re a fan of cheesecake, cake, or chocolate lovers, it has something for everyone!
With these points in mind, you can see why Boston Cream Pie Cheesecake has garnered a reputation for being the ultimate dessert choice!
Preparation and Cooking Time
Making this delicious Boston Cream Pie Cheesecake requires some time, but the results are undoubtedly worth it. Here’s a breakdown of the timing involved:
– Preparation Time: 30 minutes
– Cooking Time: 60 minutes
– Cooling Time: 4 hours (or overnight for best results)
Total time from start to enjoying your masterpiece will take roughly 5 hours and 30 minutes. However, most of that time involves cooling, allowing you the chance to step away and relax while waiting for your dessert to set.
Ingredients
– For the Cheesecake Layer:
– 2 cups cream cheese, softened
– 1 cup granulated sugar
– 1 teaspoon vanilla extract
– 3 large eggs
– 1/2 cup sour cream
– For the Cake Layer:
– 1 cup all-purpose flour
– 1/2 cup granulated sugar
– 1/4 cup unsweetened cocoa powder
– 2 large eggs
– 1/4 cup milk
– 1/4 cup vegetable oil
– 1 teaspoon baking powder
– 1/2 teaspoon salt
– For the Chocolate Ganache:
– 1 cup semi-sweet chocolate chips
– 1/2 cup heavy cream
This simple ingredient list provides everything you need to create the delightful and rich Boston Cream Pie Cheesecake you’ve been dreaming of.
Step-by-Step Instructions
Creating this Boston Cream Pie Cheesecake is a simple process if you follow these steps:
1. Preheat Oven: Preheat your oven to 325°F (160°C). Grease a 9-inch springform pan with butter and line the bottom with parchment paper for easier removal.
2. Make the Cake Layer:
– In a mixing bowl, combine the flour, sugar, cocoa powder, baking powder, and salt. Mix well.
– In another bowl, whisk together the eggs, milk, and vegetable oil.
– Pour the wet ingredients into the dry ingredients and stir until just combined.
3. Bake the Cake Layer: Pour the batter into the prepared springform pan. Bake for 15-20 minutes or until a toothpick inserted into the center comes out clean. Once done, remove from the oven and allow to cool completely.
4. Prepare the Cheesecake Layer:
– In a large mixing bowl, beat the softened cream cheese and sugar together until smooth. Add the vanilla extract and mix well.
– Incorporate the eggs, one at a time, gently mixing after each addition. Finally, add the sour cream and mix until well combined.
5. Combine Layers: Once the cake layer is completely cool, pour the cheesecake mixture evenly over the cooled cake layer in the springform pan.
6. Bake the Cheesecake: Bake the entire cheesecake for about 45-50 minutes or until the edges are set but the center is still slightly jiggly.
7. Cool the Cheesecake: Turn off the oven and crack the door open, allowing the cheesecake to cool gradually in the oven for about 1 hour.
8. Chill: After cooling, transfer the cheesecake to the refrigerator and chill for at least 4 hours, preferably overnight.
9. Make the Ganache: In a small saucepan, heat the heavy cream until just simmering. Pour over the chocolate chips and let sit for 5 minutes. Stir until smooth and glossy.
10. Finish the Cheesecake: Once the cheesecake has chilled, remove it from the springform pan. Pour the chocolate ganache evenly over the top, letting it drip down the sides.
How to Serve
When serving your Boston Cream Pie Cheesecake, consider these tips for a delightful experience:
1. Presentation: Use a cake stand to elevate your cheesecake for an appealing look that draws attention.
2. Slice Carefully: Cut clean slices using a hot knife. This ensures your pieces have pristine edges for a professional touch.
3. Pairing Options: Serve with fresh whipped cream, berries, or even a scoop of vanilla ice cream for added flair.
4. Garnish: Sprinkle with chocolate shavings or a dusting of powdered sugar to enhance the visual appeal.
By considering these serving suggestions, you elevate your Boston Cream Pie Cheesecake from delicious to utterly luxurious, creating an experience your guests will rave about long after the last bite!
Additional Tips
– Use Fresh Ingredients: Fresh eggs and dairy make a noticeable difference in flavor and texture.
– Be Patient with Cooling: Allow the cheesecake to cool gradually to avoid cracks on the top.
– Experiment with Flavoring: Adding a hint of almond extract or lemon zest can elevate the taste.
– Ensure Proper Mixing: Mix your ingredients until just combined to avoid overmixing, which can lead to a dense texture.
– Serve Chilled: This cheesecake is best when served chilled, enhancing its creamy texture and flavor.
Recipe Variation
Feel free to get creative with this Boston Cream Pie Cheesecake! Here are some variations to consider:
1. Fruit-Topped Delight: Add fresh fruit such as strawberries or raspberries on top before serving for a refreshing twist.
2. Nutty Addition: Sprinkle chopped nuts, like walnuts or pecans, over the ganache for a crunchy texture.
3. Coffee Infusion: Incorporate coffee extract into the cheesecake layer for a mocha flavor.
4. Gluten-Free Option: For a gluten-free version, substitute regular flour with gluten-free flour.
Freezing and Storage
– Storage: Store leftover cheesecake in the refrigerator in an airtight container, where it will last for up to 5 days.
– Freezing: You can freeze this cheesecake for up to 3 months. Wrap it tightly in plastic wrap and aluminum foil to prevent freezer burn. When ready to eat, allow it to thaw in the refrigerator overnight.
Special Equipment
To make this Boston Cream Pie Cheesecake, you will need the following equipment:
– 9-inch springform pan
– Mixing bowls (large and medium)
– Electric mixer or whisk
– Measuring cups and spoons
– Rubber spatula for scraping down the sides of the bowl
– Sharp knife for slicing
Frequently Asked Questions
How do I know when the cheesecake is done?
Check for doneness by ensuring the edges are set and the center is slightly jiggly. It will firm up as it cools.
Can I make this cheesecake ahead of time?
Absolutely! In fact, making it a day in advance enhances the flavors as it rests in the refrigerator.
What if I don’t have a springform pan?
A regular round cake pan will work, but using parchment paper to line the pan is essential for easy removal.
Can I use a different type of chocolate for the ganache?
Yes, milk chocolate or white chocolate can be used instead of semi-sweet chocolate for a different flavor profile.
Is this dessert suitable for special dietary needs?
Yes, by substituting ingredients like gluten-free flour and sugar alternatives, you can make this cheesecake accommodating to various dietary requirements.
Conclusion
Boston Cream Pie Cheesecake is a luscious dessert that effortlessly combines the beloved elements of both cheesecake and Boston cream pie. With its creamy texture, rich flavors, and stunning presentation, it is sure to impress your friends and family. Whether you’re celebrating a special occasion or simply indulging a sweet tooth, this cheesecake will not disappoint.

Boston Cream Pie Cheesecake: An Incredible Ultimate Recipe
- Total Time: 1 hour 30 minutes
Ingredients
– For the Cheesecake Layer:
– 2 cups cream cheese, softened
– 1 cup granulated sugar
– 1 teaspoon vanilla extract
– 3 large eggs
– 1/2 cup sour cream
– For the Cake Layer:
– 1 cup all-purpose flour
– 1/2 cup granulated sugar
– 1/4 cup unsweetened cocoa powder
– 2 large eggs
– 1/4 cup milk
– 1/4 cup vegetable oil
– 1 teaspoon baking powder
– 1/2 teaspoon salt
– For the Chocolate Ganache:
– 1 cup semi-sweet chocolate chips
– 1/2 cup heavy cream
This simple ingredient list provides everything you need to create the delightful and rich Boston Cream Pie Cheesecake you’ve been dreaming of.
Instructions
Creating this Boston Cream Pie Cheesecake is a simple process if you follow these steps:
1. Preheat Oven: Preheat your oven to 325°F (160°C). Grease a 9-inch springform pan with butter and line the bottom with parchment paper for easier removal.
2. Make the Cake Layer:
– In a mixing bowl, combine the flour, sugar, cocoa powder, baking powder, and salt. Mix well.
– In another bowl, whisk together the eggs, milk, and vegetable oil.
– Pour the wet ingredients into the dry ingredients and stir until just combined.
3. Bake the Cake Layer: Pour the batter into the prepared springform pan. Bake for 15-20 minutes or until a toothpick inserted into the center comes out clean. Once done, remove from the oven and allow to cool completely.
4. Prepare the Cheesecake Layer:
– In a large mixing bowl, beat the softened cream cheese and sugar together until smooth. Add the vanilla extract and mix well.
– Incorporate the eggs, one at a time, gently mixing after each addition. Finally, add the sour cream and mix until well combined.
5. Combine Layers: Once the cake layer is completely cool, pour the cheesecake mixture evenly over the cooled cake layer in the springform pan.
6. Bake the Cheesecake: Bake the entire cheesecake for about 45-50 minutes or until the edges are set but the center is still slightly jiggly.
7. Cool the Cheesecake: Turn off the oven and crack the door open, allowing the cheesecake to cool gradually in the oven for about 1 hour.
8. Chill: After cooling, transfer the cheesecake to the refrigerator and chill for at least 4 hours, preferably overnight.
9. Make the Ganache: In a small saucepan, heat the heavy cream until just simmering. Pour over the chocolate chips and let sit for 5 minutes. Stir until smooth and glossy.
10. Finish the Cheesecake: Once the cheesecake has chilled, remove it from the springform pan. Pour the chocolate ganache evenly over the top, letting it drip down the sides.
- Prep Time: 30 minutes
- Cook Time: 60 minutes
Nutrition
- Serving Size: 12
- Calories: 450 kcal
- Fat: 30g
- Protein: 7g