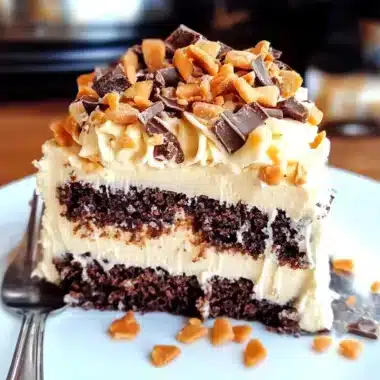
Butterfinger Bomb Cake is an incredible dessert that will take your taste buds on a delightful journey. With its layers of rich chocolate cake, creamy peanut butter filling, and crunchy Butterfinger candy, this cake is a true tribute to the popular candy bar. Every bite is a celebration of flavors that blend together in a harmonious explosion of sweetness and crunch. Whether you’re planning a birthday party, a special gathering, or simply want to indulge yourself, this cake is sure to impress everyone who tries it.
Imagine sinking your fork into a moist chocolate layer that reveals a luscious peanut butter filling, complemented by the crunch of Butterfinger pieces. This dessert isn’t just a cake; it’s an experience that brings joy and satisfaction. In this guide, you’ll discover why Butterfinger Bomb Cake is a must-try recipe, how to make it from scratch, and the best ways to serve it to create a memorable moment.
With its irresistible combination of chocolate and peanut butter, Butterfinger Bomb Cake is a dessert that appeals to both kids and adults alike. The layers are visually stunning, and the flavors are incredibly satisfying. If you’re ready to embark on a baking adventure that will leave everyone craving more, let’s dive into what makes Butterfinger Bomb Cake a treat you don’t want to miss!
Why You’ll Love This Recipe
Butterfinger Bomb Cake is not just any dessert; it’s a masterpiece that brings together various elements that make it truly special. Here are several reasons you’ll fall in love with this recipe:
1. Delicious Flavor Combination – The mix of chocolate, peanut butter, and Butterfinger creates a unique taste experience.
2. Layered Bliss – The multiple layers add visual appeal and a delightful texture to each slice.
3. Perfect for Celebrations – Whether it’s a birthday or a casual gathering, this cake makes any occasion feel special.
4. Fun to Make – The process of creating this cake is enjoyable, and the end result is incredibly rewarding.
5. Crowd-Pleaser – It’s a dessert that will appeal to a wide audience, making it ideal for parties or family get-togethers.
6. Customizable – You can adjust the recipe to suit your preferences, such as adding more Butterfinger or using gluten-free ingredients.
With these features, it’s no wonder that Butterfinger Bomb Cake has gained a reputation for being one of the most beloved desserts. Each slice is a delightful revelation that will have your guests raving about it long after the last crumb has been devoured!
Preparation and Cooking Time
Preparing Butterfinger Bomb Cake takes about 1 hour and 30 minutes, including baking and cooling time. Here’s a breakdown of the time involved:
– Preparation Time: 25 minutes
– Cooking Time: 30-35 minutes
– Cooling Time: 30 minutes
This timeline may vary based on your kitchen skills and equipment, but it provides a general framework to follow.
Ingredients
– 1 ¾ cups all-purpose flour
– 1 ½ cups granulated sugar
– ½ cup unsweetened cocoa powder
– 1 teaspoon baking powder
– 1 teaspoon baking soda
– ½ teaspoon salt
– 2 large eggs
– 1 cup whole milk
– ½ cup vegetable oil
– 2 teaspoons vanilla extract
– 1 cup boiling water
– 1 cup creamy peanut butter
– 1 cup heavy whipping cream
– 1 cup Butterfinger candy bars, crushed
– Chocolate frosting (store-bought or homemade)
Step-by-Step Instructions
Creating Butterfinger Bomb Cake is a straightforward process if you follow these simple steps:
1. Preheat Oven: Preheat your oven to 350°F (175°C). Grease and flour two 9-inch round cake pans.
2. Mix Dry Ingredients: In a large bowl, sift together the flour, sugar, cocoa powder, baking powder, baking soda, and salt.
3. Combine Wet Ingredients: In another bowl, whisk together the eggs, milk, vegetable oil, and vanilla extract until smooth.
4. Combine Mixtures: Gradually add the wet ingredients to the dry ingredients, mixing until well combined.
5. Add Boiling Water: Carefully stir in the boiling water until the batter is thin and well blended.
6. Bake: Pour the batter evenly into the prepared cake pans. Bake for 30-35 minutes or until a toothpick inserted in the center comes out clean.
7. Cool the Cakes: Allow the cakes to cool in their pans for 10 minutes, then transfer them to wire racks to cool completely.
8. Prepare the Filling: In a bowl, beat the peanut butter until creamy. In another bowl, whip the heavy cream until stiff peaks form. Gently fold the whipped cream into the peanut butter until combined.
9. Assemble the Cake: Once the cakes are completely cool, place one layer on a serving platter. Spread half of the peanut butter filling on top, then sprinkle with half of the crushed Butterfinger.
10. Top with Second Layer: Place the second cake layer on top and repeat the filling and Butterfinger layers.
11. Frost the Cake: Cover the entire cake with chocolate frosting, smoothing it out evenly.
12. Decorate: Finish by garnishing the top with the remaining crushed Butterfinger for an added crunch.
By following these steps, you’ll create a stunning Butterfinger Bomb Cake that is both delicious and visually appealing!
How to Serve
When it comes to serving Butterfinger Bomb Cake, consider the following tips to enhance the experience:
1. Presentation: Serve on a decorative cake stand for an elegant touch. A simple garnish with extra Butterfinger pieces can elevate its look.
2. Slice Sizes: Offer generous but manageable slices, allowing guests to enjoy seconds without feeling overwhelmed.
3. Pair with Beverages: This cake pairs beautifully with coffee, milk, or even a scoop of vanilla ice cream for an indulgent treat.
4. Add Fresh Fruit: Consider serving with fresh strawberries or raspberries to add a pop of color and a refreshing contrast to the rich cake.
5. Occasional Toppings: Drizzle with chocolate sauce or caramel for an extra layer of flavor that will delight your guests.
By thoughtfully preparing and serving Butterfinger Bomb Cake, you create a memorable dessert experience that everyone will cherish!
Additional Tips
– Use Quality Chocolate: For the best flavor, opt for high-quality chocolate for both the cake and frosting. This makes a significant difference in taste.
– Be Patient with Cooling: Allow the cakes to cool completely before assembling. This prevents the filling from melting and ensures a better texture.
– Experiment with Toppings: Consider adding a drizzle of melted chocolate or caramel sauce on top for an extra indulgent touch.
– Serve with Ice Cream: A scoop of vanilla or chocolate ice cream pairs perfectly with the rich flavors of Butterfinger Bomb Cake.
Recipe Variation
Feel free to switch things up! Here are a few variations to try:
1. Peanut Butter Swirl: Add a peanut butter swirl to the chocolate batter before baking for a marbled effect.
2. Different Candy Options: Instead of Butterfinger, try using crushed Reese’s Peanut Butter Cups or Snickers for a different flavor profile.
3. Layered Cheesecake: Incorporate a layer of cheesecake between the cake layers for a creamy twist.
Freezing and Storage
– Storage: Keep the Butterfinger Bomb Cake covered in the refrigerator to maintain its freshness. It should last about 5-7 days.
– Freezing: You can freeze slices of the cake for up to 3 months. Wrap each slice tightly in plastic wrap, then place it in an airtight container to prevent freezer burn.
Special Equipment
You will need a few essential tools to prepare this cake successfully:
– Mixing bowls for combining ingredients
– Electric mixer for whipping cream and mixing batter
– Offset spatula for spreading frosting
– 9-inch round cake pans for baking
– Cake stand or platter for serving
Frequently Asked Questions
How do I know when the cake is done baking?
Insert a toothpick into the center; if it comes out clean or with a few moist crumbs, the cake is ready.
Can I make this cake ahead of time?
Yes, you can prepare it a day before serving. This allows the flavors to meld and develop.
Is this cake suitable for dietary restrictions?
You can adapt the recipe by using gluten-free flour for a gluten-free option or dairy-free substitutes if necessary.
Can I eliminate the peanut butter?
Absolutely! You can use a vanilla buttercream or cream cheese frosting instead for a different taste.
Conclusion
Butterfinger Bomb Cake is not just a dessert; it’s a celebration of flavors that everyone will love. With its rich chocolate layers, creamy filling, and crunchy Butterfinger pieces, this cake is sure to be a hit at any gathering. Whether you choose to follow the original recipe or try out some variations, the joy it brings will be undeniable. Get ready to impress your family and friends with this delightful treat!
Butterfinger Bomb Cake: An Amazing Ultimate Recipe
- Total Time: 46 minute
Ingredients
– 1 ¾ cups all-purpose flour
– 1 ½ cups granulated sugar
– ½ cup unsweetened cocoa powder
– 1 teaspoon baking powder
– 1 teaspoon baking soda
– ½ teaspoon salt
– 2 large eggs
– 1 cup whole milk
– ½ cup vegetable oil
– 2 teaspoons vanilla extract
– 1 cup boiling water
– 1 cup creamy peanut butter
– 1 cup heavy whipping cream
– 1 cup Butterfinger candy bars, crushed
– Chocolate frosting (store-bought or homemade)
Instructions
Creating Butterfinger Bomb Cake is a straightforward process if you follow these simple steps:
1. Preheat Oven: Preheat your oven to 350°F (175°C). Grease and flour two 9-inch round cake pans.
2. Mix Dry Ingredients: In a large bowl, sift together the flour, sugar, cocoa powder, baking powder, baking soda, and salt.
3. Combine Wet Ingredients: In another bowl, whisk together the eggs, milk, vegetable oil, and vanilla extract until smooth.
4. Combine Mixtures: Gradually add the wet ingredients to the dry ingredients, mixing until well combined.
5. Add Boiling Water: Carefully stir in the boiling water until the batter is thin and well blended.
6. Bake: Pour the batter evenly into the prepared cake pans. Bake for 30-35 minutes or until a toothpick inserted in the center comes out clean.
7. Cool the Cakes: Allow the cakes to cool in their pans for 10 minutes, then transfer them to wire racks to cool completely.
8. Prepare the Filling: In a bowl, beat the peanut butter until creamy. In another bowl, whip the heavy cream until stiff peaks form. Gently fold the whipped cream into the peanut butter until combined.
9. Assemble the Cake: Once the cakes are completely cool, place one layer on a serving platter. Spread half of the peanut butter filling on top, then sprinkle with half of the crushed Butterfinger.
10. Top with Second Layer: Place the second cake layer on top and repeat the filling and Butterfinger layers.
11. Frost the Cake: Cover the entire cake with chocolate frosting, smoothing it out evenly.
12. Decorate: Finish by garnishing the top with the remaining crushed Butterfinger for an added crunch.
By following these steps, you’ll create a stunning Butterfinger Bomb Cake that is both delicious and visually appealing!
- Prep Time: 25 minutes
- Cook Time: 30-35 minutes
Nutrition
- Serving Size: 12
- Calories: 450 kcal
- Fat: 22g
- Protein: 7g