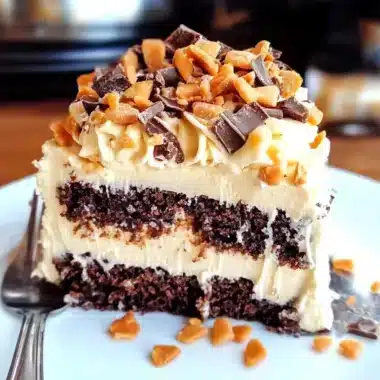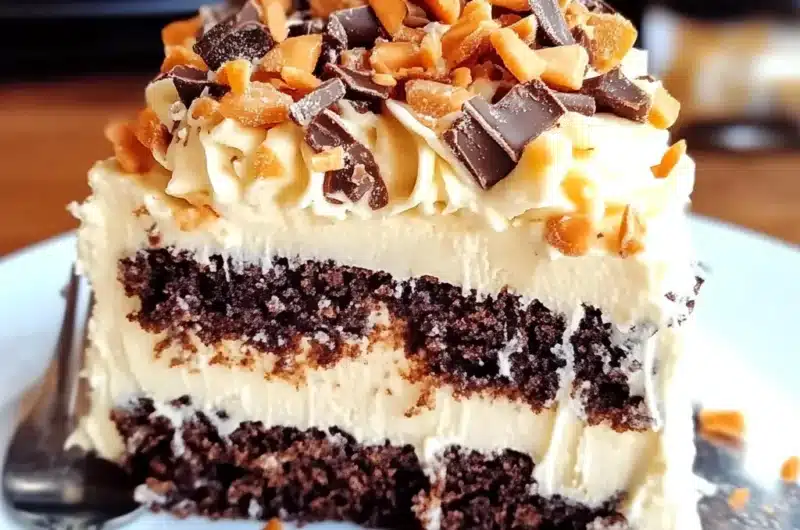
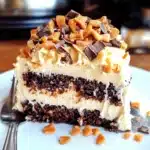
Butterfinger Bomb Cake is an amazing dessert that combines the rich flavors of chocolate with the crunchy, peanut-buttery goodness of Butterfinger candy bars. This decadent cake is perfect for special occasions or just a sweet indulgence during a cozy night in. With layers of moist cake, creamy frosting, and chunks of Butterfinger candy, it’s a treat that will leave everyone craving more. Each bite is a heavenly explosion of flavors and textures, making it a must-try for any dessert lover.
If you’ve ever wondered how to elevate your dessert game, the Butterfinger Bomb Cake is your answer. This cake is not only visually stunning but also incredibly delicious, with a unique combination of flavors that will delight your taste buds. Whether you’re celebrating a birthday, hosting a gathering, or just treating yourself, this cake is bound to impress. In this article, you will learn why this recipe stands out, how to prepare it, and tips for serving it beautifully. Get ready to embark on a journey of flavor as we dive into the world of Butterfinger Bomb Cake!
Why You’ll Love This Recipe
Butterfinger Bomb Cake is more than just a dessert; it’s a delightful experience that combines several elements that make it irresistible. Here’s why you’ll fall head over heels for this recipe:
1. Decadent Flavor: The combination of chocolate and peanut butter is a classic that never goes out of style.
2. Easy to Make: With simple ingredients and straightforward instructions, even novice bakers can create this masterpiece.
3. Versatile: You can customize this cake by adding your favorite toppings or adjusting the chocolate flavor.
4. Impressive Presentation: The layers and toppings make this cake a showstopper at any gathering.
5. Crowd-Pleaser: Butterfinger lovers and chocolate fans alike will rave about this dessert.
6. Perfect for Any Occasion: Whether it’s a birthday, holiday, or just a family dinner, this cake fits right in.
With these fantastic features in mind, it’s clear why Butterfinger Bomb Cake has become a favorite for many. Each slice is filled with flavors that create a symphony of sweet satisfaction!
Preparation and Cooking Time
Preparing the Butterfinger Bomb Cake will take approximately 1 hour and 30 minutes, including baking and cooling time. Here’s a breakdown of the time required:
– Preparation Time: 30 minutes
– Cooking Time: 30-35 minutes
– Cooling Time: 20-25 minutes
These times may vary slightly based on your kitchen setup, but this estimate provides a solid framework for planning your baking session.
Ingredients
– 2 cups all-purpose flour
– 1 ½ cups granulated sugar
– ½ cup unsweetened cocoa powder
– 1 cup whole milk
– ½ cup vegetable oil
– 3 large eggs
– 1 tablespoon baking powder
– ¼ teaspoon salt
– 1 tablespoon vanilla extract
– ½ cup creamy peanut butter
– 1 cup Butterfinger candy bars, chopped
– 1 cup chocolate frosting
– Additional Butterfinger pieces for topping (optional)
Step-by-Step Instructions
Creating the Butterfinger Bomb Cake can be straightforward when you follow these easy steps:
1. Preheat Oven: Preheat your oven to 350°F (175°C). Grease and flour two 9-inch round cake pans.
2. Mix Dry Ingredients: In a large bowl, whisk together the flour, granulated sugar, cocoa powder, baking powder, and salt until well combined.
3. Combine Wet Ingredients: In another bowl, mix together the milk, vegetable oil, eggs, and vanilla extract. Whisk until smooth.
4. Combine Mixtures: Gradually add the wet ingredients to the dry ingredients, stirring until the batter is smooth and free of lumps.
5. Add Peanut Butter: Gently fold in the creamy peanut butter and chopped Butterfinger bars until evenly distributed.
6. Divide Batter: Pour the batter evenly into the prepared cake pans.
7. Bake: Place the pans in the preheated oven and bake for 30-35 minutes, or until a toothpick inserted in the center comes out clean.
8. Cool: Remove the cakes from the oven and let them cool in the pans for about 20 minutes. Then, transfer the cakes to wire racks to cool completely.
9. Assemble the Cake: Once cooled, place one layer on a serving platter. Spread a layer of chocolate frosting over the top. Add the second layer on top and frost the top and sides of the cake.
10. Decorate: Garnish with additional chopped Butterfinger pieces for an extra crunch and visual appeal.
These steps will guide you in creating this incredible Butterfinger Bomb Cake effortlessly.
How to Serve
To elevate your serving experience, consider the following tips when presenting your Butterfinger Bomb Cake:
1. Presentation: Use a decorative cake stand to showcase the cake. A simple yet elegant display can enhance its visual appeal.
2. Accompaniments: Serve with a scoop of vanilla ice cream or whipped cream to complement the rich flavors.
3. Slice Size: Cut generous slices but ensure they are manageable. Smaller portions encourage guests to go back for seconds!
4. Beverage Pairing: This cake pairs wonderfully with coffee, milk, or a dessert wine, adding sophistication to your serving.
By putting thought into how you serve the Butterfinger Bomb Cake, you create a memorable experience that your guests will cherish long after the last slice is gone. Enjoy!
Additional Tips
– Use Room Temperature Ingredients: Ensure your eggs, milk, and peanut butter are at room temperature. This helps create a smoother batter.
– Don’t Overmix: When combining the wet and dry ingredients, mix just until combined. Overmixing can lead to a dense cake.
– Let the Cake Cool Completely: Before frosting, ensure the cake layers are completely cool to prevent the frosting from melting.
– Experiment with Frosting: While chocolate frosting is delicious, try using cream cheese frosting or even a peanut butter frosting for a different flavor profile.
Recipe Variation
Feel free to get creative with your Butterfinger Bomb Cake! Here are some variations to consider:
1. Different Cake Flavors: Instead of chocolate cake, try using a vanilla or red velvet cake as the base.
2. Add More Candy: Mix in other candies like Reese’s Pieces, Snickers, or M&M’s for a candy lovers’ delight.
3. Nutty Addition: Incorporate chopped nuts such as peanuts or pecans for an added crunch.
4. Layered Delight: Create a layered version with alternating layers of chocolate and peanut butter cake for an even richer flavor experience.
Freezing and Storage
– Storage: To keep your Butterfinger Bomb Cake fresh, store it in an airtight container in the refrigerator. It can last 5-7 days.
– Freezing: You can freeze the cake for up to 3 months. Wrap the cake tightly in plastic wrap and aluminum foil to prevent freezer burn. Thaw in the refrigerator overnight before serving.
Special Equipment
Having the right tools can make your baking experience smoother. Here’s what you’ll need:
– Mixing Bowls: A set of various sizes for mixing your ingredients.
– Electric Mixer: An electric mixer will help achieve a fluffy batter and frosting.
– Cake Pans: Two 9-inch round cake pans for even baking.
– Cooling Racks: Essential for allowing the cakes to cool evenly.
– Offset Spatula: Useful for spreading frosting smoothly on the cake.
Frequently Asked Questions
How should I store leftover cake?
Store any leftover Butterfinger Bomb Cake in an airtight container in the refrigerator for optimal freshness.
Can I use a different type of frosting?
Absolutely! Feel free to use cream cheese frosting or a simple whipped cream topping for a lighter option.
What if I can’t find Butterfinger bars?
You can substitute with other similar candy bars like Reese’s or Crush Bars for a different but delightful flavor.
How can I make this cake gluten-free?
Use a gluten-free all-purpose flour blend in place of the regular flour for a gluten-free version.
Can I make this cake in advance?
Yes, you can make the cake layers a day in advance. Just store them properly in the refrigerator until you’re ready to frost and serve.
Conclusion
The Butterfinger Bomb Cake is a delightful indulgence that merges the classic flavors of chocolate and peanut butter with the crunchiness of Butterfinger candy bars. Its impressive presentation and rich taste make it ideal for any occasion, from birthdays to casual family gatherings. Whether you’re an experienced baker or a novice, this recipe is straightforward and fun to make. With a few additional tips and variations, you can customize this cake to suit your tastes perfectly. Enjoy every delicious bite!
Butterfinger Bomb Cake: An Incredible Ultimate Recipe
- Total Time: 10 minute
Ingredients
– 2 cups all-purpose flour
– 1 ½ cups granulated sugar
– ½ cup unsweetened cocoa powder
– 1 cup whole milk
– ½ cup vegetable oil
– 3 large eggs
– 1 tablespoon baking powder
– ¼ teaspoon salt
– 1 tablespoon vanilla extract
– ½ cup creamy peanut butter
– 1 cup Butterfinger candy bars, chopped
– 1 cup chocolate frosting
– Additional Butterfinger pieces for topping (optional)
Instructions
Creating the Butterfinger Bomb Cake can be straightforward when you follow these easy steps:
1. Preheat Oven: Preheat your oven to 350°F (175°C). Grease and flour two 9-inch round cake pans.
2. Mix Dry Ingredients: In a large bowl, whisk together the flour, granulated sugar, cocoa powder, baking powder, and salt until well combined.
3. Combine Wet Ingredients: In another bowl, mix together the milk, vegetable oil, eggs, and vanilla extract. Whisk until smooth.
4. Combine Mixtures: Gradually add the wet ingredients to the dry ingredients, stirring until the batter is smooth and free of lumps.
5. Add Peanut Butter: Gently fold in the creamy peanut butter and chopped Butterfinger bars until evenly distributed.
6. Divide Batter: Pour the batter evenly into the prepared cake pans.
7. Bake: Place the pans in the preheated oven and bake for 30-35 minutes, or until a toothpick inserted in the center comes out clean.
8. Cool: Remove the cakes from the oven and let them cool in the pans for about 20 minutes. Then, transfer the cakes to wire racks to cool completely.
9. Assemble the Cake: Once cooled, place one layer on a serving platter. Spread a layer of chocolate frosting over the top. Add the second layer on top and frost the top and sides of the cake.
10. Decorate: Garnish with additional chopped Butterfinger pieces for an extra crunch and visual appeal.
These steps will guide you in creating this incredible Butterfinger Bomb Cake effortlessly.
- Prep Time: 30 minutes
- Cook Time: 30-35 minutes
Nutrition
- Serving Size: 12
- Calories: 420 kcal
- Fat: 20g
- Protein: 6g