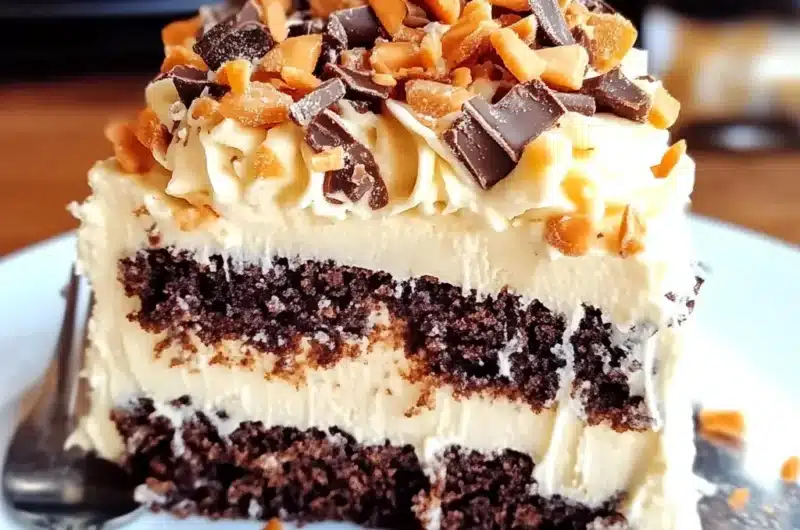
Butterfinger Bomb Cake is an amazing dessert that will take your taste buds on a delicious adventure. This cake is a delightful fusion of chocolate cake layered with creamy peanut butter frosting and topped with crunchy Butterfinger candy. The combination of rich flavors and textures makes it an unforgettable treat. Whether you’re celebrating a special occasion or simply want to indulge, this cake will surely impress everyone around you.
Imagine cutting into a moist chocolate cake, only to reveal layers of creamy peanut butter goodness. The sweet crunch of Butterfinger candy adds an extra layer of decadence that elevates this dessert to another level. If you love chocolate and peanut butter, this Butterfinger Bomb Cake is the ultimate dessert for you. In this guide, you will discover why this recipe is cherished, how to make it, and tips for serving it perfectly. Get ready to bake something incredible!
Why You’ll Love This Recipe
There are countless reasons to fall in love with Butterfinger Bomb Cake. Here are just a few that make it stand out:
1. Decadent Flavor Profile – The rich chocolate cake pairs perfectly with creamy peanut butter and crunchy Butterfinger bits.
2. Easy to Prepare – The recipe is straightforward, making it accessible even for beginner bakers.
3. Perfect for Any Gathering – Whether it’s a birthday party or a potluck, this cake is sure to be a crowd-pleaser.
4. Visually Stunning – The layers and toppings create a beautiful presentation that will wow your guests.
5. Customizable Options – You can easily adjust the recipe to include different candies or toppings to suit your taste.
6. Leftover Friendly – This cake stays delicious for several days, making it perfect for enjoying over time.
With these enticing factors, it’s no wonder that Butterfinger Bomb Cake has become a beloved recipe in many households. Every slice is a delightful experience that combines sweetness, creaminess, and a satisfying crunch.
Preparation and Cooking Time
Creating the Butterfinger Bomb Cake will take about 1 hour and 30 minutes from start to finish. Here’s a breakdown of the time required:
– Preparation Time: 30 minutes
– Cooking Time: 30-35 minutes
– Cooling Time: 30 minutes
These times may vary slightly depending on your kitchen equipment and experience level, but this framework should help you stay on track.
Ingredients
– 2 cups all-purpose flour
– 1 ½ cups granulated sugar
– ¾ cup unsweetened cocoa powder
– 1 ½ teaspoons baking powder
– 1 ½ teaspoons baking soda
– 1 teaspoon salt
– 2 large eggs
– 1 cup whole milk
– ½ cup vegetable oil
– 2 teaspoons vanilla extract
– 1 cup boiling water
– 1 cup creamy peanut butter
– ½ cup powdered sugar
– 1 cup heavy whipping cream
– 1 cup Butterfinger candy bars, crushed
Step-by-Step Instructions
Follow these simple steps to create your Butterfinger Bomb Cake:
1. Preheat the Oven: Preheat your oven to 350°F (175°C). Grease and flour two 9-inch round cake pans.
2. Mix Dry Ingredients: In a large bowl, sift together the flour, granulated sugar, cocoa powder, baking powder, baking soda, and salt.
3. Combine Wet Ingredients: In another bowl, whisk together the eggs, milk, vegetable oil, and vanilla extract until well combined.
4. Combine Mixtures: Gradually add the wet ingredients to the dry ingredients, mixing until fully incorporated.
5. Add Boiling Water: Carefully stir in the boiling water until the batter is smooth and well combined. The batter will be thin.
6. Divide Batter: Pour the batter evenly into the prepared cake pans.
7. Bake: Place in the preheated oven and bake for 30-35 minutes or until a toothpick inserted in the center comes out clean.
8. Cool the Cakes: Remove the cakes from the oven and let them cool in the pans for 10 minutes. Then, transfer them to wire racks to cool completely.
9. Make Peanut Butter Frosting: In a medium bowl, beat together the creamy peanut butter and powdered sugar until smooth. Gradually add the heavy whipping cream, beating until light and fluffy.
10. Layer the Cake: Once the cakes are completely cooled, place one layer on a serving platter. Spread a generous amount of peanut butter frosting on top.
11. Add Crushed Butterfinger: Sprinkle crushed Butterfinger candy over the frosting layer.
12. Top with Second Layer: Place the second cake layer on top and cover the entire cake with the remaining peanut butter frosting.
13. Final Touch: Garnish the top of the cake with more crushed Butterfinger candy for that extra crunch.
These steps will guide you in creating this incredible Butterfinger Bomb Cake effortlessly.
How to Serve
To make the most of your Butterfinger Bomb Cake, consider the following tips when serving:
1. Presentation Matters: Use a decorative cake stand to enhance the visual appeal of your cake.
2. Accompanying Treats: Pair the cake with a scoop of vanilla ice cream or whipped cream for an extra indulgent experience.
3. Slice Size: Cut generous slices, but not too large, to encourage guests to go back for seconds.
4. Beverage Pairing: Serve with milk, coffee, or a dessert wine to complement the rich flavors of the cake.
By putting thought into how you serve the cake, you create a memorable experience for both yourself and your guests. Enjoy every delicious bite of your Butterfinger Bomb Cake!
Additional Tips
– Use Quality Ingredients: For the best flavor, select high-quality cocoa powder and creamy peanut butter. This will enhance the overall taste of your Butterfinger Bomb Cake.
– Let the Cake Cool Completely: Before frosting, ensure your cake layers are completely cool. This helps the frosting maintain its texture and prevents it from melting.
– Experiment with Frosting: If you’re feeling adventurous, consider adding a layer of chocolate ganache on top of the peanut butter frosting for an extra rich flavor.
– Serve at Room Temperature: For the best texture and flavor experience, serve your cake at room temperature rather than straight from the fridge.
– Consider Garnishing: In addition to crushed Butterfinger, you might drizzle some chocolate syrup on each slice for added visual appeal and flavor.
Recipe Variation
Feel free to switch things up! Here are a few variations to try:
1. Nut-Free Version: If you have nut allergies, simply replace the peanut butter with sun butter or omit it altogether.
2. Different Cake Flavors: Instead of chocolate cake, use a vanilla or red velvet cake mix to create a unique flavor combination.
3. Add Fruits: Layer in some bananas or strawberries between the peanut butter frosting for a fresh twist.
4. Butterfinger Cupcakes: Transform this recipe into cupcakes by baking the batter in muffin tins and adjusting the baking time. Top with the same peanut butter frosting and crushed Butterfinger.
Freezing and Storage
– Storage: Keep the Butterfinger Bomb Cake covered in the refrigerator to maintain its freshness. It will last for about 4-5 days.
– Freezing: You can freeze slices of the cake for up to 3 months. Ensure they are well-wrapped in plastic wrap and aluminum foil to prevent freezer burn.
– Thawing: When you’re ready to enjoy frozen slices, thaw them in the refrigerator overnight before serving.
Special Equipment
You will need a few essential tools to prepare this cake successfully:
– Mixing bowls
– Electric mixer or hand whisk
– Measuring cups and spoons
– Two 9-inch round cake pans
– Cooling rack
– Spatula for spreading frosting
– Knife for slicing
Frequently Asked Questions
How do I know when the cake is done baking?
Insert a toothpick into the center; if it comes out clean or with a few moist crumbs, the cake is ready.
Can I make this cake ahead of time?
Yes! You can bake the cake layers a day in advance. Just keep them wrapped in plastic wrap and frost right before serving.
Is this cake suitable for dietary restrictions?
This recipe can be adapted for gluten-free needs by using gluten-free flour. Ensure all other ingredients are also gluten-free.
Can I eliminate the Butterfinger?
Absolutely! You can substitute it with any other candy or leave it out for a simpler cake.
What can I do if the frosting is too thick?
If your frosting is too thick, you can add a tablespoon of milk at a time until you reach your desired consistency.
Conclusion
The Butterfinger Bomb Cake is an irresistible dessert that combines rich flavors and delightful textures. Its layers of chocolate cake, creamy peanut butter frosting, and crunchy Butterfinger bits make it a standout treat for any occasion. Whether you’re celebrating a birthday or simply indulging in something sweet, this cake is sure to impress. With its easy preparation and customizable options, it’s a recipe worth keeping in your baking repertoire.

Butterfinger Bomb Cake: An Incredible Ultimate Recipe
- Total Time: 49 minute
Ingredients
– 2 cups all-purpose flour
– 1 ½ cups granulated sugar
– ¾ cup unsweetened cocoa powder
– 1 ½ teaspoons baking powder
– 1 ½ teaspoons baking soda
– 1 teaspoon salt
– 2 large eggs
– 1 cup whole milk
– ½ cup vegetable oil
– 2 teaspoons vanilla extract
– 1 cup boiling water
– 1 cup creamy peanut butter
– ½ cup powdered sugar
– 1 cup heavy whipping cream
– 1 cup Butterfinger candy bars, crushed
Instructions
Follow these simple steps to create your Butterfinger Bomb Cake:
1. Preheat the Oven: Preheat your oven to 350°F (175°C). Grease and flour two 9-inch round cake pans.
2. Mix Dry Ingredients: In a large bowl, sift together the flour, granulated sugar, cocoa powder, baking powder, baking soda, and salt.
3. Combine Wet Ingredients: In another bowl, whisk together the eggs, milk, vegetable oil, and vanilla extract until well combined.
4. Combine Mixtures: Gradually add the wet ingredients to the dry ingredients, mixing until fully incorporated.
5. Add Boiling Water: Carefully stir in the boiling water until the batter is smooth and well combined. The batter will be thin.
6. Divide Batter: Pour the batter evenly into the prepared cake pans.
7. Bake: Place in the preheated oven and bake for 30-35 minutes or until a toothpick inserted in the center comes out clean.
8. Cool the Cakes: Remove the cakes from the oven and let them cool in the pans for 10 minutes. Then, transfer them to wire racks to cool completely.
9. Make Peanut Butter Frosting: In a medium bowl, beat together the creamy peanut butter and powdered sugar until smooth. Gradually add the heavy whipping cream, beating until light and fluffy.
10. Layer the Cake: Once the cakes are completely cooled, place one layer on a serving platter. Spread a generous amount of peanut butter frosting on top.
11. Add Crushed Butterfinger: Sprinkle crushed Butterfinger candy over the frosting layer.
12. Top with Second Layer: Place the second cake layer on top and cover the entire cake with the remaining peanut butter frosting.
13. Final Touch: Garnish the top of the cake with more crushed Butterfinger candy for that extra crunch.
These steps will guide you in creating this incredible Butterfinger Bomb Cake effortlessly.
- Prep Time: 15 minutes
- Cook Time: 30-35 minutes
Nutrition
- Serving Size: 12 slices
- Calories: 400 kcal
- Fat: 20g
- Protein: 6g


