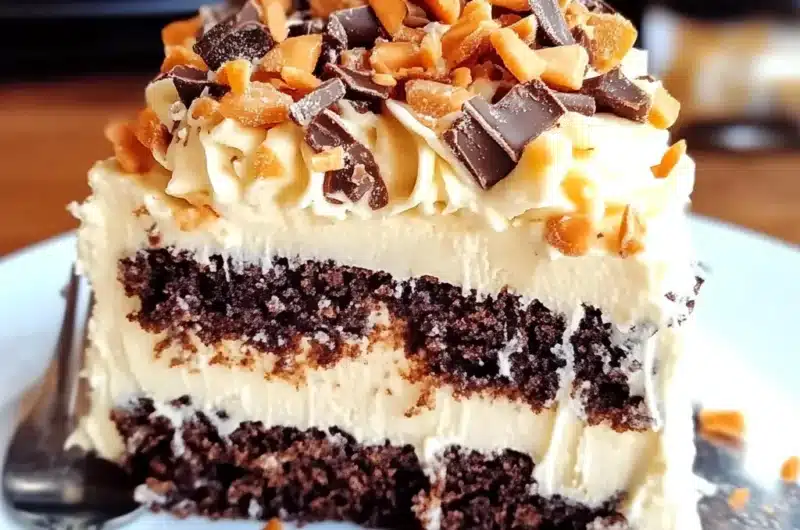
Butterfinger Bomb Cake is an amazing dessert that will satisfy your sweet tooth like nothing else. This decadent cake combines the classic flavors of chocolate, peanut butter, and the delightful crunch of Butterfinger candy bars. The result is an indulgent treat that is not just a cake, but a celebration of flavors that will leave you and your guests begging for seconds. Whether it’s a birthday, holiday gathering, or just a special weekend, this cake is sure to impress.
Imagine taking a bite of this masterpiece, where layers of moist chocolate cake are filled with a rich Butterfinger frosting. Each mouthful is a combination of creamy, crunchy, and sweet that dances on your palate. The Butterfinger Bomb Cake is not only visually stunning but also brings an incredible burst of flavor that is simply unforgettable. In this guide, we will delve into why this recipe is a must-try, the preparation and cooking time, and step-by-step instructions to make your own Butterfinger Bomb Cake.
Get ready to be wowed by the ultimate dessert experience that is sure to be the highlight of any occasion. Let’s explore what makes Butterfinger Bomb Cake so special!
Why You’ll Love This Recipe
Butterfinger Bomb Cake is a delightful creation that brings together a medley of flavors and textures. Here are several reasons why this recipe will capture your heart:
1. Decadent Flavor: The combination of chocolate, peanut butter, and Butterfinger creates a flavor explosion that is hard to resist.
2. Easy to Prepare: With straightforward ingredients and clear instructions, even novice bakers can create this masterpiece.
3. Perfect for Any Celebration: Whether it’s a birthday party, holiday feast, or casual get-together, this cake will steal the show.
4. Impressive Presentation: With its rich frosting and candy topping, this cake looks as good as it tastes, making it a great centerpiece.
5. Customizable: You can easily adjust the recipe to suit your taste by adding more or less of your favorite ingredients.
6. Family Favorite: Kids and adults alike will adore this cake, making it a great choice for family gatherings.
With all these fantastic qualities, it’s no wonder that Butterfinger Bomb Cake is a beloved dessert. Each bite offers a delightful experience that combines nostalgia with modern indulgence, making it a true crowd-pleaser.
Preparation and Cooking Time
To create your own Butterfinger Bomb Cake, you’ll need to allocate some time for preparation and baking. Here’s a quick overview of what to expect:
– Preparation Time: 30 minutes
– Cooking Time: 30-35 minutes
– Cooling Time: 20 minutes
– Total Time: Approximately 1 hour and 20 minutes
These times are estimates and may vary based on your kitchen skills and equipment. However, this should give you a solid framework to work from as you prepare to bake.
Ingredients
– For the Cake:
– 2 cups all-purpose flour
– 1 ½ cups granulated sugar
– ½ cup unsweetened cocoa powder
– 1 cup whole milk
– ½ cup vegetable oil
– 3 large eggs
– 1 tablespoon baking powder
– ¼ teaspoon salt
– 1 tablespoon vanilla extract
– ½ cup boiling water
– For the Butterfinger Frosting:
– 1 cup unsalted butter, softened
– 4 cups powdered sugar
– ½ cup creamy peanut butter
– 3-4 tablespoons milk
– 1 teaspoon vanilla extract
– 3-4 Butterfinger candy bars, crushed (for topping)
Step-by-Step Instructions
Creating the Butterfinger Bomb Cake will be a breeze if you follow these steps:
1. Preheat the Oven: Preheat your oven to 350°F (175°C). Grease and flour two 9-inch round cake pans.
2. Mix Dry Ingredients: In a large bowl, whisk together the flour, sugar, cocoa powder, baking powder, and salt until well combined.
3. Combine Wet Ingredients: In a separate bowl, mix the milk, vegetable oil, eggs, and vanilla extract until smooth.
4. Combine Mixtures: Gradually add the wet ingredients to the dry ingredients, stirring until just combined. Be careful not to overmix.
5. Add Boiling Water: Slowly stir in the boiling water to the batter. It will be thin, but that’s okay!
6. Divide Batter: Pour the batter evenly into the prepared cake pans.
7. Bake: Place in the preheated oven and bake for 30-35 minutes, or until a toothpick inserted in the center comes out clean.
8. Cool: Once baked, remove the cakes from the oven and let them cool in the pans for 20 minutes. Then, transfer them to wire racks to cool completely.
9. Prepare the Frosting: In a large bowl, beat the softened butter until creamy. Gradually add powdered sugar and peanut butter, mixing until smooth. Add milk to achieve the desired consistency and mix in the vanilla extract.
10. Assemble the Cake: Once the cakes are completely cool, place one layer on a serving platter. Spread a generous layer of frosting on top. Add the second layer and frost the top and sides of the cake.
11. Decorate: Sprinkle the crushed Butterfinger bars on top of the frosted cake for a delicious finishing touch.
By following these steps, you’ll create a Butterfinger Bomb Cake that is not only incredible in flavor but also stunning in appearance.
How to Serve
Serving your Butterfinger Bomb Cake can enhance the overall experience. Here are some ideas to make it even more special:
1. Presentation: Use a decorative cake stand to elevate the presentation. A simple yet elegant display can make a big difference.
2. Accompaniments: Serve with a scoop of vanilla ice cream or a dollop of whipped cream for an extra layer of indulgence.
3. Slice Size: Cut generous slices to encourage seconds, but consider smaller portions if serving a larger group.
4. Beverage Pairing: Pair the cake with a glass of cold milk, coffee, or even a dessert wine to complement the rich flavors.
By taking these serving suggestions into account, you’ll make the Butterfinger Bomb Cake not just a dessert, but a memorable experience for everyone at the table. Enjoy every bite!
Additional Tips
– Use Room Temperature Ingredients: Let your eggs and milk reach room temperature before mixing. This helps create a smoother batter and better texture.
– Crush Butterfingers Properly: For the best topping, crush your Butterfinger bars into small, even pieces. This ensures a nice crunch with every bite.
– Experiment with Textures: Consider adding layers of crushed cookies or nuts between cake layers for added texture.
– Decorate with Style: Use a piping bag to add decorative swirls of frosting on top of the cake for a more polished look.
– Serve Slightly Warm: For a unique experience, serve the cake slightly warmed. It enhances the flavors and makes the frosting extra creamy.
Recipe Variation
Don’t hesitate to get creative! Here are some delicious variations you can try:
1. Peanut Butter Chocolate Cake: Replace the Butterfinger with chopped Reese’s Peanut Butter Cups for a different peanut butter treat.
2. Caramel Drizzle: Drizzle warm caramel sauce over the top of the frosted cake for an added layer of sweetness.
3. Different Cake Flavors: Substitute the chocolate cake with a vanilla or red velvet cake for a different flavor profile.
4. Nutty Crunch: Incorporate chopped peanuts into the frosting for a delightful crunch.
5. Layered Delight: Add layers of chocolate ganache or a layer of fudge between the cake layers for a richer experience.
Freezing and Storage
– Storage: Keep your Butterfinger Bomb Cake covered in an airtight container in the refrigerator. It will stay fresh for about 4-5 days.
– Freezing: If you want to enjoy this cake later, you can freeze it. Wrap individual slices tightly in plastic wrap and then place them in a freezer-safe bag. The cake can be frozen for up to 3 months. Thaw in the refrigerator before serving.
Special Equipment
To make your Butterfinger Bomb Cake, you’ll need some essential tools:
– Mixing Bowls: Various sizes for mixing ingredients.
– Electric Mixer: For achieving a smooth frosting and cake batter.
– Measuring Cups and Spoons: Accurate measurements are key to a perfect cake.
– Cake Pans: Two 9-inch round pans for baking the cake layers.
– Wire Rack: For cooling the cakes evenly after baking.
– Piping Bags: Optional, for decorating the cake with frosting.
Frequently Asked Questions
How do I know when the cake is done baking?
You can check for doneness by inserting a toothpick into the center of the cake. If it comes out clean or with a few moist crumbs, the cake is ready.
Can I make this cake ahead of time?
Absolutely! You can prepare the cake layers a day in advance and store them in the fridge. Frost just before serving for the best texture.
Is this cake suitable for dietary restrictions?
You can make a gluten-free version by using gluten-free flour. Additionally, you can substitute dairy ingredients with non-dairy alternatives.
Can I reduce the sweetness of the frosting?
Yes, you can adjust the amount of powdered sugar in the frosting to your taste. Alternatively, adding a pinch of salt can balance the sweetness.
Can I eliminate the Butterfingers?
Certainly! If you prefer a simpler cake, you can leave out the crushed Butterfingers and substitute with another type of candy or omit them entirely.
Conclusion
The Butterfinger Bomb Cake is truly a standout dessert that will impress at any gathering. With its rich chocolate layers, creamy peanut butter frosting, and crunchy Butterfinger topping, it’s a treat that everyone will love. This dessert combines nostalgia with indulgence, making it a favorite for both kids and adults alike. Whether you’re celebrating a special occasion or just satisfying your sweet tooth, this cake is sure to be a hit!
Butterfinger Bomb Cake: An Incredible Ultimate Recipe
- Total Time: 56 minute
Ingredients
– For the Cake:
– 2 cups all-purpose flour
– 1 ½ cups granulated sugar
– ½ cup unsweetened cocoa powder
– 1 cup whole milk
– ½ cup vegetable oil
– 3 large eggs
– 1 tablespoon baking powder
– ¼ teaspoon salt
– 1 tablespoon vanilla extract
– ½ cup boiling water
– For the Butterfinger Frosting:
– 1 cup unsalted butter, softened
– 4 cups powdered sugar
– ½ cup creamy peanut butter
– 3-4 tablespoons milk
– 1 teaspoon vanilla extract
– 3-4 Butterfinger candy bars, crushed (for topping)
Instructions
Creating the Butterfinger Bomb Cake will be a breeze if you follow these steps:
1. Preheat the Oven: Preheat your oven to 350°F (175°C). Grease and flour two 9-inch round cake pans.
2. Mix Dry Ingredients: In a large bowl, whisk together the flour, sugar, cocoa powder, baking powder, and salt until well combined.
3. Combine Wet Ingredients: In a separate bowl, mix the milk, vegetable oil, eggs, and vanilla extract until smooth.
4. Combine Mixtures: Gradually add the wet ingredients to the dry ingredients, stirring until just combined. Be careful not to overmix.
5. Add Boiling Water: Slowly stir in the boiling water to the batter. It will be thin, but that’s okay!
6. Divide Batter: Pour the batter evenly into the prepared cake pans.
7. Bake: Place in the preheated oven and bake for 30-35 minutes, or until a toothpick inserted in the center comes out clean.
8. Cool: Once baked, remove the cakes from the oven and let them cool in the pans for 20 minutes. Then, transfer them to wire racks to cool completely.
9. Prepare the Frosting: In a large bowl, beat the softened butter until creamy. Gradually add powdered sugar and peanut butter, mixing until smooth. Add milk to achieve the desired consistency and mix in the vanilla extract.
10. Assemble the Cake: Once the cakes are completely cool, place one layer on a serving platter. Spread a generous layer of frosting on top. Add the second layer and frost the top and sides of the cake.
11. Decorate: Sprinkle the crushed Butterfinger bars on top of the frosted cake for a delicious finishing touch.
By following these steps, you’ll create a Butterfinger Bomb Cake that is not only incredible in flavor but also stunning in appearance.
- Prep Time: 30 minutes
- Cook Time: 30-35 minutes
Nutrition
- Serving Size: 12
- Calories: 450 kcal
- Fat: 22g
- Protein: 6g