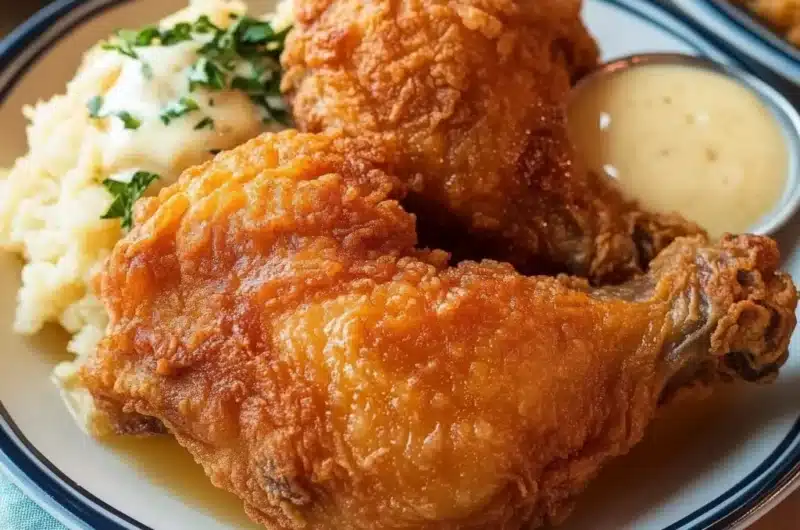
Buttermilk Fried Chicken is a culinary treasure that promises to deliver an amazing dining experience. Originating from Southern cuisine, this dish captivates flavor enthusiasts with its perfectly crispy exterior and tender, juicy meat. When prepared correctly, this classic comfort food becomes a centerpiece at gatherings, family dinners, and weekend feasts. Whether you serve it with a side of mashed potatoes, coleslaw, or cornbread, each bite will take your taste buds to new heights.
In every crispy bite, you will experience the magic that only buttermilk can impart. Its role in the marinating process tenderizes the chicken while creating a rich flavor profile that is simply irresistible. The appeal of Buttermilk Fried Chicken lies not only in its taste but also in the heartwarming nostalgia it evokes. It’s a dish that can transport you to a Sunday dinner with family or a festive summer barbecue.
As we navigate through this guide, you will discover the reasons why this recipe stands out, learn about the preparation and cooking time, and get all the ingredients and step-by-step instructions. No matter your level of culinary expertise, you’ll find that making this dish is not only rewarding but fun and delicious. Let’s dive into the art of crafting the ultimate Buttermilk Fried Chicken that is sure to impress!
Why You’ll Love This Recipe
Buttermilk Fried Chicken has a unique appeal that resonates with food lovers around the world. Here are several reasons why this recipe deserves a spot in your culinary repertoire:
1. Flavor Explosion – The combination of spices, herbs, and buttermilk creates a flavor profile that is rich and satisfying.
2. Ultimate Comfort Food – There’s something unbelievably comforting about crispy fried chicken that makes it perfect for gatherings and celebrations.
3. Crowd-Pleaser – This dish is universally loved, making it an excellent choice for family dinners and parties.
4. Versatile – Enjoy it on its own or in sandwiches, salads, or wraps. The options are endless!
5. Simple Ingredients – Most of the elements are pantry staples, making it easy to whip up without a last-minute grocery run.
6. Impressive Presentation – The golden-brown crust and juicy meat create an appetizing visual appeal that delights the eyes as much as the palate.
With these compelling characteristics, it’s clear why Buttermilk Fried Chicken has earned its place as a beloved dish across generations.
Preparation and Cooking Time
Preparing Buttermilk Fried Chicken requires some planning but is well worth the effort. Here’s a breakdown of the time involved in crafting this amazing dish:
– Preparation Time: 20-30 minutes (including marinating)
– Cooking Time: 15-20 minutes per batch
– Resting Time: 10 minutes (to allow the chicken to crisp)
On average, you’ll need about 1 hour from start to finish, depending on how many pieces you’re frying. Patience during the marinating process is vital to infuse flavors properly, so don’t rush!
Ingredients
– 4 pounds chicken pieces (legs, thighs, wings, breasts)
– 2 cups buttermilk
– 1 tablespoon hot sauce (optional)
– 2 cups all-purpose flour
– 1 tablespoon paprika
– 1 teaspoon garlic powder
– 1 teaspoon onion powder
– 1 teaspoon cayenne pepper (adjust to taste)
– 1 teaspoon salt
– ½ teaspoon black pepper
– Vegetable oil (for frying)
Step-by-Step Instructions
Follow these simple steps to create your crispy, juicy Buttermilk Fried Chicken:
1. Marinate the Chicken: In a large bowl, combine buttermilk and hot sauce (if using). Add chicken pieces, ensuring they are fully submerged. Cover and refrigerate for at least 4 hours, or overnight for the best results.
2. Prepare the Coating: In a separate bowl, whisk together the flour, paprika, garlic powder, onion powder, cayenne pepper, salt, and black pepper.
3. Heat the Oil: In a deep skillet or fryer, pour in enough vegetable oil to submerge the chicken pieces (about 2-3 inches deep). Heat the oil to 350°F (175°C).
4. Coat the Chicken: Remove the chicken from the buttermilk mixture, allowing excess to drip off. Dredge each piece in the seasoned flour mixture, making sure it’s evenly coated.
5. Fry the Chicken: Carefully place a few pieces of chicken in the hot oil, ensuring not to overcrowd the pan. Fry for 15-20 minutes or until golden brown and fully cooked, reaching an internal temperature of 165°F (74°C).
6. Drain the Chicken: Once cooked, transfer the chicken to a wire rack or a plate lined with paper towels to absorb excess oil.
7. Rest the Chicken: Allow the chicken to rest for about 10 minutes to maintain its crispiness before serving.
How to Serve
To enhance your Buttermilk Fried Chicken experience, consider the following serving suggestions:
1. Plate Presentation: Serve the fried chicken on a rustic wooden board or a colorful platter for a homey touch.
2. Accompaniments: Pair it with coleslaw, potato salad, cornbread, or baked beans for a complete Southern meal.
3. Garnish: Sprinkle freshly chopped parsley or chives over the chicken for a pop of color and freshness.
4. Beverage Pairing: Serve with sweet tea, lemonade, or your favorite beer to complement the flavors.
5. Sandwiches: Use leftover chicken to make delightful sandwiches, adding pickles, hot sauce, or your favorite sauce.
By presenting the Buttermilk Fried Chicken beautifully and pairing it with delicious sides, you’ll create a memorable meal that will leave your guests craving more!
Additional Tips
– Maintain Oil Temperature: Use a thermometer to monitor oil temperature. This ensures your chicken fries evenly, leading to a perfect crust.
– Pat Dry: Before marinating, pat the chicken pieces dry. This helps the buttermilk adhere better.
– Double Dredging: For an extra crispy texture, consider double dredging the chicken. Dip in buttermilk, coat in flour, then repeat the process.
– Use Fresh Spices: Freshly ground spices enhance flavor significantly. Consider using whole spices and grinding them before mixing.
– Rest After Cooking: Allow the chicken to rest after frying. This helps the juices redistribute, keeping the meat moist.
Recipe Variation
Get creative in the kitchen with these variations of Buttermilk Fried Chicken:
1. Spicy Buttermilk Fried Chicken: Add more cayenne pepper or include chili powder in the flour mixture for an even spicier kick.
2. Herb-Infused Chicken: Mix fresh or dried herbs, such as thyme or rosemary, into the buttermilk for an aromatic variation.
3. Gluten-Free Version: Substitute all-purpose flour with a gluten-free flour blend to make the dish suitable for gluten-sensitive guests.
4. Air-Fried Buttermilk Chicken: If you prefer a healthier option, try air frying the coated chicken pieces for a crispy texture with less oil.
Freezing and Storage
– Storage: Keep leftover fried chicken in an airtight container in the refrigerator. It will stay fresh for about 3 to 4 days.
– Freezing: For longer storage, freeze the fully cooked chicken. Wrap it tightly in plastic wrap and place it in a freezer-safe bag. It can last up to 3 months.
– Reheating: Reheat chicken in an oven to retain its crispiness. Preheat the oven to 375°F (190°C) and cook for about 20 minutes, or until heated through.
Special Equipment
To prepare the ultimate Buttermilk Fried Chicken, ensure you have the following:
– Deep Skillet or Dutch Oven: For frying, a deep skillet or Dutch oven helps maintain the oil temperature.
– Thermometer: An instant-read thermometer is essential for checking oil temperature and chicken doneness.
– Wire Rack: Use a wire rack for draining the excess oil after frying. It prevents sogginess.
– Mixing Bowls: Use various-sized mixing bowls for marinating and coating the chicken.
– Tongs: Handy for safely placing and flipping chicken pieces in hot oil.
Frequently Asked Questions
Can I use chicken breasts for this recipe?
Yes, chicken breasts work well. Just adjust frying time based on thickness.
Is it necessary to marinate overnight?
While marinating for at least 4 hours is ideal, overnight allows for deeper flavor and tenderness.
What if I don’t have buttermilk?
You can make a substitute by mixing one cup of milk with a tablespoon of lemon juice or vinegar. Let it sit for 5-10 minutes.
Can I bake the chicken instead of frying?
While frying gives the best texture, you can bake it at 400°F (204°C) for about 25-30 minutes after coating.
Is this dish suitable for meal prep?
Absolutely! You can marinate the chicken, cook it, and store it for quick meals throughout the week.
Conclusion
Buttermilk Fried Chicken is more than just a meal; it’s an experience filled with flavorful memories and joy. By following this guide, you’ve unlocked the secrets to creating tender, juicy, and impossibly crispy chicken that everyone will love. With its versatility and convenience, this dish is sure to become a staple in your culinary repertoire. Impress your family and friends with your cooking prowess and enjoy every delicious bite!

Buttermilk Fried Chicken: An Incredible Ultimate Recipe
- Total Time: 35 minutes
Ingredients
– 4 pounds chicken pieces (legs, thighs, wings, breasts)
– 2 cups buttermilk
– 1 tablespoon hot sauce (optional)
– 2 cups all-purpose flour
– 1 tablespoon paprika
– 1 teaspoon garlic powder
– 1 teaspoon onion powder
– 1 teaspoon cayenne pepper (adjust to taste)
– 1 teaspoon salt
– ½ teaspoon black pepper
– Vegetable oil (for frying)
Instructions
Follow these simple steps to create your crispy, juicy Buttermilk Fried Chicken:
1. Marinate the Chicken: In a large bowl, combine buttermilk and hot sauce (if using). Add chicken pieces, ensuring they are fully submerged. Cover and refrigerate for at least 4 hours, or overnight for the best results.
2. Prepare the Coating: In a separate bowl, whisk together the flour, paprika, garlic powder, onion powder, cayenne pepper, salt, and black pepper.
3. Heat the Oil: In a deep skillet or fryer, pour in enough vegetable oil to submerge the chicken pieces (about 2-3 inches deep). Heat the oil to 350°F (175°C).
4. Coat the Chicken: Remove the chicken from the buttermilk mixture, allowing excess to drip off. Dredge each piece in the seasoned flour mixture, making sure it’s evenly coated.
5. Fry the Chicken: Carefully place a few pieces of chicken in the hot oil, ensuring not to overcrowd the pan. Fry for 15-20 minutes or until golden brown and fully cooked, reaching an internal temperature of 165°F (74°C).
6. Drain the Chicken: Once cooked, transfer the chicken to a wire rack or a plate lined with paper towels to absorb excess oil.
7. Rest the Chicken: Allow the chicken to rest for about 10 minutes to maintain its crispiness before serving.
- Prep Time: 15 minutes
- Cook Time: 20 minutes
Nutrition
- Serving Size: 8
- Calories: 380 kcal
- Fat: 22g
- Protein: 24g