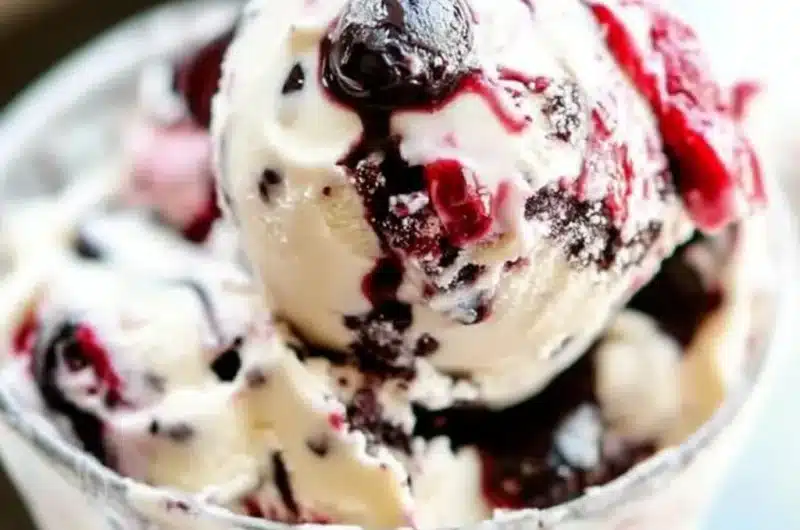
Cherry Garcia Ice Cream is a delightful combination of cherry-flavored ice cream with chunks of chocolate and bits of sweet cherries. This amazing dessert pays homage to the famous musician Jerry Garcia, and it’s loved by many for its rich flavors and creamy texture. The unique blend of sweet and tart makes each spoonful a savory delight, a taste that lingers and leaves you wanting more. If you have a sweet tooth or simply enjoy a good treat, you’ll find that making this ice cream brings joy into each scoop.
Cherry Garcia Ice Cream not only satisfies your cravings, but it also inspires creativity in the kitchen. Creating your own version allows you to customize ingredients to fit your preferences. Whether you prefer a more tart ice cream or wish to add extra chocolate chunks, the possibilities are endless. This incredible recipe allows for adjustments that cater to your personal taste. Let’s explore the extraordinary reasons you’ll love this homemade version of Cherry Garcia Ice Cream, perfectly suited for warm summer days or cozy winter evenings.
Imagine scooping into a bowl of creamy ice cream, filled with chewy cherry pieces and rich chocolate flavors. You’ll find this irresistible treat is not just for kids; it’s a nostalgic favorite for everyone. With the upcoming recipe, you’ll discover just how simple it is to make this classic dessert right at home. You can impress friends and family or merely enjoy this indulgence all on your own.
Why You’ll Love This Recipe
Cherry Garcia Ice Cream is the perfect combination of flavors and textures that come together seamlessly. Here are some reasons why you’ll adore this recipe:
1. Simple Ingredients: Most of the ingredients are easily accessible and might already be in your kitchen.
2. Customizable: Feel free to adjust the sweetness or add mix-ins, such as nuts or additional fruits.
3. No Ice Cream Maker Required: Even if you don’t have an ice cream maker, you can still create this delightful treat.
4. Perfect for Any Season: This ice cream is a favorite that can be enjoyed year-round.
5. Quick to Prepare: With minimal effort, your homemade ice cream can be ready to serve in just a few hours.
These appealing points make Cherry Garcia Ice Cream a beloved recipe that speaks to every palate. You’ll quickly understand why fans of all ages savor every delicious bite!
Preparation and Cooking Time
Creating your Cherry Garcia Ice Cream will take a total of about 6 hours, with the majority of the time spent on freezing. Here’s the breakdown of the time involved:
– Preparation Time: 15 minutes
– Chilling Time: 1 hour
– Freezing Time: 4 to 5 hours
This timing gives a good estimate, although the actual freezing time may vary based on your freezer’s efficiency.
Ingredients
– 2 cups heavy whipping cream
– 1 cup whole milk
– 3/4 cup granulated sugar
– 1 teaspoon vanilla extract
– 1 tablespoon cherry extract
– 1 1/2 cups chopped sweet cherries (fresh or frozen)
– 1/2 cup semi-sweet chocolate chips
Step-by-Step Instructions
Making Cherry Garcia Ice Cream is an enjoyable process if you follow these straightforward steps:
1. Combine Base Ingredients: In a mixing bowl, combine heavy whipping cream, whole milk, and granulated sugar. Whisk together until sugar is dissolved.
2. Add Flavors: Stir in the vanilla and cherry extracts to add that delightful cherry flavor to your base mixture.
3. Incorporate Cherries: Gently fold in the chopped cherries and chocolate chips. Make sure they are evenly distributed throughout the mixture.
4. Chill the Mixture: Refrigerate the mixture for 1 hour to allow the flavors to meld and chill it before freezing.
5. Freeze the Ice Cream: Transfer the chilled mixture to a container and place it in the freezer. Allow it to freeze for 4 to 5 hours or until firm. Stir it occasionally during the first couple of hours for a creamier texture.
It’s as simple as that! You’ll have your own delectable Cherry Garcia Ice Cream ready to serve in no time.
How to Serve
When it comes to making the perfect presentation for your Cherry Garcia Ice Cream, consider the following tips:
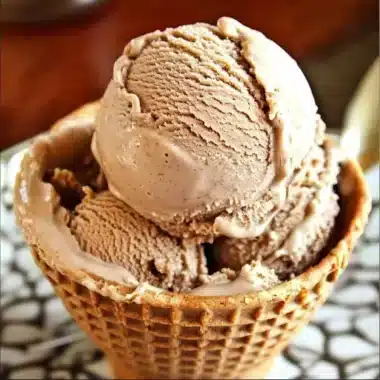
1. Serve in Bowls or Cones: For a classic approach, use ice cream bowls or cones. Waffle cones add an additional layer of flavor and texture.
2. Add Toppings: Enhance the experience with toppings like hot fudge, whipped cream, or crushed nuts.
3. Garnish with Cherries: A fresh cherry on top makes for an eye-catching and tasty decoration.
4. Pair with Desserts: Serve alongside brownies or a slice of chocolate cake for a true dessert feast.
5. Consider Beverages: Pair your ice cream with iced coffee or a milkshake for added enjoyment.
By following these serving suggestions, you’ll elevate your homemade Cherry Garcia Ice Cream experience, making it memorable for you and your guests!
Additional Tips
– Use Fresh Ingredients: Opt for ripe, sweet cherries for the best flavor, as they will enhance the overall taste of your Cherry Garcia Ice Cream.
– Taste Test: Before freezing, taste the mixture and adjust the sweetness if necessary. This ensures the perfect balance before it becomes ice cream.
– Stir Occasionally: During the initial freezing period, stir the mixture every 30 to 60 minutes. This helps create a smoother texture by breaking up ice crystals.
Recipe Variation
Experimenting with flavors can make your Cherry Garcia Ice Cream even more exciting. Here are a few variations to try:
1. Chocolate Cherry Swirl: After mixing the base, swirl in some chocolate syrup for extra richness before freezing.
2. Cherry-Lime Fusion: Add a splash of lime juice or some zest for a refreshing citrus twist that pairs beautifully with the cherries.
3. Almond Flavor: Incorporate almond extract in place of cherry extract for a delightful cherry-almond ice cream experience.
Freezing and Storage
– Storage: Store your Cherry Garcia Ice Cream in an airtight container to maintain freshness. It can last up to 2 weeks in the freezer.
– Freezing: For the best texture, allow the ice cream to set for at least 4 to 5 hours. Let it sit at room temperature for a few minutes before scooping to ease the serving process.
Special Equipment
While you can create Cherry Garcia Ice Cream without specialized tools, having a few items can enhance your baking experience:
– Mixing bowls
– Whisk or electric mixer for combining ingredients
– A sturdy spatula for folding in the chunks
– An airtight container for freezing the ice cream
Frequently Asked Questions
Can I use frozen cherries instead of fresh?
Yes, frozen cherries can work well. Just ensure they are thawed and drained before adding to the mixture.
What if I don’t have cherry extract?
You can substitute it with additional vanilla extract or use a cherry-flavored syrup for a different but still delicious flavor.
How can I make this dairy-free?
Consider using coconut cream and almond milk as replacements for the heavy cream and whole milk.
Why is my ice cream icy?
If your ice cream turns out icy, it could be due to insufficient mixing or freezing time. Stirring periodically while freezing prevents large ice crystals from forming.
Conclusion
Making Cherry Garcia Ice Cream at home doesn’t have to be complicated. By following this easy recipe, you can create a delicious treat that is perfect for any occasion. Whether you are enjoying it on a hot summer day or serving it as a comforting dessert during colder months, this ice cream will surely satisfy your sweet cravings. So gather your ingredients, invite friends over, and treat them to a scoop (or two!) of your homemade Cherry Garcia Ice Cream!
Cherry Garcia Ice Cream: An Incredible Ultimate Recipe with 5 Steps
- Total Time: 37 minute
Ingredients
– 2 cups heavy whipping cream
– 1 cup whole milk
– 3/4 cup granulated sugar
– 1 teaspoon vanilla extract
– 1 tablespoon cherry extract
– 1 1/2 cups chopped sweet cherries (fresh or frozen)
– 1/2 cup semi-sweet chocolate chips
Instructions
Making Cherry Garcia Ice Cream is an enjoyable process if you follow these straightforward steps:
1. Combine Base Ingredients: In a mixing bowl, combine heavy whipping cream, whole milk, and granulated sugar. Whisk together until sugar is dissolved.
2. Add Flavors: Stir in the vanilla and cherry extracts to add that delightful cherry flavor to your base mixture.
3. Incorporate Cherries: Gently fold in the chopped cherries and chocolate chips. Make sure they are evenly distributed throughout the mixture.
4. Chill the Mixture: Refrigerate the mixture for 1 hour to allow the flavors to meld and chill it before freezing.
5. Freeze the Ice Cream: Transfer the chilled mixture to a container and place it in the freezer. Allow it to freeze for 4 to 5 hours or until firm. Stir it occasionally during the first couple of hours for a creamier texture.
It’s as simple as that! You’ll have your own delectable Cherry Garcia Ice Cream ready to serve in no time.
- Prep Time: 15 minutes
- Cook Time: N/A
Nutrition
- Serving Size: 6-8 servings
- Calories: 300 kcal per serving
- Fat: 18g
- Protein: 3g