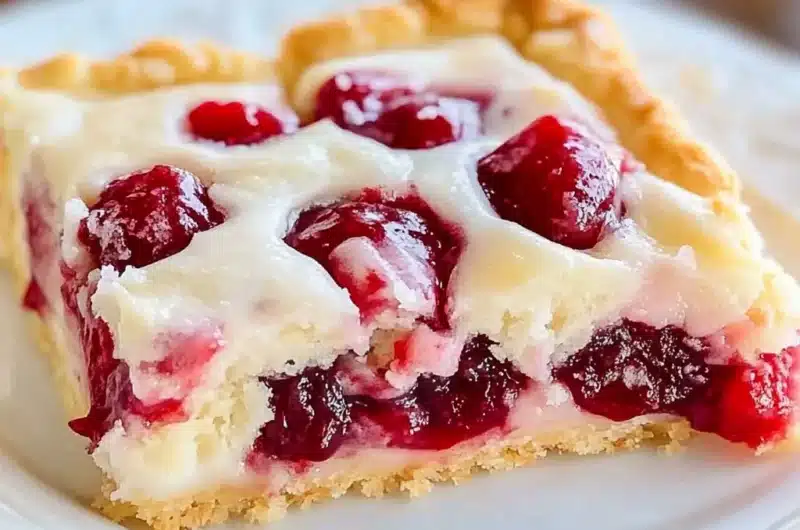
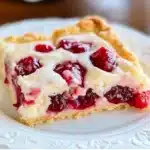
Cherry Pie Bars are a delightful treat that brings the classic flavor of cherry pie into a convenient bar form. These bars are not only delicious but also incredibly easy to make, making them the perfect dessert for any occasion. From the buttery crust to the sweet and tangy cherry filling, the combination of flavors is truly irresistible. If you love cherries, you’ll definitely want to make these amazing bars!
The first bite of Cherry Pie Bars will remind you of summer picnics and family gatherings. They provide the perfect balance of sweetness and tartness, making each bite a heavenly experience. These bars are versatile, as they can be served warm with a scoop of vanilla ice cream or chilled as a refreshing snack. In this guide, you will learn why this recipe has become a household favorite, how to prepare it, and tips on serving it perfectly. Whether you are a seasoned baker or just starting, these Cherry Pie Bars will surely impress those you share them with.
With their bright red color and inviting aroma, Cherry Pie Bars not only taste great but also look stunning on any dessert table. They are sure to bring smiles to the faces of family and friends. Let’s dive into what makes Cherry Pie Bars an essential recipe in your baking repertoire!
Why You’ll Love This Recipe
Cherry Pie Bars offer a delightful twist on a traditional dessert with many reasons to love them:
1. Easy to Make – The step-by-step process makes it simple for bakers of all levels to create these delicious bars.
2. Perfect for Sharing – These bars are great for potlucks, picnics, or family gatherings, as they’re easily sliced for serving.
3. Wonderful Flavor – The mix of sweet cherries and buttery crust creates a flavor combination that’s hard to resist.
4. Versatile Enjoyment – Serve them on their own, with ice cream, or topped with whipped cream for an extra treat.
5. Make Ahead – These bars can be prepared in advance and stored, making them perfect for busy schedules.
6. Customizable – You can use fresh cherries, canned cherries, or even other fruits to suit your taste.
These factors make Cherry Pie Bars not just a dessert, but an experience that you and your loved ones will cherish!
Preparation and Cooking Time
To create your Cherry Pie Bars, you’ll need a little bit of time and effort. Here’s a breakdown of what to expect:
– Preparation Time: 30 minutes
– Cooking Time: 45-55 minutes
– Cooling Time: 30 minutes
In total, you can expect to spend about 1 hour and 30 minutes from start to finish, allowing ample time for cooling. These times can vary based on your baking experience and kitchen efficiency.
Ingredients
– 2 cups all-purpose flour
– 1 cup granulated sugar
– 1/2 teaspoon salt
– 1/2 teaspoon baking powder
– 1 cup unsalted butter, softened
– 1 large egg
– 1 teaspoon vanilla extract
– 1 can (21 ounces) cherry pie filling
– 1 tablespoon lemon juice
– Powdered sugar, for dusting (optional)
Step-by-Step Instructions
Creating Cherry Pie Bars is simple if you follow these steps:
1. Preheat Oven: Preheat your oven to 350°F (175°C) and grease a 9×13-inch baking dish.
2. Mix Dry Ingredients: In a large bowl, combine the flour, sugar, salt, and baking powder.
3. Cream Butter: In a separate bowl, cream together the softened butter and sugar until smooth.
4. Add Egg and Vanilla: Beat in the egg and vanilla extract into the butter mixture until fully incorporated.
5. Combine Mixtures: Gradually mix the dry ingredients into the wet ingredients until a dough forms.
6. Divide Dough: Take about two-thirds of the dough and press it evenly into the bottom of the prepared baking dish to form a crust.
7. Spread Cherry Filling: Pour the cherry pie filling over the crust, spreading it evenly with a spatula.
8. Top with Dough: Take the remaining dough and crumble it over the cherry filling. It’s okay if some cherry filling peeks through.
9. Bake: Place in the oven and bake for 45-55 minutes, or until the top is golden brown and the filling is bubbly.
10. Cool: Remove from the oven and let it cool in the dish for about 30 minutes before slicing into bars.
11. Dust with Powdered Sugar: Optionally, dust the cooled bars with powdered sugar for an extra touch of sweetness.
By carefully following these steps, you’ll have delicious Cherry Pie Bars that are sure to impress!
How to Serve
When it comes to serving your Cherry Pie Bars, consider these delicious options:
1. Presentation: Arrange the bars on a colorful serving platter. A simple design enhances their appeal.
2. Garnish: Top each bar with a dollop of whipped cream or a scoop of vanilla ice cream for a decadent touch.
3. Accompaniments: Consider pairing them with fresh cherries or a light fruit salad to complement the flavors.
4. Slice Size: Serve in generous portions but encourage a second helping for those who can’t get enough!
5. Beverage Pairing: These bars pair beautifully with a glass of milk, a cup of coffee, or even a light dessert wine.
By paying attention to how you serve Cherry Pie Bars, you can make the experience even more special and memorable for your guests. Enjoy every bite!
Additional Tips
– Use Fresh Cherries: If you have access to fresh cherries, consider pitting and using them for even better flavor.
– Let the Bars Cool Completely: Allow the bars to cool fully before cutting to get clean slices and prevent the filling from running.
– Experiment with Toppings: Try drizzling chocolate or adding a sprinkle of chopped nuts on top for added texture.
Recipe Variation
You can get creative with your Cherry Pie Bars! Here are some ideas:
1. Mixed Berry Version: Substitute half of the cherry filling with blueberry or raspberry filling for a delightful mixed berry twist.
2. Almond Flavoring: Add a teaspoon of almond extract to the cherry filling for a unique flavor that pairs wonderfully with cherries.
3. Crumble Topping: Instead of flattening the remaining dough, create a crumble topping for a more textured finish.
Freezing and Storage
– Storage: Keep the Cherry Pie Bars in an airtight container in the refrigerator for up to 4 to 5 days. This helps to maintain their freshness and flavor.
– Freezing: If you wish to make them ahead, you can freeze the bars after they cool completely. Wrap them well in plastic wrap and aluminum foil, and store in the freezer for up to 3 months. When ready to enjoy, thaw in the refrigerator overnight.
Special Equipment
While making Cherry Pie Bars is simple, having the right tools will enhance your baking experience:
– Mixing bowls: Use large bowls for mixing your ingredients.
– Measuring cups and spoons: Accurately measure your ingredients for the best results.
– Spatula: Helpful for spreading the cherry filling and crumbling the topping evenly.
– 9×13-inch baking dish: Essential for baking your bars evenly.
– Cooling rack: A cooling rack is ideal for cooling the bars uniformly.
Frequently Asked Questions
Can I use frozen cherries instead of canned pie filling?
Yes, you can use thawed frozen cherries, but you might need to add sugar or cornstarch to thicken the filling.
How do I know when the Cherry Pie Bars are done baking?
Look for a golden brown topping, and ensure the filling is bubbling. A toothpick should come out clean from the crust.
Can I make these bars gluten-free?
Absolutely! Substitute the all-purpose flour with a gluten-free flour blend or almond flour for a gluten-free option.
What can I serve with Cherry Pie Bars?
These bars are delightful on their own or served with ice cream, whipped cream, or a drizzle of chocolate sauce.
How do I store leftover Cherry Pie Bars?
Store them in an airtight container in the refrigerator. You can also freeze them for later enjoyment.
Conclusion
Cherry Pie Bars are not just a delicious dessert; they encapsulate the joys of summer in each bite. With their tasty cherry filling, buttery crust, and endless ways to enjoy them, they truly shine at gatherings or as a sweet treat at home. You can create memorable moments with family and friends while they savor these delightful bars. So, gather your ingredients, follow the steps, and indulge in the amazing flavors of Cherry Pie Bars today!
Cherry Pie Bars: An Amazing Ultimate Recipe You Can’t Resist
- Total Time: 9 minute
Ingredients
– 2 cups all-purpose flour
– 1 cup granulated sugar
– 1/2 teaspoon salt
– 1/2 teaspoon baking powder
– 1 cup unsalted butter, softened
– 1 large egg
– 1 teaspoon vanilla extract
– 1 can (21 ounces) cherry pie filling
– 1 tablespoon lemon juice
– Powdered sugar, for dusting (optional)
Instructions
Creating Cherry Pie Bars is simple if you follow these steps:
1. Preheat Oven: Preheat your oven to 350°F (175°C) and grease a 9×13-inch baking dish.
2. Mix Dry Ingredients: In a large bowl, combine the flour, sugar, salt, and baking powder.
3. Cream Butter: In a separate bowl, cream together the softened butter and sugar until smooth.
4. Add Egg and Vanilla: Beat in the egg and vanilla extract into the butter mixture until fully incorporated.
5. Combine Mixtures: Gradually mix the dry ingredients into the wet ingredients until a dough forms.
6. Divide Dough: Take about two-thirds of the dough and press it evenly into the bottom of the prepared baking dish to form a crust.
7. Spread Cherry Filling: Pour the cherry pie filling over the crust, spreading it evenly with a spatula.
8. Top with Dough: Take the remaining dough and crumble it over the cherry filling. It’s okay if some cherry filling peeks through.
9. Bake: Place in the oven and bake for 45-55 minutes, or until the top is golden brown and the filling is bubbly.
10. Cool: Remove from the oven and let it cool in the dish for about 30 minutes before slicing into bars.
11. Dust with Powdered Sugar: Optionally, dust the cooled bars with powdered sugar for an extra touch of sweetness.
By carefully following these steps, you’ll have delicious Cherry Pie Bars that are sure to impress!
- Prep Time: 30 minutes
- Cook Time: 45-55 minutes
Nutrition
- Serving Size: 12 bars
- Calories: 220 kcal
- Fat: 10g
- Protein: 2g


I just put mine in the oven. I didn’t see where you are to add lemon juice. So I added it to dough. I hope they turn out. You need to check your recipe.
★★★★