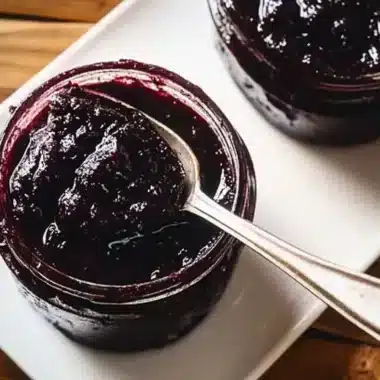
Cherry Pie Filling is a delightful addition to any dessert spread. This sweet and tart mixture can elevate everything from a classic cherry pie to a variety of other delectable creations. The irresistible combination of flavors brings joy to gatherings, celebrations, or even quiet moments at home. Whether you are using it as a topping for pancakes or as a filling for pastries, this cherry pie filling recipe is genuinely essential for any dessert lover.
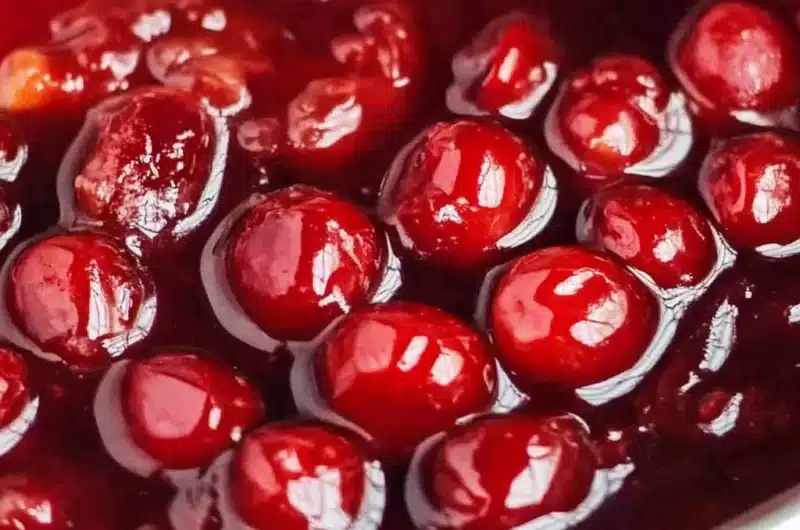
When you think of cherry pie filling, you might picture luscious red cherries soaked in a sweet syrup. This recipe takes fresh or frozen cherries and transforms them into something magical. Imagine the delightful aroma of cherries simmering on the stove, filling your kitchen with a warm sweetness. The vibrant color and rich flavor are not just wonderful to look at; they add a delightful burst of taste to your favorite dishes as well.
In this guide, we will explore why this cherry pie filling recipe is loved by many, its preparation and cooking times, the essential ingredients you’ll need, clear step-by-step instructions, and lastly, how to serve this delightful concoction. Get ready to create a cherry pie filling that will impress your family and friends without the fuss.
Why You’ll Love This Recipe
Cherry Pie Filling is more than just a simple recipe; it is a versatile and flavorful addition to many dishes. Here are some compelling reasons why you’ll adore this cherry pie filling recipe:
1. Versatile Usage: Besides the classic pie, it can be used in tarts, cheesecakes, and even as a topping for yogurt or ice cream.
2. Simple Ingredients: The ingredients are basic and easy to find. Most of them are likely already in your pantry.
3. Delicious Flavor: The balance of sweet and tart cherries creates a beautiful flavor profile that is irresistible.
4. Quick Preparation: This recipe is straightforward and requires minimal time, perfect for a busy lifestyle.
5. Fresh or Frozen Cherries: You can use fresh cherries in season or frozen cherries when they are out of season, ensuring deliciousness year-round.
6. Homemade Goodness: Making your own cherry pie filling allows you to control the sweetness, giving it a personalized touch.
With these factors in mind, you’ll quickly see why this cherry pie filling recipe is a go-to for many home cooks and bakers alike!
Preparation and Cooking Time
Creating your own cherry pie filling is a quick and easy process. Below is the breakdown of time required for this recipe:
– Preparation Time: 10 minutes
– Cooking Time: 20 minutes
– Total Time: 30 minutes
These times may vary slightly based on your experience and kitchen setup, but this guide will help you streamline the process.
Ingredients
– 4 cups fresh or frozen cherries, pitted
– 1 cup granulated sugar
– 1/4 cup cornstarch
– 1/4 teaspoon almond extract
– 1/4 teaspoon vanilla extract
– 1 tablespoon lemon juice
– 1/4 teaspoon salt
– 1/4 cup water
Step-by-Step Instructions
Preparing your cherry pie filling is simple if you follow these easy steps:
1. Gather Ingredients: Assemble all the ingredients on your countertop for easy access.
2. Combine Dry Ingredients: In a medium bowl, mix the sugar, cornstarch, and salt together until well combined.
3. Prepare Cherries: If using fresh cherries, rinse them thoroughly, pit them, and slice them in half.
4. Heat Cherries: In a saucepan, add the cherries, water, lemon juice, almond extract, and vanilla extract.
5. Add Sugar Mixture: Gradually sprinkle the dry mixture over the cherries while stirring gently to avoid breaking the cherries.
6. Cook the Mixture: Place the saucepan over medium heat and continuously stir. Cook for about 5-7 minutes until the mixture starts to bubble.
7. Thicken the Filling: Once bubbling, continue to cook for an additional 5-7 minutes until the mixture thickens and the cherries soften.
8. Cool the Filling: Remove the pan from heat. Allow the cherry filling to cool to room temperature.
9. Store or Use: Use immediately in your recipes or store in an airtight container in the refrigerator for up to one week.
These steps will guide you in creating a delicious cherry pie filling effortlessly!
How to Serve
Cherry Pie Filling can be enjoyed in several delightful ways. Here are some tips for serving this incredible mixture:
1. Cherry Pie: Use the filling in a classic cherry pie by pouring it into a prepared pie crust and topping with lattice or a simple crust.
2. Tarts: Create individual cherry tarts using puff pastry or short pastry shells. Fill them with the cherry mixture and bake until golden.
3. Ice Cream Topping: Serve warm on top of vanilla ice cream for a quick yet impressive dessert.
4. Yogurt Parfaits: Layer the filling with yogurt and granola for a delicious breakfast or snack option.
5. Cheesecake: Drizzle the cherry filling over your favorite cheesecake for a fruity twist.
By incorporating the cherry pie filling into a variety of dishes, you can enjoy its deliciousness in countless ways!
Additional Tips
– Use Fresh Cherries: For the best flavor, consider using fresh, in-season cherries when available. They provide a vibrant taste and texture.
– Adjust the Sweetness: Depending on your taste preference, feel free to decrease or increase the sugar based on the tartness of the cherries used.
– Experiment with Flavor: Adding a hint of cinnamon or nutmeg can elevate the filling’s flavor profile even more.
– Check Consistency: If you prefer a thicker filling, cook it a little longer; if you want it thinner, add a touch more water during cooking.
Recipe Variation
Explore these variations to personalize your cherry pie filling experience:
1. Spiced Cherry Filling: Add a pinch of ground cloves or allspice for a warm, spiced flavor that works wonderfully in pies.
2. Lemon Cherry Filling: Increase the lemon juice to add a zesty touch; it brightens the cherry flavor and balances sweetness.
3. Cherry Almond Filling: Incorporate a few more drops of almond extract for a pronounced almond flavor that pairs beautifully with cherries.
4. Luxurious Chocolate Cherry Filling: Mix in some cocoa powder or dark chocolate for a decadent chocolate-cherry experience.
Freezing and Storage
– Storage: Keep the cherry pie filling in an airtight container in the refrigerator. It will stay fresh for up to one week.
– Freezing: To freeze, store the filling in a freezer-safe container. It can last up to three months. Thaw overnight in the refrigerator before using.
Special Equipment
To prepare your cherry pie filling, you’ll need a few simple kitchen tools:
– Medium saucepan
– Mixing bowls
– Measuring cups and spoons
– Wooden spoon or spatula for stirring
– Airtight container for storage
Frequently Asked Questions
Can I use canned cherries for the filling?
Yes, canned cherries can be used; however, they may be softer and sweeter. Adjust the sugar accordingly.
How can I ensure my filling doesn’t overflow in the pie?
Make sure to let the filling cool slightly before pouring it into the pie crust, as it will thicken more upon cooling.
What other fruits pair well with cherries in pies?
Fruits like blueberries, raspberries, and even apples can enhance the cherry pie filling, providing a mixed fruit experience.
Can I use this filling for other desserts?
Absolutely. This filling is perfect for trifles, tarts, or as a topping for pancakes and waffles.
Is this cherry pie filling gluten-free?
Yes, all ingredients used in this recipe are gluten-free, making it suitable for those with gluten sensitivities.
Conclusion
Cherry Pie Filling is an essential recipe for any dessert enthusiast. Its versatility makes it adaptable to many dishes, while its simple preparation ensures it is not a hassle. This recipe captures the delightful essence of cherries, balancing their sweetness with just the right amount of tartness. Whether served warm over ice cream or baked within a flaky pie crust, this filling will surely impress and satisfy.

Cherry Pie Filling: An Incredible Essential Recipe
- Total Time: 35 minutes
Ingredients
– 4 cups fresh or frozen cherries, pitted
– 1 cup granulated sugar
– 1/4 cup cornstarch
– 1/4 teaspoon almond extract
– 1/4 teaspoon vanilla extract
– 1 tablespoon lemon juice
– 1/4 teaspoon salt
– 1/4 cup water
Instructions
Preparing your cherry pie filling is simple if you follow these easy steps:
1. Gather Ingredients: Assemble all the ingredients on your countertop for easy access.
2. Combine Dry Ingredients: In a medium bowl, mix the sugar, cornstarch, and salt together until well combined.
3. Prepare Cherries: If using fresh cherries, rinse them thoroughly, pit them, and slice them in half.
4. Heat Cherries: In a saucepan, add the cherries, water, lemon juice, almond extract, and vanilla extract.
5. Add Sugar Mixture: Gradually sprinkle the dry mixture over the cherries while stirring gently to avoid breaking the cherries.
6. Cook the Mixture: Place the saucepan over medium heat and continuously stir. Cook for about 5-7 minutes until the mixture starts to bubble.
7. Thicken the Filling: Once bubbling, continue to cook for an additional 5-7 minutes until the mixture thickens and the cherries soften.
8. Cool the Filling: Remove the pan from heat. Allow the cherry filling to cool to room temperature.
9. Store or Use: Use immediately in your recipes or store in an airtight container in the refrigerator for up to one week.
These steps will guide you in creating a delicious cherry pie filling effortlessly!
- Prep Time: 15 minutes
- Cook Time: 20 minutes
Nutrition
- Serving Size: 2 cups
- Calories: 290 kcal
- Fat: 0g
- Protein: 1g