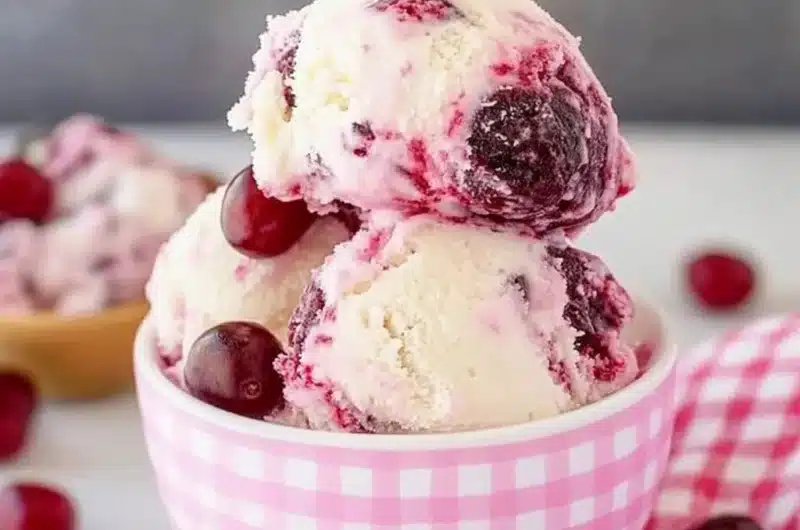
Cherry Vanilla Ice Cream is a wonderful treat that combines the rich creaminess of vanilla with the sweet-tartness of cherries. This delightful ice cream is not just a dessert; it’s a refreshing escape on a warm summer day. Imagine each spoonful bursting with flavors that dance on your taste buds! Whether you’re relaxing by the pool, hosting a party, or just indulging yourself, Cherry Vanilla Ice Cream is sure to impress.
This homemade Cherry Vanilla Ice Cream will take your taste satisfaction to the next level. Its incredible flavor profile makes it a favorite among all age groups. If you’re looking for a delicious way to cool down or a unique dessert to impress your guests, this is the perfect recipe for you. In this guide, you’ll discover how to craft this delightful ice cream, why it’s such a hit, and some tips on serving it to create an unforgettable experience.
So, prepare to embark on a culinary adventure with Cherry Vanilla Ice Cream. You’ll be amazed at how easy it is to make a treat that tastes like it’s from a gourmet ice cream shop!
Why You’ll Love This Recipe
Cherry Vanilla Ice Cream stands out for several reasons that will make you fall in love with it:
1. Simple to Make: You don’t need to be a culinary expert to whip this up. The straightforward steps make it accessible for everyone.
2. Fresh Ingredients: Using real cherries amplifies the flavor, giving your ice cream a homemade touch that store-bought cannot compete with.
3. Naturally Delicious: With no artificial flavors or preservatives, this ice cream hits the sweet spot while remaining wholesome.
4. Versatile Flavors: Adjust the recipe to include chocolate chips or nuts for added texture and taste.
5. Perfect for Any Occasion: Whether for a summer BBQ or a cozy winter night, this dessert is ideal for any gathering.
6. Impressive Presentation: It looks as amazing as it tastes, making it perfect for special occasions.
All these factors explain why Cherry Vanilla Ice Cream is the ultimate treat in the dessert world. Once you try this recipe, you will understand why everyone raves about it!
Preparation and Cooking Time
Making Cherry Vanilla Ice Cream is quick and straightforward. Below is the estimated time you will need:
– Preparation Time: 15 minutes
– Chilling Time: 4-6 hours (or overnight for best results)
– Churning Time: About 20-30 minutes
In total, you should plan to set aside about 6 hours to make this delightful ice cream. Most of this time is spent chilling the mixture, allowing the flavors to meld beautifully.
Ingredients
– 2 cups heavy whipping cream
– 1 cup whole milk
– 3/4 cup granulated sugar
– 1 tablespoon vanilla extract
– 1/2 teaspoon almond extract
– 1 cup fresh cherries, pitted and halved (or use frozen, thawed cherries)
– A pinch of salt
Step-by-Step Instructions
Creating homemade Cherry Vanilla Ice Cream is easy if you follow these step-by-step instructions:
1. Mix the Base: In a mixing bowl, whisk together the heavy whipping cream, whole milk, sugar, vanilla extract, almond extract, and salt until the sugar is fully dissolved.
2. Add the Cherries: Fold the halved cherries into the mixture, making sure they are evenly distributed for a perfect balance of flavor in every bite.
3. Chill the Mixture: Cover the bowl and refrigerate the mixture for at least 4 hours, or overnight, to enhance the flavor.
4. Churn the Ice Cream: Pour the chilled mixture into your ice cream maker and churn according to the manufacturer’s instructions until it reaches a soft-serve consistency. This usually takes about 20-30 minutes.
5. Freeze and Serve: Transfer the ice cream to an airtight container and freeze for at least 2 hours, or until firm. Scoop into bowls and enjoy!
These easy steps will have you ready to relish in your homemade Cherry Vanilla Ice Cream.
How to Serve
To enhance your Cherry Vanilla Ice Cream experience, consider the following serving suggestions:
1. Elegant Bowls: Serve the ice cream in beautiful dessert bowls or tall glasses for an elegant presentation.
2. Toppings Galore: Offer a variety of toppings like chocolate syrup, sprinkles, or nuts to allow your guests to personalize their servings.
3. Garnish: Fresh mint leaves or additional cherry halves make for stunning garnishes that add a fresh touch.
4. Blend it Up: Turn your dessert into a sundae by adding whipped cream and a cherry on top for a classic diner-style treat.
5. Pair with Desserts: This ice cream is also fantastic when served alongside a slice of cake or pie for added flavor dynamics.
Taking these extra steps ensures that everyone will not only enjoy the Cherry Vanilla Ice Cream but remember how beautifully it was presented!
Now you are equipped to make and serve the best Cherry Vanilla Ice Cream imaginable. Enjoy the process and the delicious results!
Additional Tips
– Use Fresh Cherries: For the best flavor, opt for fresh cherries when they are in season. They add a bright, natural sweetness that elevates the ice cream.
– Chill Your Equipment: If possible, chill your mixing bowl and ice cream maker bowl before use. This helps the ice cream freeze faster and results in a smoother texture.
– Taste Test: Before chilling, taste your mixture! Adjust the sweetness or flavor profile as desired to ensure it’s perfect for your palate.
– Experiment with Extracts: Play around with different extracts, like coconut or mint, to add a unique twist to your Cherry Vanilla Ice Cream.
– Enjoy Within a Week: For optimal taste and quality, enjoy your homemade ice cream within a week of making it.
Recipe Variation
Feel free to switch things up! Here are a few variations to try:
1. Cherry Chocolate Chip Ice Cream: Fold in some dark chocolate or white chocolate chips for a delightful contrast of flavors.
2. Cherry Almond Delight: Increase the almond extract slightly for a more pronounced almond flavor, complementing the cherries beautifully.
3. Swirled Cherry Vanilla: Create a swirled effect by swirling in some cherry sauce or puree before the final freezing to add a striking visual element and extra cherry flavor.
4. Vegan Cherry Vanilla Ice Cream: Substitute heavy cream and whole milk with coconut milk and almond milk for a delicious dairy-free version.
5. Cherry Vanilla with Crunch: Mix in crushed graham crackers or crushed walnuts for added texture and depth.
Freezing and Storage
– Storage: Keep your ice cream in an airtight container in the freezer. This will help maintain its texture and prevent ice crystals from forming.
– Freezing: Homemade Cherry Vanilla Ice Cream should be consumed within 2-3 weeks for the best flavor. After that, the texture may change, but it will still be safe to eat.
– Softening: If your ice cream gets too hard after freezing, let it sit at room temperature for about 5-10 minutes before scooping to make it easier to serve.
Special Equipment
You will need a few essential tools to prepare Cherry Vanilla Ice Cream successfully:
– Ice Cream Maker: This is crucial for achieving the right texture.
– Mixing Bowls: Use different sizes for different stages of mixing.
– Measuring Cups and Spoons: Precision is key when baking or making ice cream.
– Airtight Container: Make sure to have a good-quality container to store the ice cream once it’s churned and frozen.
Frequently Asked Questions
Can I use frozen cherries?
Yes, frozen cherries work well! Just make sure to thaw and drain them before using to prevent excess water in the mixture.
How long does it take to churn the ice cream?
Most ice cream makers will take about 20-30 minutes to churn the mixture to a soft-serve consistency.
What if I don’t have an ice cream maker?
You can make no-churn Cherry Vanilla Ice Cream by pouring the mixture into a freezer-safe container and stirring it every 30 minutes for the first few hours to prevent ice crystals.
Can I use almond milk instead of whole milk?
Absolutely! You can substitute almond milk or any milk alternative to make a lighter version; however, it may alter the creaminess slightly.
Is this ice cream suitable for kids?
Yes, Cherry Vanilla Ice Cream is a kid-favorite! Just ensure they are not allergic to any ingredients used.
Conclusion
Making Cherry Vanilla Ice Cream at home is both rewarding and straightforward. The beautiful combination of sweet cherries and rich vanilla creates an unforgettable dessert that everyone will love. With its simplicity and delightful flavor, this ice cream has the potential to become a staple treat in your household.
So gather your ingredients, keep these tips in mind, and enjoy an incredible homemade Cherry Vanilla Ice Cream that you and your loved ones will cherish!
Cherry Vanilla Ice Cream: An Incredible 5-Step Recipe
- Total Time: 42 minute
Ingredients
– 2 cups heavy whipping cream
– 1 cup whole milk
– 3/4 cup granulated sugar
– 1 tablespoon vanilla extract
– 1/2 teaspoon almond extract
– 1 cup fresh cherries, pitted and halved (or use frozen, thawed cherries)
– A pinch of salt
Instructions
Creating homemade Cherry Vanilla Ice Cream is easy if you follow these step-by-step instructions:
1. Mix the Base: In a mixing bowl, whisk together the heavy whipping cream, whole milk, sugar, vanilla extract, almond extract, and salt until the sugar is fully dissolved.
2. Add the Cherries: Fold the halved cherries into the mixture, making sure they are evenly distributed for a perfect balance of flavor in every bite.
3. Chill the Mixture: Cover the bowl and refrigerate the mixture for at least 4 hours, or overnight, to enhance the flavor.
4. Churn the Ice Cream: Pour the chilled mixture into your ice cream maker and churn according to the manufacturer’s instructions until it reaches a soft-serve consistency. This usually takes about 20-30 minutes.
5. Freeze and Serve: Transfer the ice cream to an airtight container and freeze for at least 2 hours, or until firm. Scoop into bowls and enjoy!
These easy steps will have you ready to relish in your homemade Cherry Vanilla Ice Cream.
- Prep Time: 15 minutes
- Cook Time: 20-30 minutes
Nutrition
- Serving Size: 8
- Calories: 250 kcal
- Fat: 14g
- Protein: 3g