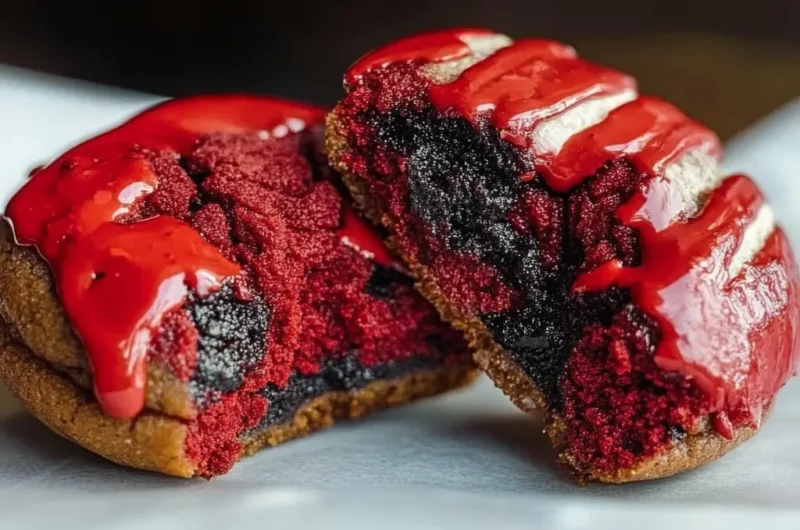
Chewy Red Velvet Oreo Cookies with Gooey Centers are a delightful twist on classic cookies that will leave you craving more. These amazing treats combine the rich flavors of red velvet cake with the beloved Oreo cookie, creating a dessert that is both visually stunning and utterly delicious. With their vibrant color and gooey chocolate centers, these cookies are perfect for any occasion, whether it’s a holiday gathering, a birthday party, or simply a cozy night in with friends.
Imagine biting into a soft, chewy cookie with a warm, gooey center that oozes chocolate goodness. The combination of red velvet and Oreo creates a flavor profile that is both unique and satisfying. If you’ve ever enjoyed the taste of red velvet cake, you’ll know exactly what I mean. These cookies are not just a treat for your taste buds; they are a feast for the eyes as well.
In this guide, you will discover why this recipe for Chewy Red Velvet Oreo Cookies with Gooey Centers is so special. We’ll explore the preparation and cooking time, provide a detailed ingredient list, and break down the steps to create these irresistible cookies. Whether you’re a seasoned baker or a novice, you’ll find that making these cookies is easy and rewarding. Get ready to impress your family and friends with this incredible cookie recipe!
Why You’ll Love This Recipe
Chewy Red Velvet Oreo Cookies with Gooey Centers are more than just a dessert; they are an experience that combines flavor, texture, and visual appeal. Here are several reasons why you’re sure to love this recipe:
1. Unique Flavor: The combination of red velvet and Oreo creates a delightful taste that stands out from traditional cookie recipes.
2. Gooey Centers: The warm, melted chocolate center adds an indulgent element to each bite, making them irresistible.
3. Eye-Catching Appearance: The vibrant red color of the cookies, paired with the contrast of the white Oreo filling, makes for a stunning presentation.
4. Perfect for Sharing: These cookies are great for gatherings, parties, or simply to enjoy with family at home.
5. Easy to Make: With simple ingredients and straightforward steps, even novice bakers can achieve delicious results.
6. Versatile: You can customize the recipe by adding nuts, different types of chocolate, or even cream cheese frosting on top.
With these appealing factors in mind, you’ll understand why these cookies are a favorite among cookie lovers everywhere. Each bite offers a delightful mix of flavors and textures that will leave you wanting more!
Preparation and Cooking Time
In total, preparing Chewy Red Velvet Oreo Cookies with Gooey Centers will take about 1 hour and 15 minutes. Here’s a breakdown of the time required:
– Preparation Time: 25-30 minutes
– Cooking Time: 10-12 minutes per batch
– Cooling Time: 10 minutes
These times might vary slightly based on your experience and kitchen equipment, but this framework should provide a good estimate for your baking adventure.
Ingredients
– 2 ¼ cups all-purpose flour
– 1 tablespoon cocoa powder
– 1 teaspoon baking soda
– ½ teaspoon salt
– ½ cup unsalted butter, softened
– 1 cup granulated sugar
– 1 large egg
– 1 tablespoon red food coloring
– 1 teaspoon vanilla extract
– 1 cup white chocolate chips
– 12 Oreo cookies, halved (for the centers)
Step-by-Step Instructions
Creating Chewy Red Velvet Oreo Cookies with Gooey Centers is straightforward if you follow these simple steps:
1. Preheat Oven: Preheat your oven to 350°F (175°C) and line a baking sheet with parchment paper.
2. Mix Dry Ingredients: In a bowl, whisk together the flour, cocoa powder, baking soda, and salt. Set aside.
3. Cream Butter and Sugar: In a large mixing bowl, beat the softened butter and granulated sugar together until light and fluffy.
4. Add Egg and Flavorings: Add the egg, red food coloring, and vanilla extract to the butter mixture. Mix until combined.
5. Combine Mixtures: Gradually add the dry ingredients to the wet ingredients, mixing until just combined.
6. Fold in Chocolate Chips: Gently fold in the white chocolate chips, ensuring they are evenly distributed.
7. Scoop Dough: Using a cookie scoop or tablespoon, scoop out dough and form it into balls.
8. Add Oreo Centers: Take half an Oreo cookie and press it into the center of each dough ball. Then, take another piece of cookie dough and seal it around the Oreo.
9. Bake: Place the cookie balls on the prepared baking sheet, spacing them about 2 inches apart. Bake for 10-12 minutes, until the edges are set but the centers are still soft.
10. Cool: Remove from the oven and let the cookies cool on the baking sheet for about 10 minutes before transferring them to a wire rack to cool completely.
These steps will guide you in creating these incredible cookies effortlessly.
How to Serve
To make a lasting impression when serving Chewy Red Velvet Oreo Cookies with Gooey Centers, consider the following:
1. Presentation: Arrange the cookies on a decorative platter or cake stand for an eye-catching display.
2. Accompaniments: Pair with a glass of cold milk or a scoop of vanilla ice cream to enhance the indulgence.
3. Serving Size: Offer generous servings, but consider cutting larger cookies in half for sharing.
4. Decorative Touch: Dust with powdered sugar or drizzle with additional melted white chocolate for a finishing touch.
By putting thought into how you serve these cookies, you elevate the entire experience, making it memorable for you and your guests. Enjoy the delightful flavors and textures of your Chewy Red Velvet Oreo Cookies with Gooey Centers!
Additional Tips
– Use Quality Ingredients: For the best flavor, opt for high-quality cocoa powder and white chocolate chips. This enhances the overall taste of your Chewy Red Velvet Oreo Cookies with Gooey Centers.
– Chill the Dough: If you’re finding the dough too sticky to work with, consider chilling it for about 30 minutes. This will make it easier to scoop and shape your cookies.
– Experiment with Fillings: Try different types of cookies for the center. Instead of Oreos, consider using chocolate chip cookies or even peanut butter cookies for a fun twist.
– Don’t Overbake: Keep an eye on your cookies while they bake. The goal is to achieve that soft, chewy texture, so take them out when the edges are set but the centers are still soft.
Recipe Variation
Feel free to explore these fun variations of Chewy Red Velvet Oreo Cookies with Gooey Centers:
1. Cream Cheese Center: Instead of Oreos, use a dollop of cream cheese filling in the center for a deliciously tangy contrast.
2. Nutty Addition: Fold in chopped nuts like walnuts or pecans into the dough for added texture and flavor.
3. Different Chocolate: Swap out white chocolate chips for dark or milk chocolate chips for a richer taste.
4. Red Velvet Swirl: Create a swirl effect by mixing a little of the red velvet batter with a vanilla batter before baking.
Freezing and Storage
– Storage: Store the cookies in an airtight container at room temperature for up to a week. They can also be refrigerated for longer freshness.
– Freezing: To freeze, place the cookies in a single layer on a baking sheet until firm, then transfer them to a freezer bag. They can be frozen for up to three months. When ready to enjoy, simply thaw at room temperature.
Special Equipment
To make the Chewy Red Velvet Oreo Cookies with Gooey Centers, you’ll need the following equipment:
– Mixing bowls
– Electric mixer or whisk
– Cookie scoop or tablespoon
– Baking sheets
– Parchment paper
– Wire rack for cooling
Frequently Asked Questions
How do I know when the cookies are done baking?
Check the edges of the cookies; they should be firm while the centers remain soft. A light golden color on the edges indicates they’re ready.
Can I make these cookies gluten-free?
Yes, you can substitute all-purpose flour with a gluten-free flour blend, ensuring the other ingredients are also gluten-free.
What can I do if my dough is too sticky?
If the dough is sticky, chill it in the refrigerator for about 30 minutes. This will help firm it up and make it easier to handle.
Can I use other types of food coloring?
Absolutely! You can experiment with different colors to create a unique twist on the classic red velvet cookies.
How do I prevent the cookies from spreading too much?
Make sure to chill the dough before baking. This helps maintain the shape of the cookies while they bake.
Conclusion
Chewy Red Velvet Oreo Cookies with Gooey Centers are a delightful treat that combines the rich flavors of red velvet cake with the indulgence of an Oreo cookie. With their vibrant color, gooey centers, and easy preparation, these cookies are sure to impress anyone who takes a bite. Whether you’re baking for a special occasion or just treating yourself, this recipe is guaranteed to satisfy your sweet tooth!
Chewy Red Velvet Oreo Cookies with Gooey Centers: An Incredible Ultimate Recipe
- Total Time: 26 minute
Ingredients
– 2 ¼ cups all-purpose flour
– 1 tablespoon cocoa powder
– 1 teaspoon baking soda
– ½ teaspoon salt
– ½ cup unsalted butter, softened
– 1 cup granulated sugar
– 1 large egg
– 1 tablespoon red food coloring
– 1 teaspoon vanilla extract
– 1 cup white chocolate chips
– 12 Oreo cookies, halved (for the centers)
Instructions
Creating Chewy Red Velvet Oreo Cookies with Gooey Centers is straightforward if you follow these simple steps:
1. Preheat Oven: Preheat your oven to 350°F (175°C) and line a baking sheet with parchment paper.
2. Mix Dry Ingredients: In a bowl, whisk together the flour, cocoa powder, baking soda, and salt. Set aside.
3. Cream Butter and Sugar: In a large mixing bowl, beat the softened butter and granulated sugar together until light and fluffy.
4. Add Egg and Flavorings: Add the egg, red food coloring, and vanilla extract to the butter mixture. Mix until combined.
5. Combine Mixtures: Gradually add the dry ingredients to the wet ingredients, mixing until just combined.
6. Fold in Chocolate Chips: Gently fold in the white chocolate chips, ensuring they are evenly distributed.
7. Scoop Dough: Using a cookie scoop or tablespoon, scoop out dough and form it into balls.
8. Add Oreo Centers: Take half an Oreo cookie and press it into the center of each dough ball. Then, take another piece of cookie dough and seal it around the Oreo.
9. Bake: Place the cookie balls on the prepared baking sheet, spacing them about 2 inches apart. Bake for 10-12 minutes, until the edges are set but the centers are still soft.
10. Cool: Remove from the oven and let the cookies cool on the baking sheet for about 10 minutes before transferring them to a wire rack to cool completely.
These steps will guide you in creating these incredible cookies effortlessly.
- Prep Time: 15 minutes
- Cook Time: 10-12 minutes
Nutrition
- Serving Size: 24 cookies
- Calories: 210 kcal
- Fat: 10g
- Protein: 2g