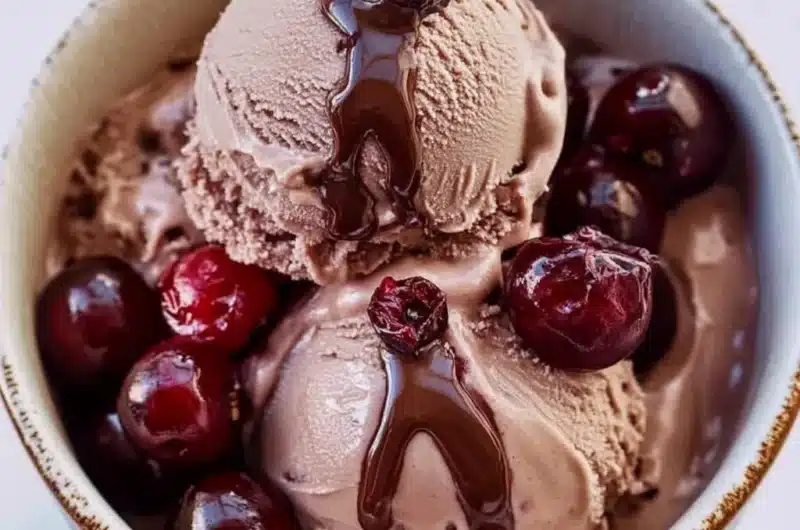
Chocolate Cherry Ice Cream is a deliciously decadent treat that combines the rich taste of chocolate with the vibrant flavor of cherries. This delightful concoction not only pleases the palate but also serves as a delightful indulgence perfect for warm days, celebrations, or simply enjoying a quiet moment at home. There’s something inherently amazing about the mixture of creamy ice cream and juicy cherries, making each scoop a small celebration. This recipe will take you step-by-step through creating a frozen delicacy that’s sure to impress friends and family alike.
If you’ve ever enjoyed the luscious combination of rich chocolate and tart cherries, you are in for a treat. The smooth, creamy texture of the ice cream contrasts beautifully with the small bursts of cherry flavor, creating an unforgettable dessert experience. Chocolate Cherry Ice Cream is more than just a dessert; it’s an experience designed to bring joy to any occasion. In this article, we’ll share not only the fantastic reason you’ll love this recipe but also the precise steps to create your own batch of this amazing frozen delight.
Rich in flavor and easy to prepare, Chocolate Cherry Ice Cream elevates your dessert game to new heights. Whether you’re serving it at a summer barbecue, enjoying it after dinner, or gifting it to someone special, this ice cream will delight the senses and satisfy cravings. Furthermore, you can customize it easily to cater to your taste preferences. Let’s dive into what makes this dessert a must-try!
Why You’ll Love This Recipe
There are countless reasons to adore Chocolate Cherry Ice Cream, from its wonderful flavors to its creamy texture. Here are some highlights that make this recipe stand out:
1. Simple Ingredients: Many of the items needed are kitchen staples, making this a convenient treat to whip up.
2. Flavor Harmony: The combination of chocolate and cherries creates an incredible balance that tantalizes the taste buds.
3. Versatile Dessert: This recipe can be altered to include other mix-ins, such as nuts or additional fruits, allowing for personal touches.
4. Perfect for Sharing: It’s great for parties and gatherings, making it a surefire hit with guests.
5. No Ice Cream Maker Required: You can create this delightful ice cream using easy methods that don’t require specialized equipment.
6. Homemade Goodness: Made from scratch, it ensures freshness and quality ingredients for a guilt-free treat.
These factors highlight why this Chocolate Cherry Ice Cream recipe is adored by so many. You will likely find it to become a regular feature in your dessert repertoire!
Preparation and Cooking Time
Making Chocolate Cherry Ice Cream will take about 4–6 hours in total, primarily due to the freezing time. Here’s a breakdown of what to expect:
– Preparation Time: 30 minutes
– Chilling Time: 1 hour
– Freezing Time: 3–5 hours
These estimates may vary slightly based on your kitchen equipment or ambient temperature, but this should serve as a good guideline for your planning.
Ingredients
– 2 cups heavy whipping cream
– 1 cup whole milk
– ¾ cup granulated sugar
– 1 teaspoon pure vanilla extract
– 1 cup fresh or frozen cherries, pitted and halved
– ½ cup semi-sweet chocolate chips
– 1 tablespoon cocoa powder (optional, for added chocolate flavor)
– Pinch of salt
Step-by-Step Instructions
Creating your Chocolate Cherry Ice Cream can be a straightforward process if you follow these steps:
1. Mix Dairy Ingredients: In a large mixing bowl, combine the heavy whipping cream, whole milk, and granulated sugar. Whisk until the sugar is fully dissolved.
2. Add Flavorings: Stir in the vanilla extract and cocoa powder (if using) to the mixture. Ensure everything is well incorporated.
3. Prepare the Cherries: If using fresh cherries, wash, pit, and halve them. If using frozen cherries, let them thaw completely and drain excess liquid.
4. Combine Cherries: Gently fold the prepared cherries into the cream mixture, distributing them evenly.
5. Add Chocolate Chips: Fold in the semi-sweet chocolate chips, ensuring an even distribution throughout the mixture.
6. Chill Mixture: Cover the bowl with plastic wrap and place it in the refrigerator for at least 1 hour. Chilling helps enhance the flavors before freezing.
7. Freeze the Mixture: After chilling, pour the mixture into a freezer-safe container or an ice cream maker if you have one. If using a container, cover it tightly.
8. Initial Freezing: Place the container in the freezer for at least 3 hours. If using an ice cream maker, follow the manufacturer’s instructions.
9. Mix Halfway: If using a container, after 1½ hours, stir the ice cream to break up any ice crystals and ensure a smooth texture.
10. Final Freeze: Allow the ice cream to freeze for an additional 1½ to 3 hours until fully set.
How to Serve
When it comes to serving your Chocolate Cherry Ice Cream, consider these tips to make it even more enjoyable:
1. Presentation: Use an elegant bowl or glass to serve the ice cream, showcasing the beautiful chocolate and cherry colors.
2. Garnish: Top each serving with extra cherries, a drizzle of chocolate sauce, or a sprinkle of fresh mint for decoration.
3. Accompaniments: Pair with warm chocolate cake, brownies, or even a simple cone for that classic ice cream experience.
4. Temperature: Let the ice cream sit at room temperature for a few minutes before scooping to achieve the perfect creamy texture.
5. Make it a Float: For a fun twist, add a scoop of Chocolate Cherry Ice Cream into a glass of soda or sparkling water for a delightful cherry float.
By incorporating these suggestions, you’ll create a memorable dessert experience that leaves a lasting impression on everyone who enjoys your homemade Chocolate Cherry Ice Cream!
Additional Tips
– Use Fresh Cherries: Fresh cherries will enhance the flavor of your Chocolate Cherry Ice Cream significantly, but frozen cherries are a great alternative if fresh isn’t available.
– Chill Everything: Ensure that all your ingredients are as cold as possible before mixing; this helps in achieving a smoother texture.
– Experiment with Textures: For additional texture, consider folding in chopped nuts or a swirl of cherry puree before freezing.
– Taste and Adjust: Don’t hesitate to sample the mixture before freezing; adjust the sweetness or chocolate level to suit your palate.
Recipe Variation
Feel free to customize your Chocolate Cherry Ice Cream with these delicious variations:
1. Cherry Almond Delight: Add a teaspoon of almond extract to the mixture for a nutty flavor that complements the cherries beautifully.
2. Vegan Option: Substitute heavy cream and whole milk with coconut milk or almond milk, ensuring a delightful non-dairy treat.
3. Chocolate Cherry Swirl: Create a swirl effect by layering the ice cream mixture with raspberry or cherry sauce as you freeze it.
4. Brownie Bits: Fold in chunks of brownie before freezing for a delightful chocolatey add-in.
Freezing and Storage
– Storage: Keep your Chocolate Cherry Ice Cream in an airtight container to maintain its freshness and texture. It can last up to 2 weeks in the freezer.
– Freezing: If your ice cream becomes too hard after storing, let it sit at room temperature for a few minutes before scooping for easier serving.
Special Equipment
You’ll need some essential kitchen tools to prepare your Chocolate Cherry Ice Cream successfully:
– Mixing bowls for combining ingredients
– Whisk or electric mixer for blending the dairy and sugar
– Freezer-safe container for storing the finished ice cream
– Knife and cutting board for preparing cherries
– Optional: Ice cream maker for an even creamier texture
Frequently Asked Questions
Can I use other types of fruit?
Absolutely! You can try this recipe with other fruits, such as strawberries or raspberries, for a different flavor profile.
Why is my ice cream too hard?
If your ice cream is too hard, it may need more air incorporated during the mixing phase or less freezing time; ensure it is frozen properly without becoming rock solid.
Can I skip the chilling step?
Chilling the mixture enhances the flavors and ensures a better texture, but if you’re short on time, you can skip it. Just be aware that the texture may not be as creamy.
Is it possible to make a cherry ice cream without chocolate?
Yes, you can create a cherry ice cream by omitting the cocoa powder and chocolate chips but maintain the base ingredients.
What can I do if the mixture isn’t sweet enough?
If it’s not sweet enough, just add a little more sugar until you reach your preferred sweetness before chilling and freezing.
Conclusion
Chocolate Cherry Ice Cream is not just a dessert; it’s an indulgent experience that delights the senses. This recipe offers the perfect blend of rich chocolate and tart cherries, delivering a refreshing treat that’s easy to prepare. Ideal for family gatherings or enjoying quiet evenings at home, this ice cream elevates any occasion. Whether you stick to the classic recipe or try one of the delicious variations, each serving is guaranteed to impress. Dive into this delectable treat and enjoy every creamy bite!
Chocolate Cherry Ice Cream: An Incredible Ultimate Recipe
- Total Time: 48 minute
Ingredients
– 2 cups heavy whipping cream
– 1 cup whole milk
– ¾ cup granulated sugar
– 1 teaspoon pure vanilla extract
– 1 cup fresh or frozen cherries, pitted and halved
– ½ cup semi-sweet chocolate chips
– 1 tablespoon cocoa powder (optional, for added chocolate flavor)
– Pinch of salt
Instructions
Creating your Chocolate Cherry Ice Cream can be a straightforward process if you follow these steps:
1. Mix Dairy Ingredients: In a large mixing bowl, combine the heavy whipping cream, whole milk, and granulated sugar. Whisk until the sugar is fully dissolved.
2. Add Flavorings: Stir in the vanilla extract and cocoa powder (if using) to the mixture. Ensure everything is well incorporated.
3. Prepare the Cherries: If using fresh cherries, wash, pit, and halve them. If using frozen cherries, let them thaw completely and drain excess liquid.
4. Combine Cherries: Gently fold the prepared cherries into the cream mixture, distributing them evenly.
5. Add Chocolate Chips: Fold in the semi-sweet chocolate chips, ensuring an even distribution throughout the mixture.
6. Chill Mixture: Cover the bowl with plastic wrap and place it in the refrigerator for at least 1 hour. Chilling helps enhance the flavors before freezing.
7. Freeze the Mixture: After chilling, pour the mixture into a freezer-safe container or an ice cream maker if you have one. If using a container, cover it tightly.
8. Initial Freezing: Place the container in the freezer for at least 3 hours. If using an ice cream maker, follow the manufacturer’s instructions.
9. Mix Halfway: If using a container, after 1½ hours, stir the ice cream to break up any ice crystals and ensure a smooth texture.
10. Final Freeze: Allow the ice cream to freeze for an additional 1½ to 3 hours until fully set.
- Prep Time: 15 minutes
- Cook Time: N/A
Nutrition
- Serving Size: 6
- Calories: 320 kcal
- Fat: 20g
- Protein: 3g