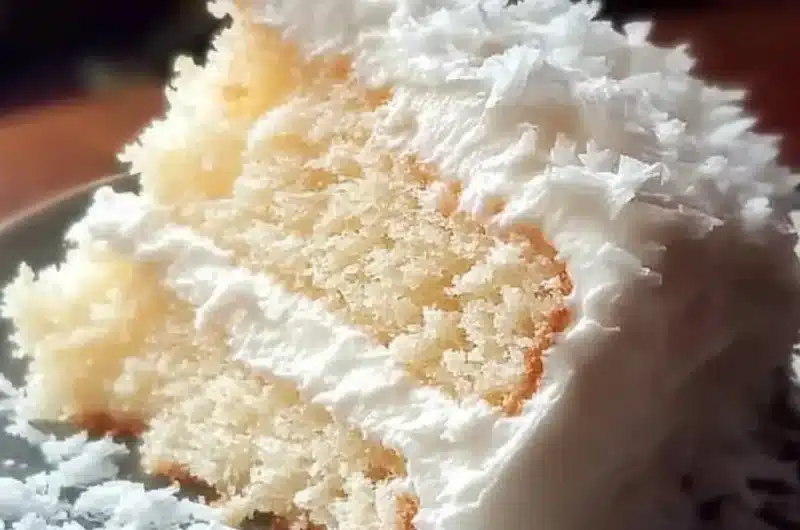
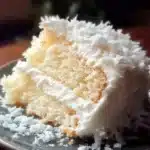
Christmas Coconut Snow Cake is a delightful treat that captures the magic of the holiday season. This amazing dessert, with its fluffy layers and luscious coconut flavor, will be the centerpiece of your festive gatherings. Each bite offers a taste of winter wonder and celebration, making it an essential addition to your Christmas dessert table. Whether you’re hosting a holiday party or simply want to indulge yourself, this cake promises to impress your family and friends alike.
If you’re looking for a unique dessert that stands out, the Christmas Coconut Snow Cake is the answer. The combination of coconut, cream, and light textures will transport you to a winter wonderland. As the flavors meld together, they create a symphony of sweetness that’s reminiscent of snowy landscapes and festive cheer. In this guide, you’ll discover why this recipe is worth trying, how to prepare it, and tips for serving it perfectly.
The Christmas Coconut Snow Cake is more than just a cake; it’s an experience. With its stunning presentation and incredible taste, it is bound to evoke feelings of nostalgia and joy. Let’s explore what makes this recipe so special and why it should be at the top of your holiday baking list!
Why You’ll Love This Recipe
There are countless reasons to fall in love with Christmas Coconut Snow Cake. Here are some highlights that make it an unforgettable dessert:
1. Festive Appearance: The snow-like frosting creates a beautiful centerpiece for your holiday table.
2. Coconut Flavor: Coconut lovers will rejoice at the rich, tropical flavor that pairs well with the winter season.
3. Layered Delight: The seven layers of cake provide a delightful texture that keeps each slice interesting.
4. Easy to Make: With clear instructions and simple ingredients, even novice bakers can master this cake.
5. Versatile Recipe: Customize it with different fillings or toppings to suit your taste.
6. Perfect for Sharing: The cake’s size makes it an ideal dessert for gatherings and celebrations.
With so many delightful aspects, it’s no wonder that this cake has become a holiday favorite. Each layer tells a story of warmth, love, and festive joy!
Preparation and Cooking Time
Creating the Christmas Coconut Snow Cake will take approximately 2 hours, including preparation and baking time. Here’s a breakdown of the time required:
– Preparation Time: 30 minutes
– Baking Time: 30-35 minutes
– Cooling Time: 30 minutes
– Frosting Time: 30 minutes
These times may vary slightly based on your experience and kitchen equipment. However, this framework should give you a good estimate to plan your baking session.
Ingredients
– 2 cups all-purpose flour
– 1 ½ cups granulated sugar
– 1 cup unsweetened shredded coconut
– 1 cup whole milk
– ½ cup unsalted butter, softened
– 4 large eggs
– 2 teaspoons baking powder
– ½ teaspoon salt
– 1 teaspoon vanilla extract
– 1 teaspoon coconut extract
– 1 ½ cups heavy whipping cream
– 2 cups powdered sugar (for frosting)
– Extra shredded coconut for decoration
Step-by-Step Instructions
Creating the Christmas Coconut Snow Cake is simple if you follow these steps:
1. Preheat the Oven: Preheat your oven to 350°F (175°C). Grease and flour three 9-inch round cake pans.
2. Mix Dry Ingredients: In a large bowl, sift together the flour, baking powder, and salt.
3. Cream Butter and Sugar: In another bowl, cream the softened butter and granulated sugar until light and fluffy.
4. Add Eggs: Beat in the eggs one at a time, ensuring each is fully incorporated before adding the next.
5. Combine Wet Ingredients: Add the milk, vanilla extract, and coconut extract to the butter mixture. Mix until smooth.
6. Add Dry Ingredients: Gradually add the dry mixture to the wet mixture, stirring until just combined.
7. Fold in Coconut: Gently fold in the shredded coconut until evenly distributed.
8. Divide Batter: Divide the batter evenly among the prepared cake pans.
9. Bake: Place in the preheated oven and bake for 30-35 minutes or until a toothpick inserted in the center comes out clean.
10. Cool Cakes: Remove from the oven and allow the cakes to cool in their pans for about 10 minutes. Then, transfer them to wire racks to cool completely.
11. Prepare Frosting: In a mixing bowl, whip the heavy cream until soft peaks form. Gradually add the powdered sugar and continue whipping until stiff peaks form.
12. Assemble the Cake: Place one layer on a cake stand or serving platter. Spread a layer of whipped cream frosting on top. Repeat with the second layer, then place the third layer on top.
13. Frost the Sides: Frost the top and sides of the cake with the remaining whipped cream.
14. Decorate: Generously sprinkle shredded coconut over the top and sides for a snowy effect.
These steps will lead you to create a stunning Christmas Coconut Snow Cake that will delight everyone at your holiday gathering.
How to Serve
To elevate the presentation of your Christmas Coconut Snow Cake, consider these serving tips:
1. Presentation: Use a decorative cake stand to showcase the beauty of the cake.
2. Accompaniments: Serve with fresh berries or a drizzle of chocolate sauce for added flavor.
3. Slice Size: Cut generous slices, ensuring they are not too overwhelming. Smaller portions encourage guests to try more!
4. Beverage Pairing: This cake pairs beautifully with a warm cup of cocoa or a festive holiday punch.
By putting thought into your serving methods, you’ll create a memorable experience that your guests will cherish long after the last slice is gone. Enjoy your holiday baking!
Additional Tips
– Use Fresh Ingredients: For the best flavor, ensure your eggs and dairy are fresh. This enhances the overall taste of the Christmas Coconut Snow Cake.
– Experiment with Coconut: If you want a more intense coconut flavor, consider using coconut milk instead of whole milk in the recipe.
– Serve Chilled: The cake tastes even better when chilled. Allow it to sit in the refrigerator for a couple of hours before serving to let the flavors meld together.
– Garnish Creatively: Consider adding edible glitter or festive sprinkles to enhance the visual appeal of your cake during the holiday season.
Recipe Variation
Feel free to get creative! Here are a few exciting variations to try:
1. Chocolate Layer: Add a layer of chocolate ganache between the cake layers for a rich twist on the traditional coconut flavor.
2. Tropical Twist: Incorporate crushed pineapple into the frosting for a tropical flavor that complements the coconut beautifully.
3. Nutty Addition: Sprinkle chopped almonds or walnuts between the layers for a delightful crunch and added texture.
4. Lemon Zest: Add a teaspoon of lemon zest to the batter for a refreshing citrus note that brightens up the cake.
Freezing and Storage
– Storage: To keep your Christmas Coconut Snow Cake fresh, store it in an airtight container in the refrigerator. It will remain delicious for about 4-5 days.
– Freezing: You can freeze individual slices or the whole cake. Wrap it securely in plastic wrap and place it in an airtight container. It can be frozen for up to 3 months. Thaw in the refrigerator when you’re ready to enjoy.
Special Equipment
To prepare this cake successfully, you will need a few essential tools:
– Mixing bowls
– Electric mixer for whipping cream
– Measuring cups and spoons
– Three 9-inch round cake pans
– Offset spatula for spreading frosting
– Wire racks for cooling
Frequently Asked Questions
How long does the cake take to set after frosting?
Let the cake sit for at least 30 minutes after frosting to allow the flavors to blend and the frosting to firm up.
Can I use a different type of frosting?
Absolutely! Feel free to use cream cheese frosting or even a buttercream frosting if you prefer.
Is this cake suitable for gluten-free diets?
You can substitute all-purpose flour with a gluten-free flour blend to make this cake gluten-free.
What if I don’t have shredded coconut?
If you’re out of shredded coconut, you can substitute it with desiccated coconut, which will provide a similar texture and flavor.
Conclusion
The Christmas Coconut Snow Cake is a stunning addition to your holiday celebrations. With its seven fluffy layers and creamy frosting, it offers a delightful balance of flavors that will impress your guests. This cake not only looks beautiful but tastes divine, making it a perfect centerpiece for your Christmas dessert table. Whether you stick to the classic recipe or try one of the variations, this cake is sure to become a cherished holiday tradition.
Christmas Coconut Snow Cake: An Incredible 7-Layer Recipe
- Total Time: 57 minute
Ingredients
– 2 cups all-purpose flour
– 1 ½ cups granulated sugar
– 1 cup unsweetened shredded coconut
– 1 cup whole milk
– ½ cup unsalted butter, softened
– 4 large eggs
– 2 teaspoons baking powder
– ½ teaspoon salt
– 1 teaspoon vanilla extract
– 1 teaspoon coconut extract
– 1 ½ cups heavy whipping cream
– 2 cups powdered sugar (for frosting)
– Extra shredded coconut for decoration
Instructions
Creating the Christmas Coconut Snow Cake is simple if you follow these steps:
1. Preheat the Oven: Preheat your oven to 350°F (175°C). Grease and flour three 9-inch round cake pans.
2. Mix Dry Ingredients: In a large bowl, sift together the flour, baking powder, and salt.
3. Cream Butter and Sugar: In another bowl, cream the softened butter and granulated sugar until light and fluffy.
4. Add Eggs: Beat in the eggs one at a time, ensuring each is fully incorporated before adding the next.
5. Combine Wet Ingredients: Add the milk, vanilla extract, and coconut extract to the butter mixture. Mix until smooth.
6. Add Dry Ingredients: Gradually add the dry mixture to the wet mixture, stirring until just combined.
7. Fold in Coconut: Gently fold in the shredded coconut until evenly distributed.
8. Divide Batter: Divide the batter evenly among the prepared cake pans.
9. Bake: Place in the preheated oven and bake for 30-35 minutes or until a toothpick inserted in the center comes out clean.
10. Cool Cakes: Remove from the oven and allow the cakes to cool in their pans for about 10 minutes. Then, transfer them to wire racks to cool completely.
11. Prepare Frosting: In a mixing bowl, whip the heavy cream until soft peaks form. Gradually add the powdered sugar and continue whipping until stiff peaks form.
12. Assemble the Cake: Place one layer on a cake stand or serving platter. Spread a layer of whipped cream frosting on top. Repeat with the second layer, then place the third layer on top.
13. Frost the Sides: Frost the top and sides of the cake with the remaining whipped cream.
14. Decorate: Generously sprinkle shredded coconut over the top and sides for a snowy effect.
These steps will lead you to create a stunning Christmas Coconut Snow Cake that will delight everyone at your holiday gathering.
- Prep Time: 30 minutes
- Cook Time: 30-35 minutes
Nutrition
- Serving Size: 12
- Calories: 320 kcal
- Fat: 15g
- Protein: 4g