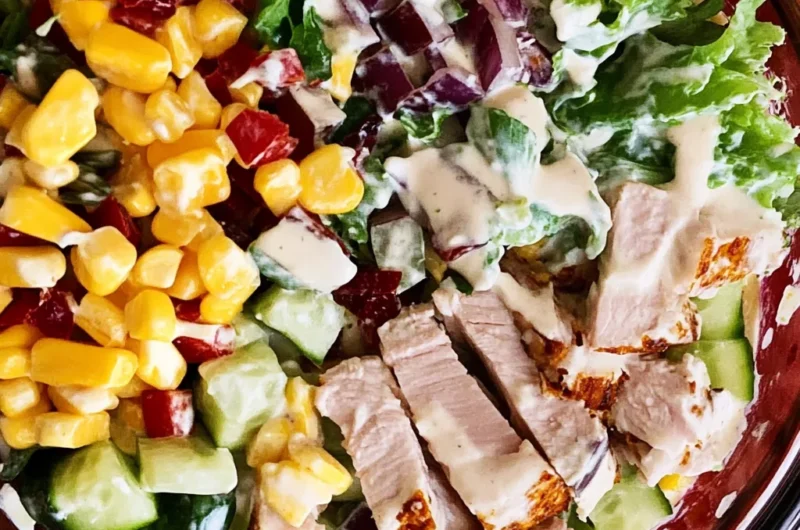
Classic 7 Layer Salad is an iconic dish that has graced potlucks and family gatherings for decades. This mind-blowing salad is a beautiful arrangement of colorful ingredients, making it as pleasing to the eye as it is delicious to the palate. Each layer brings its own flavor and texture, resulting in a salad that guarantees to be the star of any meal. Its rich and satisfying taste, combined with its easy preparation, offers the perfect mix of convenience and indulgence. Whether it’s a holiday feast, a BBQ, or a simple family dinner, this salad is sure to amaze everyone at the table.
Imagine digging into a bowl that features perfectly layered ingredients ranging from crisp greens to creamy dressing, creating a delightful contrast in every bite. What’s really fantastic about this Classic 7 Layer Salad is that everyone can customize their layers to suit personal preferences. You can easily swap out ingredients, add extra layers, or even adjust the dressing, making it a versatile option for countless occasions. Not only does it taste amazing, but it’s also a showstopper that you can easily prepare ahead of time.
In this article, we will explore why you’ll love this recipe, how to prepare it efficiently, and of course, the specific ingredients needed to create this incredible salad. The step-by-step instructions will ensure that you’ll have the confidence to whip up this show-stopping salad in no time. Let’s dive in and discover this delicious dish in all its glory!
Why You’ll Love This Recipe
Classic 7 Layer Salad is a beloved choice for many good reasons. It is not just a salad; it’s an experience that brings together a diverse array of flavors and textures. Here are several reasons why this salad will win your heart:
1. Visual Appeal: The distinct layers of colors and textures make this salad look stunning on any table. It doubles as decor and food!
2. Simple Yet Sophisticated: While it’s essentially a salad, the layer technique gives it an elegant touch. It’s perfect for impressing your guests.
3. Adaptable Recipe: You can customize the layers according to your dietary preferences or seasonal ingredients. Go ahead and experiment!
4. Deliciously Satisfying: From the creaminess of the dressing to the crunch of the vegetables, every bite is a burst of flavor.
5. Make-Ahead Friendly: This salad can be prepared a day in advance, allowing you to save time on busy days while still presenting a gourmet dish.
6. Crowd-Pleaser: Its combination of flavors ensures that there’s something for everyone, making it a perfect dish for gatherings.
With these features, it’s no wonder that Classic 7 Layer Salad continues to be a hit! Each layer tells its own story and adds something special, creating an unforgettable dish.
Preparation and Cooking Time
Making your very own Classic 7 Layer Salad is quick and simple. Here’s a breakdown of the estimated time required:
– Preparation Time: 20-30 minutes
– Chilling Time: 1-2 hours (or overnight for best results)
Total time including prep and chilling can be managed within a few hours, but the longer you let it chill, the better the flavors meld together.
Ingredients
– 1 head of lettuce, chopped
– 1 cup cherry tomatoes, halved
– 1 cup cucumbers, diced
– 1 cup radishes, sliced
– 1 cup shredded carrots
– 1 cup frozen green peas, thawed
– 1 cup cooked bacon, crumbled
– 1 cup shredded cheddar cheese
– 1 cup mayonnaise
– 1 tablespoon apple cider vinegar
– 1 tablespoon sugar
– Salt and pepper to taste
Step-by-Step Instructions
Creating your Classic 7 Layer Salad is straightforward when you follow these steps:
1. Prepare the Base: Start by chopping the lettuce into bite-sized pieces and place it at the bottom of a clear serving dish or a large bowl.
2. Add Tomatoes: Layer the halved cherry tomatoes over the lettuce, distributing evenly.
3. Place Cucumbers: Next, add the diced cucumbers as the third layer. Arrange them gently to maintain the structure.
4. Layer Radishes: Add the sliced radishes on top of the cucumbers, creating a vibrant pink layer.
5. Add Carrots: Sprinkle the shredded carrots over the radishes for a burst of color and sweetness.
6. Place Peas: Evenly distribute the thawed green peas over the carrots, allowing for a pop of green.
7. Bacon Layer: Add the crumbled cooked bacon as the next layer, giving it a savory and satisfying crunch.
8. Final Cheese Layer: Sprinkle the shredded cheddar cheese on top of the bacon for that creamy finish.
9. Prepare Dressing: In a separate bowl, mix mayonnaise, apple cider vinegar, and sugar, adding salt and pepper to taste.
10. Top it Off: Pour the dressing evenly over the top layer of cheese, ensuring it drizzles down through the layers.
11. Chill: Cover the salad with plastic wrap and place in the refrigerator. Allow it to chill for at least an hour for the flavors to meld.
How to Serve
Serving your incredible Classic 7 Layer Salad is just as easy as preparing it. Here are some tips to present it beautifully and enjoyably:
1. Presentation: Use a glass bowl to showcase the colorful layers. This creates an eye-catching centerpiece for any meal.
2. Serving Utensils: Provide larger serving spoons to help guests scoop down to explore the various layers of the salad.
3. Accompaniments: Pair your salad with homemade bread or rolls. This complements the flavors while offering a fulfilling meal.
4. Garnishing Options: For an extra touch, consider garnishing with fresh herbs such as parsley or chives right before serving.
5. Portion Control: Consider dividing the salad into smaller portions to suit everyone’s individual servings, making it easy for guests to indulge.
With these tips, your Classic 7 Layer Salad will not only taste fantastic but will also leave a lasting impression. Enjoy each delightful layer and savor the joy it brings!
Additional Tips
– Use Fresh Ingredients: The flavor of your Classic 7 Layer Salad will greatly improve with fresh vegetables and toppings. Visit your local farmer’s market for the best picks.
– Layer with Care: Ensure that each layer is evenly distributed. This will not only enhance presentation but also ensure that every bite contains a delightful mix of flavors.
– Dress Just Before Serving: To maintain the crispness of your vegetables, consider adding the dressing just before you’re ready to serve the salad. This preserves freshness and crunch.
– Experiment with Dressings: While the classic dressing is delicious, try adding yogurt or sour cream for a tangy twist. You can also use different types of vinegar for varied flavor profiles.
– Alternate Layer Ingredients: Don’t be afraid to switch specific ingredients based on your preferences or dietary restrictions. For instance, swap bacon for chickpeas for a vegetarian option.
Recipe Variation
The Classic 7 Layer Salad is versatile and can easily cater to different tastes. Here are some variations to try:
1. Mediterranean Twist: Incorporate olives, feta cheese, and roasted red peppers in place of bacon and cheddar for a Mediterranean flair.
2. Southwest Style: Add black beans, corn, and avocado for a delicious southwestern take. Use a zesty ranch dressing to finish it off.
3. Seasonal Ingredients: Adjust your ingredients based on the season. In summer, you might use fresh corn and bell peppers, while in fall, consider roasted butternut squash.
4. Protein Boost: Add shredded rotisserie chicken or chickpeas for extra protein, making the salad a complete meal.
5. Low-Carb Version: Substitute lettuce with spiralized zucchini or cucumber for a low-carb alternative that’s still tasty.
Freezing and Storage
– Storage: The Classic 7 Layer Salad is best enjoyed fresh, but you can store it in the refrigerator. A covered dish can keep it fresh for up to 3 days.
– Layer Management: If storing leftovers, consider keeping the dressing separate until you’re ready to eat. This ensures that remaining layers stay crispy.
– Freezing: Freezing this salad is generally not recommended due to the texture changes in vegetables and the dressing. However, if you’ve prepared a large batch, the individual components can be frozen. For instance, leftover bacon can be frozen for later use.
Special Equipment
You won’t need much special equipment to make your Classic 7 Layer Salad. However, here are a few helpful tools:
– Clear glass bowl: A clear container allows you to highlight the beautiful layers of your salad.
– Salad spinner: This tool is great for ensuring your lettuce is thoroughly washed and dried, maintaining its crispness.
– Measuring cups: Accurate measurements are essential for layering, especially when it comes to the dressing.
– Mixing bowl: You will need a bowl for preparing your dressing.
Frequently Asked Questions
Can I prepare the salad a day in advance?
Yes, preparing the Classic 7 Layer Salad a day beforehand is actually beneficial. It allows the flavors to meld beautifully. Just wait to add the dressing until you’re ready to serve.
Can I substitute ingredients based on allergies?
Absolutely! The Classic 7 Layer Salad is very adaptable. You can easily remove or substitute any ingredient that someone might be allergic to.
How do I know if the salad is fresh enough to serve?
Check the freshness by looking at the vegetables. Bright colors with no wilting or brown spots usually indicate partner freshness.
Is there a gluten-free version of this salad?
Yes! All the primary ingredients in the Classic 7 Layer Salad are naturally gluten-free, making it suitable for those with gluten sensitivities.
What other dressings can I use?
Besides the traditional mayonnaise dressing, options like ranch, vinaigrette, or creamy Italian can offer exciting variations to the salad.
Conclusion
The Classic 7 Layer Salad is a delightful dish brimming with flavor and versatility. Its unique layers and easy preparation make it a favorite for gatherings, potlucks, or simple family dinners. With its eye-catching appearance and customizable ingredients, it promises to be a conversation starter and a palate pleaser. Whether you stick to the classic recipe or choose to experiment with variations, this salad is sure to impress everyone at the table. So go ahead, gather your ingredients, and create a masterpiece that will leave a lasting impression at your next meal!

Classic 7 Layer Salad: The Incredible Ultimate Recipe That Will Amaze You
- Total Time: 15 minutes
Ingredients
– 1 head of lettuce, chopped
– 1 cup cherry tomatoes, halved
– 1 cup cucumbers, diced
– 1 cup radishes, sliced
– 1 cup shredded carrots
– 1 cup frozen green peas, thawed
– 1 cup cooked bacon, crumbled
– 1 cup shredded cheddar cheese
– 1 cup mayonnaise
– 1 tablespoon apple cider vinegar
– 1 tablespoon sugar
– Salt and pepper to taste
Instructions
Creating your Classic 7 Layer Salad is straightforward when you follow these steps:
1. Prepare the Base: Start by chopping the lettuce into bite-sized pieces and place it at the bottom of a clear serving dish or a large bowl.
2. Add Tomatoes: Layer the halved cherry tomatoes over the lettuce, distributing evenly.
3. Place Cucumbers: Next, add the diced cucumbers as the third layer. Arrange them gently to maintain the structure.
4. Layer Radishes: Add the sliced radishes on top of the cucumbers, creating a vibrant pink layer.
5. Add Carrots: Sprinkle the shredded carrots over the radishes for a burst of color and sweetness.
6. Place Peas: Evenly distribute the thawed green peas over the carrots, allowing for a pop of green.
7. Bacon Layer: Add the crumbled cooked bacon as the next layer, giving it a savory and satisfying crunch.
8. Final Cheese Layer: Sprinkle the shredded cheddar cheese on top of the bacon for that creamy finish.
9. Prepare Dressing: In a separate bowl, mix mayonnaise, apple cider vinegar, and sugar, adding salt and pepper to taste.
10. Top it Off: Pour the dressing evenly over the top layer of cheese, ensuring it drizzles down through the layers.
11. Chill: Cover the salad with plastic wrap and place in the refrigerator. Allow it to chill for at least an hour for the flavors to meld.
- Prep Time: 15 minutes
- Cook Time: 0 minutes
Nutrition
- Serving Size: 8
- Calories: 320 kcal
- Fat: 24g
- Protein: 10g