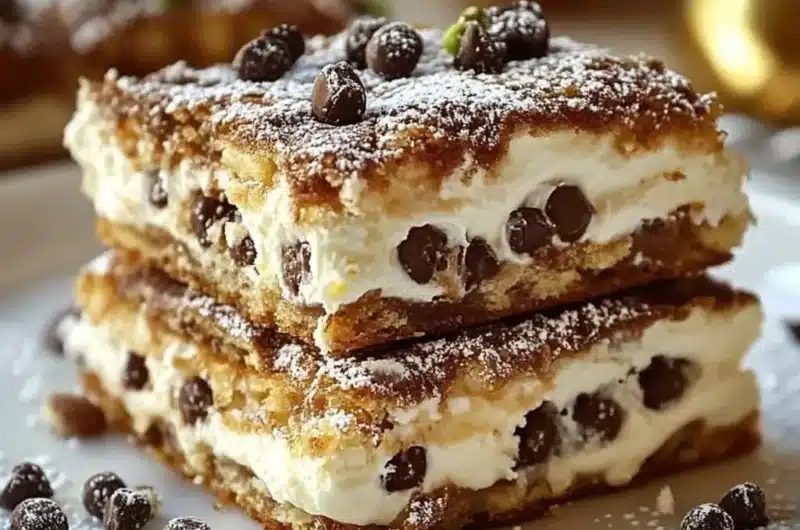
Classic Cannoli Squares are a delightful twist on a beloved Italian dessert, combining the creamy, luscious filling of traditional cannoli with a convenient square format. The versatility of this dessert makes it perfect for gatherings, family celebrations, or just a cozy night in. Each bite is filled with a wonderful blend of flavors, showcasing rich ricotta, chocolate chips, and a hint of citrus zest, all nestled within a buttery, flaky crust. If you’ve ever savored a cannoli, imagine enjoying that classic flavor in a quick-to-make, shareable form!
Classic Cannoli Squares are not just a treat for the taste buds; they evoke feelings of nostalgia and warmth, reminiscent of family gatherings around the dining table. The satisfaction of biting into a square reveals a creamy filling that brings back childhood memories of trips to your favorite Italian bakery. This recipe will surely become a staple in your dessert rotation, ensuring you always have a delectable option ready to impress friends and family.
But wait! The beauty of this recipe lies not only in its incredible taste but also in how simple it is to prepare. With just a few key ingredients and straightforward steps, you can create an amazing dessert that highlights the flavors of Italy without the fuss of making traditional cannoli shells. So if you’re ready to embark on a culinary journey that will leave you and your guests craving more, let’s explore why Classic Cannoli Squares are an essential addition to your dessert repertoire!
Why You’ll Love This Recipe
There are countless reasons to fall head over heels for Classic Cannoli Squares. Here are just a few of the delightful aspects that set this recipe apart:
1. Unique Combination: By merging the classic flavors of cannoli into square form, you get the best of both worlds—quick and easy dessert preparation with all the deliciousness you crave.
2. Easily Shareable: These squares are perfect for parties or potlucks. Cut them into squares, and they’ll be a hit among guests!
3. Simple Ingredients: Many of the ingredients needed are pantry staples, making this an accessible dessert for spontaneous baking sessions.
4. Versatile Options: You can easily customize the filling with your favorite flavors or add toppings like crushed pistachios or a sprinkle of cinnamon for an extra touch.
5. No Special Equipment Required: Unlike traditional cannoli that may need special molds, these squares only require basic baking tools.
6. Time-Saving: Preparing Classic Cannoli Squares takes significantly less time than making individual cannoli, allowing you to spend more time enjoying the dessert rather than assembling it.
With these advantages, it’s clear why Classic Cannoli Squares are more than just a dessert—they’re a wonderful way to indulge in rich Italian tradition with minimal effort!
Preparation and Cooking Time
To whip up a tray of Classic Cannoli Squares, set aside about an hour. Here’s a breakdown of how the time is allocated:
– Preparation Time: 25 minutes
– Baking Time: 30 minutes
– Cooling Time: 15 minutes
This efficient time frame ensures you spend more time enjoying your masterpiece rather than laboring in the kitchen. It’s perfect for both experienced bakers and novices looking to impress!
Ingredients
– 1 pre-made pie crust (or homemade if preferred)
– 2 cups ricotta cheese (drained)
– 1 cup powdered sugar
– ½ teaspoon vanilla extract
– ½ teaspoon almond extract
– ½ cup mini chocolate chips
– Zest of 1 orange or lemon
– 1 tablespoon unsweetened cocoa powder (optional)
– Additional powdered sugar for dusting
Step-by-Step Instructions
Creating your Classic Cannoli Squares is straightforward. Follow these steps to ensure you achieve perfect results:
1. Preheat the Oven: Set your oven to 350°F (175°C) and prepare a square baking dish (8×8 inches) by greasing it lightly.
2. Prepare the Pie Crust: Roll out the pre-made pie crust into the baking dish, pressing it into the corners and flat against the bottom. Prick the crust with a fork to prevent bubbling.
3. Pre-Bake the Crust: Bake the crust in the preheated oven for 10-12 minutes, or until lightly golden. Remove from the oven and let cool.
4. Mix the Filling: In a large bowl, combine the drained ricotta cheese, powdered sugar, vanilla extract, almond extract, and orange or lemon zest. Mix until smooth.
5. Add Chocolate Chips: Stir in the mini chocolate chips. If desired, add the cocoa powder for a richer, chocolatey flavor. Mix well to combine.
6. Assemble: Spread the ricotta mixture evenly over the cooled pie crust. Use a spatula to smooth the top.
7. Bake Again: Return the dish to the oven and bake for an additional 15-20 minutes. The filling should be set but still creamy.
8. Cool Completely: Remove from the oven and allow it to cool at room temperature for about 15 minutes, then place it in the refrigerator to chill for at least an hour.
9. Slice and Serve: Cut the squares into desired sizes. Dust with additional powdered sugar before serving for an elegant touch.
Following these steps will guide you in creating a batch of Classic Cannoli Squares that everyone will love!
How to Serve
To elevate your presentation and make your Classic Cannoli Squares even more enticing, consider the following serving tips:
1. Plating: Arrange the squares on a beautiful serving platter, stacking them slightly for a visually appealing display.
2. Garnishment: Consider topping with a few extra chocolate chips or a sprinkle of finely chopped pistachios for added color and crunch.
3. Accompaniment: Pair the squares with a dollop of sweetened whipped cream or a side of fresh berries to balance the richness.
4. Drinks: Serve with a robust coffee, a light dessert wine, or even an espresso for a true Italian experience.
These suggestions will enhance the overall enjoyment of your Classic Cannoli Squares. By putting some thought into how you serve them, you’re sure to impress your guests and create unforgettable memories around the dessert table!
Additional Tips
– Taste Test the Filling: Before spreading it on the crust, taste the filling. Adjust the sweetness or flavor as desired.
– Use Fresh Ingredients: Fresh ricotta and quality chocolate will elevate your Cannoli Squares.
– Let It Chill: For the best flavor, allow your squares to chill in the fridge for several hours or overnight. This step helps the flavors to meld beautifully.
– Experiment with Flavors: Don’t hesitate to experiment with the zest. Lemon lends a bright flavor, while orange brings a warm sweetness.
– Decorate Creatively: Use whipped cream or a raspberry sauce for a decorative touch when serving.
Recipe Variation
Feel free to mix it up! Consider these variations to create your own unique version of Classic Cannoli Squares:
1. Different Cheese Options: Blend in mascarpone for a richer flavor or use low-fat ricotta for a lighter version.
2. Fruit Additions: Add fresh berries within the filling or layer slices of banana for an extra fruity twist.
3. Nutty Delight: Incorporate finely chopped pistachios or almonds into the filling for added texture and flavor.
4. Chocolate Drizzle: Drizzle melted chocolate over the top for a decadent touch.
5. Limoncello Infusion: Add a tablespoon of limoncello to the filling for an adult twist that adds flavor depth.
Freezing and Storage
– Storage: Keep any leftovers covered in the refrigerator; they’ll stay fresh for 3-4 days.
– Freezing: Classic Cannoli Squares can be frozen. Wrap them tightly in plastic wrap and then aluminum foil to keep them fresh for up to 2 months.
Special Equipment
To prepare Classic Cannoli Squares, you will find the following kitchen tools helpful:
– Baking Dish: An 8×8 inch square baking dish for baking your squares.
– Mixing Bowls: A couple of good-sized bowls for mixing the filling and crust.
– Spatula: For spreading the filling evenly across the crust.
– Whisk: Handy for blending the filling ingredients smoothly.
– Fork: To prick holes in the crust to prevent bubbling.
Frequently Asked Questions
1. Can I substitute the ricotta cheese?
Yes, you can use mascarpone cheese for a richer flavor or another creamy cheese that fits your taste.
2. How can I know when the filling is set?
Bake until the filling appears firm but still looks creamy. The edges may be slightly puffed.
3. Can I use a different crust?
Absolutely! Feel free to substitute a graham cracker crust or even a cookie crust for a unique twist.
4. Is there a gluten-free option for the crust?
You can use a gluten-free pie crust or make a crust with gluten-free cookies for a delicious alternative.
5. What if I don’t have time to chill the squares?
While it’s best to chill the squares for full flavor, you can serve them immediately after baking if you’re short on time.
Conclusion
In conclusion, Classic Cannoli Squares offer a delicious and nostalgic twist on a traditional Italian favorite. This delightful dessert is not only straightforward to prepare but also comes packed with vibrant flavors and customizable options. By following the steps outlined, you will create a treat that is sure to impress friends and family. Enjoy sharing these squares at your next gathering or savoring them during a cozy evening at home!
Classic Cannoli Squares: An Amazing Ultimate Recipe You Must Try!
- Total Time: 45 minutes
Ingredients
– 1 pre-made pie crust (or homemade if preferred)
– 2 cups ricotta cheese (drained)
– 1 cup powdered sugar
– ½ teaspoon vanilla extract
– ½ teaspoon almond extract
– ½ cup mini chocolate chips
– Zest of 1 orange or lemon
– 1 tablespoon unsweetened cocoa powder (optional)
– Additional powdered sugar for dusting
Instructions
Creating your Classic Cannoli Squares is straightforward. Follow these steps to ensure you achieve perfect results:
1. Preheat the Oven: Set your oven to 350°F (175°C) and prepare a square baking dish (8×8 inches) by greasing it lightly.
2. Prepare the Pie Crust: Roll out the pre-made pie crust into the baking dish, pressing it into the corners and flat against the bottom. Prick the crust with a fork to prevent bubbling.
3. Pre-Bake the Crust: Bake the crust in the preheated oven for 10-12 minutes, or until lightly golden. Remove from the oven and let cool.
4. Mix the Filling: In a large bowl, combine the drained ricotta cheese, powdered sugar, vanilla extract, almond extract, and orange or lemon zest. Mix until smooth.
5. Add Chocolate Chips: Stir in the mini chocolate chips. If desired, add the cocoa powder for a richer, chocolatey flavor. Mix well to combine.
6. Assemble: Spread the ricotta mixture evenly over the cooled pie crust. Use a spatula to smooth the top.
7. Bake Again: Return the dish to the oven and bake for an additional 15-20 minutes. The filling should be set but still creamy.
8. Cool Completely: Remove from the oven and allow it to cool at room temperature for about 15 minutes, then place it in the refrigerator to chill for at least an hour.
9. Slice and Serve: Cut the squares into desired sizes. Dust with additional powdered sugar before serving for an elegant touch.
Following these steps will guide you in creating a batch of Classic Cannoli Squares that everyone will love!
- Prep Time: 15 minutes
- Cook Time: 30 minutes
Nutrition
- Serving Size: 9 squares
- Calories: 300 kcal
- Fat: 15g
- Protein: 6g