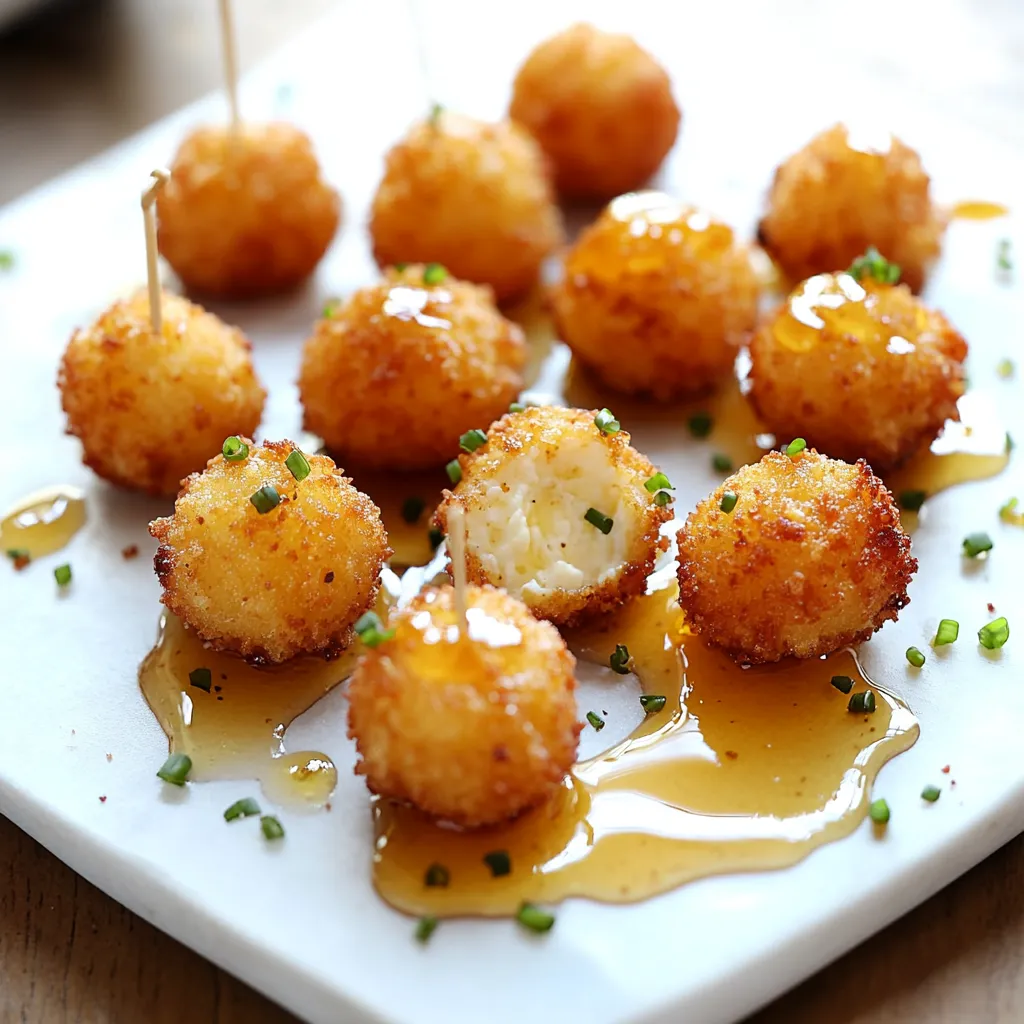
If you’re looking for a crowd-pleasing appetizer that’s equal parts elegant and indulgent, these Crispy Goat Cheese Poppers with Honey are the perfect bite. Creamy, tangy goat cheese rolled into golden, panko-crusted poppers and finished with a warm drizzle of honey—this is the kind of appetizer that disappears almost as quickly as you can fry them.
These little bites are crisp on the outside, soft and melty on the inside, and perfectly balanced between savory and sweet. I first made them for a holiday party as something a little different from the usual cheese board, and they were an instant hit. Now, they’re my go-to for dinner parties, wine nights, or anytime I want a simple but gourmet-style snack.
What makes these poppers extra special is the combination of texture and flavor. The goat cheese brings creamy tanginess, the panko gives that addictively crispy shell, and the honey drizzle adds just enough sweetness to round it all out. Whether you’re serving them as a starter, on a party tray, or even as a snack for yourself, these poppers feel just a little fancy without being complicated.
Let’s dive into the ingredients and first few steps of making these irresistible little bites.
Ingredients You’ll Need:
- 8 oz soft goat cheese (log-style)
- ½ cup all-purpose flour
- 2 large eggs, beaten
- 1 cup panko breadcrumbs
- ½ tsp garlic powder (optional)
- ¼ tsp black pepper
- Vegetable oil, for frying
- Honey, for drizzling
- Fresh thyme or red pepper flakes (optional garnish)
This recipe makes about 16 poppers, depending on how large you roll them. You can serve them plain or dress them up with herbs or a sprinkle of spice. The panko coating makes them extra crispy, while the honey and thyme elevate the whole dish with very little effort.
STEP 1: Firm Up the Goat Cheese
Start by placing your goat cheese in the freezer for 15–20 minutes. This step makes it much easier to handle and shape without the cheese sticking to your hands.
STEP 2: Roll into Bite-Sized Balls
Once the cheese is firm, scoop out small portions (about 1 tablespoon each) and roll them into balls. Don’t worry if they’re not perfectly round—they’ll be coated and crisped later.
Place the formed balls on a baking sheet or plate and keep them in the fridge while you set up your breading station.
STEP 3: Set Up Your Breading Station
In three shallow bowls, set up your coating lineup:
- Bowl 1: All-purpose flour
- Bowl 2: Beaten eggs
- Bowl 3: Panko breadcrumbs mixed with garlic powder and black pepper
This three-step breading process is key to achieving that crispy, golden exterior that holds up perfectly during frying.
Coating, Frying, and Serving Crispy Goat Cheese Poppers
With your goat cheese balls prepped and your breading station ready, it’s time to coat and fry these irresistible poppers. This is where the magic happens—each ball gets a crisp, golden shell that holds up beautifully to the warm, creamy goat cheese inside. Whether you’re frying them for a crowd or making a small batch for yourself, this step is quick, satisfying, and totally worth it.
Let’s get into the coating, chilling, frying, and serving process to bring your goat cheese poppers to crispy, melty perfection.
STEP 4: Coat the Goat Cheese Balls
Working one at a time, take each chilled goat cheese ball and:
- Roll it in the flour, tapping off any excess.
- Dip it in the beaten egg, making sure it’s fully coated.
- Roll it in the panko breadcrumb mixture, pressing lightly to ensure an even, firm coating.
Repeat with all the goat cheese balls and place them on a plate or tray.
This three-step breading process is essential to getting that golden crunch when frying.
STEP 5: Chill Before Frying
Once all the goat cheese balls are coated, refrigerate them for at least 15 minutes. This helps them firm up and hold their shape during frying, preventing any melty messes in the hot oil.
If you’re prepping ahead for a party, you can refrigerate them longer—just cover them with plastic wrap.
STEP 6: Heat the Oil
Pour vegetable oil into a deep skillet or saucepan, filling it with enough oil to submerge the poppers (about 2 inches deep). Heat the oil over medium-high heat until it reaches 350°F (175°C).
If you don’t have a thermometer, test the oil by dropping in a small piece of bread—it should sizzle and turn golden in about 30 seconds.
STEP 7: Fry Until Golden
Carefully fry the goat cheese poppers in batches, 4–5 at a time, being sure not to overcrowd the pan. Fry for about 1–2 minutes, turning occasionally, until they’re golden brown and crisp all over.
Use a slotted spoon to remove the poppers and transfer them to a paper towel-lined plate to drain excess oil.
Repeat with the remaining poppers, allowing the oil to return to temperature between batches for consistent results.
STEP 8: Serve Warm with Honey and Garnish
Arrange the fried goat cheese poppers on a serving plate and drizzle with warm honey just before serving. If you’d like, garnish with fresh thyme for an herby finish or crushed red pepper flakes for a little heat.
These are best enjoyed warm, when the cheese is still soft and the coating is ultra-crispy.
Tips for Perfect Poppers Every Time:
1. Don’t Skip the Chill Time
Chilling after breading helps the coating stick and keeps the cheese from leaking out during frying.
2. Use a Thermometer
Maintaining oil temperature around 350°F ensures a crispy coating without absorbing too much oil.
3. Make Ahead Friendly
You can form and bread the poppers ahead of time and keep them chilled until ready to fry—perfect for parties or prep-ahead entertaining.
4. Go Light with the Honey
A little drizzle goes a long way. The sweetness balances the tangy goat cheese and savory coating without overpowering it.
Fun Variations to Try:
Once you’ve tried these classic Crispy Goat Cheese Poppers with Honey, you might find yourself dreaming up new flavor combos. The beauty of this recipe is how customizable it is—goat cheese pairs well with both savory and sweet, so you can easily tailor these poppers to suit your taste, occasion, or ingredient stash.
Here are a few delicious twists to inspire your next batch:
1. Herbed Goat Cheese Poppers
Mix fresh or dried herbs like thyme, rosemary, or chives directly into the goat cheese before shaping. This adds an extra layer of flavor and makes each bite feel a little more gourmet.
2. Fig and Goat Cheese Poppers
Press a tiny dollop of fig jam into the center of each goat cheese ball before rolling. The jam melts slightly as they fry, giving you that sweet-savory bite that pairs beautifully with the honey drizzle.
3. Spicy Jalapeño Goat Cheese Poppers
Fold in finely minced fresh jalapeño or a dash of cayenne pepper into the goat cheese for a little heat. You can also add red pepper flakes to the breadcrumb coating for an extra kick.
4. Cranberry Pecan Goat Cheese Poppers
Mix in finely chopped dried cranberries and crushed pecans into the goat cheese before rolling into balls. This version is especially great for fall and holiday gatherings.
5. Lemon Zest and Black Pepper Poppers
Add fresh lemon zest and a bit of extra cracked black pepper to the cheese mixture for a bright, tangy variation. Serve with a lemon-infused honey drizzle for a fresh finish.
6. Truffle Goat Cheese Poppers
A drizzle of truffle oil mixed into the goat cheese turns these into a rich, upscale treat. Skip the honey and finish with a sprinkle of sea salt or fresh herbs for a more savory, indulgent version.
7. Baked Instead of Fried
Looking for a lighter option? Bake the breaded poppers at 400°F (200°C) on a parchment-lined sheet for 12–15 minutes, flipping once halfway through, until golden and crisp. They won’t be quite as decadent as the fried version, but still delicious.
These fun twists let you serve something just a little different each time—perfect for making this already irresistible appetizer feel new and exciting with every batch.
Crispy Goat Cheese Poppers FAQ and Final Thoughts:
These Crispy Goat Cheese Poppers with Honey may look and taste like a restaurant-worthy appetizer, but they’re surprisingly simple to make at home. From the creamy, tangy filling to the crisp, golden crust and sweet drizzle of honey—every bite hits that perfect balance of savory and sweet. If you’re planning to make these for a gathering or just want to elevate your snack game, here are some commonly asked questions and helpful tips to guide you.
1. Can I make goat cheese poppers ahead of time?
Yes. You can form and bread the goat cheese balls ahead of time and keep them covered in the refrigerator for up to 24 hours. Just fry them right before serving for the best texture.
2. Can I freeze them?
Absolutely. After breading, freeze the poppers in a single layer on a baking sheet until solid, then transfer to a freezer-safe bag. Fry from frozen, adding 30–60 seconds to the cooking time, or bake directly from frozen.
3. What’s the best oil for frying?
Use a neutral oil with a high smoke point, such as vegetable, canola, or peanut oil. These oils heat evenly and won’t overpower the delicate flavor of the goat cheese.
4. What can I use instead of goat cheese?
Cream cheese or a mix of goat cheese and cream cheese works well if you want a milder flavor. You can also try Boursin or herbed soft cheeses for a different twist.
5. Can I bake these instead of frying?
Yes. For a lighter option, bake at 400°F (200°C) for 12–15 minutes, flipping halfway through, until golden and crisp. They won’t be quite as crispy as fried, but they’re still delicious.
6. How do I keep them warm for serving?
Place the cooked poppers on a wire rack over a baking sheet in a 200°F (90°C) oven to keep them warm and crisp until serving time.
7. What’s the best way to serve them?
Serve warm with a generous drizzle of honey and garnish with fresh thyme or crushed red pepper flakes for a gourmet presentation. They’re excellent as part of a charcuterie spread or on their own with cocktails.
Conclusion: A Bite-Sized Showstopper for Any Occasion
These Crispy Goat Cheese Poppers with Honey are the kind of appetizer that guests remember—and request again and again. The contrast of creamy, tangy goat cheese and crunchy panko coating is irresistible, especially when finished with that simple touch of warm honey.
They’re versatile, easy to prep ahead, and endlessly customizable. Whether you’re entertaining for the holidays, hosting a wine night, or just want something special to snack on, this recipe is a foolproof favorite.
Try the classic version or one of the fun variations, and don’t be surprised when they vanish within minutes. If you give them a go, let me know how you dressed them up—or down—to suit your occasion. Happy frying!
Print
Crispy Goat Cheese Poppers with Honey
- Total Time: 35 minutes
Description
These Crispy Goat Cheese Poppers are a flavor-packed bite of creamy tangy cheese wrapped in a golden, crunchy shell—finished with a drizzle of sweet honey for the perfect savory-sweet combo. An elegant and irresistible appetizer for any occasion!
Ingredients
-
8 oz goat cheese (soft, log-style)
-
½ cup all-purpose flour
-
2 large eggs, beaten
-
1 cup panko breadcrumbs
-
½ tsp garlic powder (optional)
-
¼ tsp black pepper
-
Vegetable oil, for frying
-
Honey, for drizzling
-
Fresh thyme or crushed red pepper flakes (optional garnish)
Instructions
1️⃣ Firm the cheese: Place goat cheese in the freezer for 15–20 minutes to make rolling easier.
2️⃣ Shape the poppers: Scoop 1-tbsp portions and roll into balls.
3️⃣ Set up breading station: Prepare three bowls—one with flour, one with beaten eggs, and one with panko mixed with garlic powder and black pepper.
4️⃣ Coat the balls: Roll each ball in flour, dip in egg, then coat in seasoned panko.
5️⃣ Chill again: Place coated balls on a tray and refrigerate for at least 15 minutes.
6️⃣ Heat oil: In a deep skillet or saucepan, heat oil to 350°F (175°C).
7️⃣ Fry the poppers: Fry in batches for 1–2 minutes or until golden and crispy. Do not overcrowd.
8️⃣ Drain and serve: Use a slotted spoon to transfer to a paper towel-lined plate. Serve warm with honey drizzle and optional garnish.
Notes
-
Pro Tip: Freeze longer if your goat cheese is extra soft or sticky.
-
Flavor Boost: Add lemon zest or chopped herbs to the goat cheese before rolling.
-
Make Ahead: Roll and bread ahead of time; chill until ready to fry.
-
Baking Option: Bake at 425°F for 12–15 minutes for a lighter version.
-
Serving Idea: Perfect on a cheese board or passed appetizer tray!
- Prep Time: 25 minutes (includes chilling)
- Cook Time: 10 minutes

