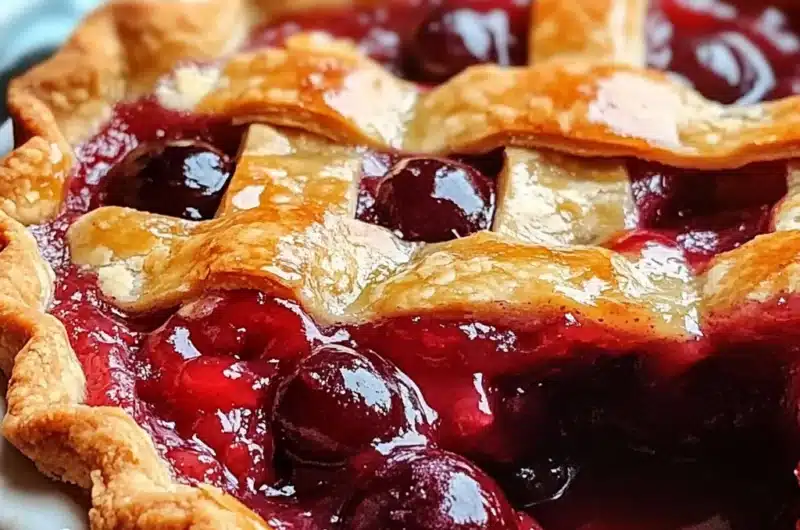
Delicious Fresh Cherry Pie is a delightful way to celebrate the joys of summer fruit. The moment you take a bite, the burst of tart and sweet cherries, enveloped in a flaky, buttery crust, will transport you to a land of culinary bliss. Each slice of this pie feels like a hug for your taste buds, combining simple ingredients into an extraordinary dessert. Whether it’s for a family gathering, a holiday, or simply for your own enjoyment, this cherry pie is sure to impress everyone.
If you love cherries, then this recipe will become your go-to for any occasion. It’s not just about satisfying your sweet tooth; it’s about creating a memorable experience. With its stunning garnet color and fragrant aroma wafting through your kitchen, you’re bound to have people lining up for a piece. Moreover, this pie encapsulates the essence of homemade goodness, drawing everyone back to cherished memories of summers past.
In this guide, you will explore the reasons why this cherry pie recipe stands out, the preparation and cooking time, as well as the step-by-step instructions to ensure your pie comes out perfectly every time. Get ready for a slice of summer with this incredible cherry pie recipe!
Why You’ll Love This Recipe
This Delicious Fresh Cherry Pie is not just a treat; it’s a celebration of simple ingredients that come together to create an incredible dessert. Here are some reasons that will guarantee your love for this recipe:
1. Fresh Ingredients: Using fresh cherries makes a noticeable difference in flavor and texture, ensuring a vibrant result.
2. Easy to Make: The step-by-step instructions make it simple, even for novice bakers.
3. Perfect Flavor Balance: The combination of sweet and tart cherries creates a delightful flavor profile that beckons for more.
4. Versatility: While cherries take center stage, you can incorporate other fruits or flavors to make it your own.
5. Impressive Presentation: The pie’s gorgeous color and flaky crust create a stunning visual appeal that will impress your guests.
6. Tradition and Comfort: Baking a cherry pie evokes warm memories and is a classic dessert everyone loves.
With these highlights, it’s easy to see why this pie is cherished and adored. It’s time to immerse yourself in the world of baking with this scrumptious cherry pie!
Preparation and Cooking Time
Before you dive into making your Delicious Fresh Cherry Pie, it’s important to get a sense of the time involved. Here’s a breakdown:
– Preparation Time: 30-40 minutes
– Cooking Time: 45-50 minutes
– Cooling Time: 1 hour
In total, you can expect the process to take about 2 hours, including cooling, before you can serve this delightful pie.
Ingredients
– 2 cups fresh cherries, pitted and halved
– 1 cup granulated sugar
– 2 tablespoons cornstarch
– 1 tablespoon lemon juice
– 1 teaspoon vanilla extract
– 1/4 teaspoon almond extract
– 1 pinch salt
– 1 tablespoon butter, diced
– 1 prepared pie crust (store-bought or homemade)
– 1 egg (for egg wash, optional)
– 1 tablespoon coarse sugar (for topping, optional)
Step-by-Step Instructions
Baking a Delicious Fresh Cherry Pie requires following these uncomplicated steps:
1. Preheat the Oven: Preheat your oven to 425°F (220°C).
2. Prepare the Filling: In a mixing bowl, combine the pitted cherries, granulated sugar, cornstarch, lemon juice, vanilla extract, almond extract, and a pinch of salt. Toss until the cherries are well-coated, and set aside.
3. Roll out the Dough: If using homemade dough, roll out half of the dough to fit your pie dish. Place it in the dish and refrigerate while you prepare the filling.
4. Add the Filling: Pour the cherry mixture into the prepared pie crust. Dot the filling with small pieces of butter for added richness.
5. Cover with Second Crust: Roll out the second portion of dough and cover the cherry filling. You can create a lattice design for aesthetic appeal or keep it solid. If using a solid crust, cut a few slits for steam to escape.
6. Egg Wash (Optional): Beat the egg and brush it over the crust for a golden finish. Sprinkle with coarse sugar for extra sweetness and texture.
7. Bake the Pie: Place the pie in the preheated oven. Bake for 45-50 minutes or until the crust is golden brown and the filling is bubbly.
8. Cooling: Remove the pie from the oven and let it cool for at least an hour on a wire rack. This will allow the filling to set properly.
9. Serve: After cooling, slice and serve the pie. Enjoy it plain or with a scoop of vanilla ice cream.
How to Serve
When it comes to serving your Delicious Fresh Cherry Pie, consider the following tips for the ideal presentation:
1. Presentation Style: Use a beautiful pie dish and a decorative cake stand to elevate your pie’s appearance.
2. Serving Temperature: Serve the pie at room temperature for the best flavor. You can warm slices slightly in the microwave if desired.
3. Garnishes: Enhance each slice with a dollop of whipped cream or a scoop of vanilla or almond ice cream. Fresh mint leaves make a lovely garnish as well.
4. Pairing Beverages: This pie pairs wonderfully with a glass of chilled white wine or iced tea, perfect for summer gatherings.
5. Leftovers Storage: Keep any leftover pie covered in the refrigerator, and consume within a few days. It tastes great even after a day!
By following these serving suggestions, you’ll create a delightful cherry pie experience that everyone will remember. Enjoy your baking adventure, and get ready to savor the fruit-filled goodness of this Incredible Delicious Fresh Cherry Pie!
Additional Tips
– Use Quality Cherries: For the best flavor, opt for in-season fresh cherries. They provide a sweeter and juicier filling.
– Adjust Sweetness: Taste the cherry filling before baking. If you prefer a sweeter pie, increase the sugar slightly.
– Add Spice: A dash of cinnamon or nutmeg can elevate the flavor of the filling. Experiment to find your perfect mix.
– Perfect the Crust: For a flakier crust, be sure not to overwork the dough. Less handling encourages a tender texture.
– Allow Cooling: Patience is key! Allow the pie to cool completely for the filling to set correctly, ensuring cleaner slices.
Recipe Variation
Feel free to customize your Delicious Fresh Cherry Pie! Here are some variations to try:
1. Mixed Berry Pie: Combine fresh cherries with blueberries or raspberries for a delightful mix of flavors.
2. Almond Flavored Crust: Add almond extract to the crust for a subtle nutty flavor that pairs beautifully with cherries.
3. Chocolate Cherry: Incorporate a layer of dark chocolate chips into the pie before adding the cherries for a rich twist.
4. Gluten-Free Option: Substitute regular flour with a gluten-free blend to accommodate dietary restrictions.
Freezing and Storage
– Storage: Keep the cherry pie covered with plastic wrap in the refrigerator. It will stay fresh for about 3 to 4 days.
– Freezing: You can freeze the pie before baking for up to 3 months. Wrap it tightly in foil or plastic wrap. Thaw in the refrigerator overnight before baking.
– Leftover Slices: If you have leftover baked pie, wrap them individually and freeze. They can last about 2 months and maintain their flavor and texture well.
Special Equipment
To make your Delicious Fresh Cherry Pie, here are some essential tools you might need:
– Mixing Bowls: For combining your filling ingredients.
– Rolling Pin: To roll out the pie crust evenly.
– Pie Dish: A standard 9-inch pie dish works perfectly.
– Pastry Brush: For the egg wash to achieve a golden-brown crust.
– Wire Rack: To let the pie cool evenly after baking.
Frequently Asked Questions
Can I use frozen cherries?
Yes, frozen cherries are a great alternative! Just thaw and drain excess liquid before using them in the pie.
What if my pie crust cracks?
If your pie crust cracks, don’t panic! Simply patch it with small pieces of dough and press gently to seal.
Can this pie be made ahead of time?
Absolutely! You can prepare the pie a day in advance, just keep it covered in the refrigerator until ready to serve.
What’s the best way to reheat leftovers?
Reheat slices in a toaster oven or microwave briefly, but be careful not to overdo it. The crust can get tough if heated too long.
How do I know when the pie is done baking?
Look for a golden crust and bubbling filling. If you see both, it’s a good indication your Delicious Fresh Cherry Pie is ready!
Conclusion
The Delicious Fresh Cherry Pie recipe is a delightful way to harness the fresh flavors of summer. Its flaky crust and sweet-tart filling are sure to leave a lasting impression on anyone who takes a slice. Whether enjoyed with friends and family or savored alone, this pie epitomizes comfort and joy. Once you try this recipe, it will undoubtedly become your favorite go-to dessert for any occasion.

Delicious Fresh Cherry Pie: An Incredible Ultimate Recipe
- Total Time: 29 minute
Ingredients
– 2 cups fresh cherries, pitted and halved
– 1 cup granulated sugar
– 2 tablespoons cornstarch
– 1 tablespoon lemon juice
– 1 teaspoon vanilla extract
– 1/4 teaspoon almond extract
– 1 pinch salt
– 1 tablespoon butter, diced
– 1 prepared pie crust (store-bought or homemade)
– 1 egg (for egg wash, optional)
– 1 tablespoon coarse sugar (for topping, optional)
Instructions
Baking a Delicious Fresh Cherry Pie requires following these uncomplicated steps:
1. Preheat the Oven: Preheat your oven to 425°F (220°C).
2. Prepare the Filling: In a mixing bowl, combine the pitted cherries, granulated sugar, cornstarch, lemon juice, vanilla extract, almond extract, and a pinch of salt. Toss until the cherries are well-coated, and set aside.
3. Roll out the Dough: If using homemade dough, roll out half of the dough to fit your pie dish. Place it in the dish and refrigerate while you prepare the filling.
4. Add the Filling: Pour the cherry mixture into the prepared pie crust. Dot the filling with small pieces of butter for added richness.
5. Cover with Second Crust: Roll out the second portion of dough and cover the cherry filling. You can create a lattice design for aesthetic appeal or keep it solid. If using a solid crust, cut a few slits for steam to escape.
6. Egg Wash (Optional): Beat the egg and brush it over the crust for a golden finish. Sprinkle with coarse sugar for extra sweetness and texture.
7. Bake the Pie: Place the pie in the preheated oven. Bake for 45-50 minutes or until the crust is golden brown and the filling is bubbly.
8. Cooling: Remove the pie from the oven and let it cool for at least an hour on a wire rack. This will allow the filling to set properly.
9. Serve: After cooling, slice and serve the pie. Enjoy it plain or with a scoop of vanilla ice cream.
- Prep Time: 30-40 minutes
- Cook Time: 45-50 minutes
Nutrition
- Serving Size: 8 slices
- Calories: 320 kcal
- Fat: 14g
- Protein: 2g