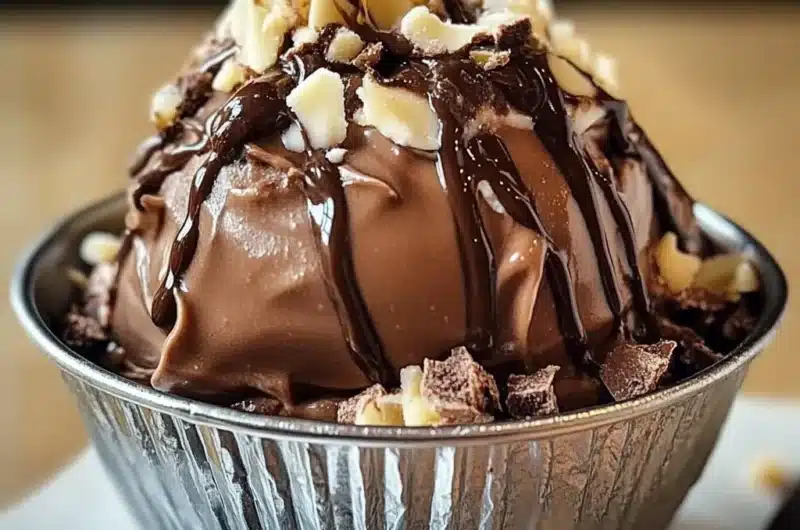
Easy Homemade Chocolate Nutella Gelato Recipe will transform your dessert experience. There’s nothing quite like the rich, creamy texture of homemade gelato, especially when it’s infused with the mouthwatering flavor of Nutella. This amazing dessert combines the elegance of Italian gelato with the comforting taste of chocolate hazelnut spread. It’s perfect for summer days, special occasions, or simply as a delightful treat to indulge in any time of the year.
Imagine serving up a bowl of this creamy Nutella gelato, the indulgent chocolate melting on your tongue, balanced with the sweet nuttiness of hazelnuts. You and your guests will be left in awe, desperately trying to resist a second scoop. This recipe is not only easy but also gives you the ultimate satisfaction of making gelato at home, using simple and accessible ingredients. Whether you’re a novice in the kitchen or a seasoned pro, this gelato recipe will amaze everyone, including yourself.
In this detailed guide, we’ll explore why this tasty treat is a must-try, how to prepare it swiftly, and tips on serving it to create a memorable experience for all. Your passion for homemade desserts will reach new heights once you discover how wonderful it is to create your own gelato right in your kitchen.
Why You’ll Love This Recipe
There are countless reasons why this Easy Homemade Chocolate Nutella Gelato Recipe will win your heart. Here’s what makes it truly special:
1. Easy Preparation: This recipe is straightforward, making it a joy to make even for kitchen novices.
2. Rich Flavor: The combination of chocolate and Nutella creates a gelato bursting with deliciousness.
3. Creamy Texture: Its velvety consistency makes every spoonful a delightful experience.
4. Customizable: Feel free to add extras like crushed nuts, chocolate chips, or even a swirl of caramel.
5. No Ice Cream Maker Needed: You can prepare this gelato with basic kitchen appliances, such as a blender or mixer.
6. Perfect for Any Event: Be it a party, family get-together, or a cozy night in, this gelato is sure to impress.
By opting for homemade gelato, you gain control over the ingredients, ensuring a wholesome treat free from artificial additives. It’s not just about the flavor—it’s about crafting a beloved dessert that brings happiness and joy!
Preparation and Cooking Time
Creating this delightful gelato takes minimal time and effort. Here’s how the timing breaks down:
– Preparation Time: 10-15 minutes
– Chill Time: 4-6 hours (or overnight for best results)
– Total Time: Approximately 4-6 hours (largely waiting for it to freeze)
With this quick preparation time, you can easily whip up this treat and have it ready for later enjoyment.
Ingredients
– 2 cups whole milk
– 1 cup heavy cream
– 1 cup Nutella
– 3/4 cup granulated sugar
– 1/2 cup unsweetened cocoa powder
– 1 tablespoon vanilla extract
– A pinch of salt
Step-by-Step Instructions
Now that you have everything ready, let’s dive into the simple steps to create this delightful gelato:
1. Mix Milk and Cream: In a large bowl, combine the whole milk and heavy cream. Whisk them together until well blended.
2. Add Nutella: Spoon the Nutella into the milk mixture. Use a whisk to blend until smooth and fully incorporated.
3. Incorporate Sugar: Gradually add the granulated sugar, whisking continuously until completely dissolved.
4. Mix in Cocoa Powder: Sift the unsweetened cocoa powder into the mixture while stirring. This step helps avoid lumps and ensures a smooth texture.
5. Add Vanilla and Salt: Stir in the vanilla extract and a pinch of salt to enhance the flavor of your gelato.
6. Chill the Mixture: Cover the bowl with plastic wrap or a lid. Place it in the refrigerator for at least 2 hours, or until the mixture is thoroughly chilled.
7. Blend Until Smooth: After chilling, re-whisk the mixture to ensure it’s uniform. This makes it easier to pour into your container.
8. Freeze the Gelato: Pour the mixture into a freezer-safe container, smoothing the top with a spatula.
9. Initial Freeze: Place in the freezer and allow it to freeze for about 4 hours. If you prefer a creamier texture, stir the mixture every hour to incorporate air.
10. Final Serving: Once the gelato has frozen completely, scoop it into bowls and enjoy!
These easy-to-follow steps will guide you in crafting an indulgent gelato that everyone will adore.
How to Serve
Serving your Easy Homemade Chocolate Nutella Gelato can be as creative and fun as you want. Here are some tips to achieve an impressive presentation:
1. Stylish Bowls: Use elegant dessert bowls or unique mason jars to serve your gelato. The presentation alone can elevate the overall experience.
2. Toppings: Enhance your gelato with tasty toppings. Consider adding crushed hazelnuts, a drizzle of melted chocolate, or fresh berries for a pop of color and flavor.
3. Garnish: A sprig of mint can serve as a lovely garnish, adding a fresh aroma and complementing the rich chocolate flavors.
4. Share the Joy: Serve in larger bowls for sharing, or create gelato sandwiches with cookies for a unique treat.
5. Beverage Pairing: Pair your gelato with a shot of espresso for a delightful coffee experience or a glass of dessert wine for a sophisticated finish.
By focusing on the presentation and serving style, you can create an unforgettable gelato experience that not only satisfies the taste buds but also looks stunning on the table!
Additional Tips
– Use Quality Ingredients: High-quality cocoa powder and Nutella will significantly enhance the gelato’s flavor. Fresh milk and cream also make a difference in taste and texture.
– Chill Thoroughly: Ensure your mixture is very cold before freezing. This will help achieve that perfect gelato consistency.
– Let it Sit: Allow the gelato to sit out at room temperature for about 5-10 minutes before scooping. This will soften it, making it easier to serve.
– Experiment with Flavors: In addition to Nutella, try adding a swirl of fudge or mixing in chocolate chips for added texture.
Recipe Variation
Get creative with your gelato! Here are some variations you might like to explore:
1. Nutella Swirl Gelato: After freezing for an hour, swirl in more Nutella for an extra burst of flavor.
2. Coffee Hazelnut Gelato: Add 1 tablespoon of instant espresso to the mixture for a mocha twist.
3. Vegan Version: Substitute whole milk with almond milk and heavy cream with coconut cream for a delicious vegan option.
4. Fruit Infusion: Blend in some frozen bananas before freezing for a fruity flavor complementing the chocolate.
Freezing and Storage
– Storage: Keep your gelato in an airtight container to avoid ice crystals. It stays fresh for about 2 weeks in the freezer.
– Freezing Tip: If your gelato feels hard after freezing, let it sit out for 10-15 minutes before scooping. This will soften it for easier serving.
Special Equipment
To make this Easy Homemade Chocolate Nutella Gelato, here are some recommended tools:
– Mixing bowl: A large bowl for combining ingredients.
– Whisk: For mixing the ingredients until smooth.
– Container: A freezer-safe container to hold the gelato while it freezes.
– Spatula: To smooth the gelato in the container.
– Measurer: For measuring out your ingredients accurately.
Frequently Asked Questions
Can I use a different nut butter instead of Nutella?
Yes! You can substitute peanut butter, almond butter, or any nut spread of your choice for a unique flavor.
Why is my gelato icy?
Icy gelato may result from not incorporating enough air or the mixture not being cold enough before freezing. Stir the mixture periodically as it freezes to prevent large ice crystals.
Can I make this gelato without an ice cream maker?
Absolutely! This recipe does not require an ice cream maker and can be made with basic kitchen equipment.
How do I know when my gelato is ready to serve?
The gelato should be firm but not rock solid. If it feels hard, let it sit at room temperature for a few minutes.
Is this recipe suitable for kids to help with?
Yes! The preparation is simple and fun, making it an enjoyable experience for kids to join in the kitchen.
Conclusion
Making your Easy Homemade Chocolate Nutella Gelato is an exciting and rewarding culinary adventure. The process is simple, and the results are delectable. This gelato not only pleases the palate but also showcases your creativity in the kitchen. Whether enjoyed on a hot summer day, as an elegant dessert for a dinner party, or just as a delightful treat for yourself, this gelato is sure to impress. So gather your ingredients and start creating this incredible dessert that everyone will love!

Easy Homemade Chocolate Nutella Gelato Recipe: An Amazing Ultimate Guide
- Total Time: 57 minute
Ingredients
– 2 cups whole milk
– 1 cup heavy cream
– 1 cup Nutella
– 3/4 cup granulated sugar
– 1/2 cup unsweetened cocoa powder
– 1 tablespoon vanilla extract
– A pinch of salt
Instructions
Now that you have everything ready, let’s dive into the simple steps to create this delightful gelato:
1. Mix Milk and Cream: In a large bowl, combine the whole milk and heavy cream. Whisk them together until well blended.
2. Add Nutella: Spoon the Nutella into the milk mixture. Use a whisk to blend until smooth and fully incorporated.
3. Incorporate Sugar: Gradually add the granulated sugar, whisking continuously until completely dissolved.
4. Mix in Cocoa Powder: Sift the unsweetened cocoa powder into the mixture while stirring. This step helps avoid lumps and ensures a smooth texture.
5. Add Vanilla and Salt: Stir in the vanilla extract and a pinch of salt to enhance the flavor of your gelato.
6. Chill the Mixture: Cover the bowl with plastic wrap or a lid. Place it in the refrigerator for at least 2 hours, or until the mixture is thoroughly chilled.
7. Blend Until Smooth: After chilling, re-whisk the mixture to ensure it’s uniform. This makes it easier to pour into your container.
8. Freeze the Gelato: Pour the mixture into a freezer-safe container, smoothing the top with a spatula.
9. Initial Freeze: Place in the freezer and allow it to freeze for about 4 hours. If you prefer a creamier texture, stir the mixture every hour to incorporate air.
10. Final Serving: Once the gelato has frozen completely, scoop it into bowls and enjoy!
These easy-to-follow steps will guide you in crafting an indulgent gelato that everyone will adore.
- Prep Time: 15 minutes
- Cook Time: 4-6 hours (chill time)
Nutrition
- Serving Size: About 4-6 servings
- Calories: 320 kcal per serving
- Fat: 20g
- Protein: 4g