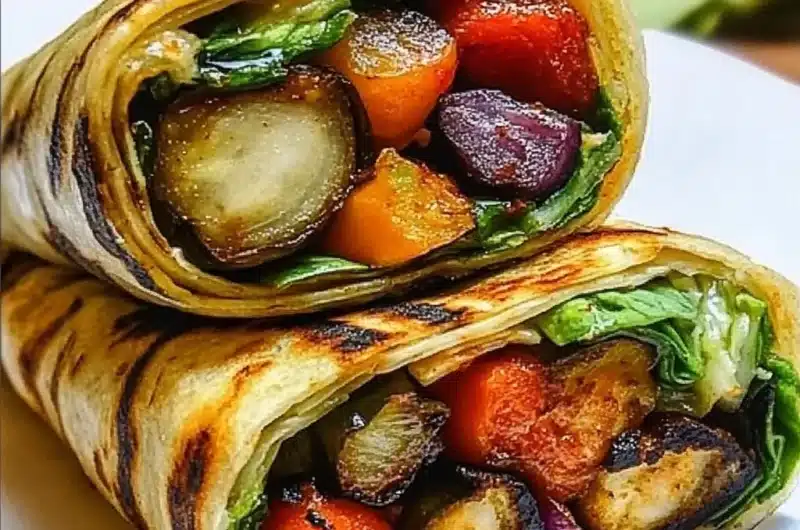
Grilled Vegetable Wrap is a delightful dish that brings the charm of summer cooking right to your table. These wraps are bursting with flavor and texture, making them an amazing option for anyone who loves grilled vegetables paired with a whole grain wrap. Not only are they delicious, but they also pack a nutritional punch. With vibrant vegetables and tasty sauces, these wraps promise a satisfying meal that will leave you feeling energized and happy.
If you’ve ever savored the mouthwatering flavors of a Grilled Vegetable Wrap, you’ll understand why they are so beloved. The grill caramelizes the vegetables, enhancing their natural sweetness and creating a medley of flavors that blend beautifully with fresh herbs and dressings. Furthermore, these wraps are incredibly versatile, allowing you to customize your ingredients based on your preferences or what you have on hand.
In this comprehensive guide, you will discover why this recipe is a must-try. We will explore its amazing benefits, how to prepare it efficiently, and simple step-by-step instructions to ensure a perfect wrap every time. Whether you’re looking for a quick lunch, a light dinner, or a colorful addition to any meal, Grilled Vegetable Wraps will surely impress.
Why You’ll Love This Recipe
Grilled Vegetable Wraps have a lot to offer, and here are several reasons why you will fall head over heels for this incredible dish:
1. Healthy Choice: Packed with fresh vegetables, these wraps are a great source of vitamins and minerals.
2. Quick and Easy: The preparation and cooking process is straightforward, making it perfect for busy weeknights.
3. Customizable: You can swap out vegetables based on your preferences or seasonal availability.
4. Flavor Explosion: The combination of grilled vegetables with zesty sauces creates a medley of tastes.
5. Great for Meal Prep: These wraps can be made in advance and stored in the refrigerator for delicious lunches throughout the week.
6. Kid-Friendly: The vibrant colors and fun presentation make them a hit with children, encouraging them to eat their veggies.
With all these benefits, it’s clear why Grilled Vegetable Wraps have become a favorite for many. The delightful mix of flavors and textures will surely elevate any meal.
Preparation and Cooking Time
Creating your Grilled Vegetable Wrap will require a bit of time, but the end result is totally worth it. Here’s the breakdown of the preparation and cooking time:
– Preparation Time: 15 minutes
– Cooking Time: 15-20 minutes
– Total Time: Approximately 30-35 minutes
This fast and efficient timeline makes it an excellent choice for when you’re short on time but still want something satisfying and healthy.
Ingredients
– 4 whole grain wraps or tortillas
– 1 zucchini, sliced
– 1 red bell pepper, sliced
– 1 yellow bell pepper, sliced
– 1 red onion, sliced
– 1 cup of fresh spinach or mixed greens
– 1-2 tablespoons olive oil
– 1 teaspoon garlic powder
– 1 teaspoon salt
– ½ teaspoon black pepper
– ½ teaspoon smoked paprika
– ½ teaspoon Italian seasoning
– Hummus or tzatziki sauce, for spreading
– Optional: Feta cheese or goat cheese for garnish
Step-by-Step Instructions
Creating the perfect Grilled Vegetable Wrap is simple if you follow these easy steps:
1. Preheat the Grill: Preheat your grill or grill pan to medium-high heat.
2. Prepare the Vegetables: Slice the zucchini, bell peppers, and red onion into strips for grilling.
3. Season the Vegetables: In a bowl, combine the olive oil, garlic powder, salt, black pepper, smoked paprika, and Italian seasoning. Toss the sliced vegetables in the mixture until evenly coated.
4. Grill the Vegetables: Place the seasoned vegetables directly on the grill. Cook for about 5-7 minutes per side, or until they are tender and have nice grill marks.
5. Assemble the Wraps: Lay each whole grain wrap on a clean surface. Spread a generous layer of hummus or tzatziki sauce over each tortilla.
6. Add Vegetables and Greens: Layer the grilled vegetables and fresh spinach (or mixed greens) on top of the sauce.
7. Wrap It Up: Roll the wrap tightly, tucking in the sides as you go to secure the filling inside.
8. Grill the Wraps (Optional): For a toasted finish, grill the assembled wraps for an additional 2-3 minutes on each side.
9. Slice and Serve: Cut the wrap in half diagonally and enjoy immediately or pack for later.
With these steps, you can create Grilled Vegetable Wraps that are not only visually appealing but also packed with flavors that guarantee satisfaction!
How to Serve
When it comes to serving your Grilled Vegetable Wrap, consider the following tips to enhance the overall experience:
1. Presentation: Arrange the sliced wraps on a colorful platter. Garnish with fresh herbs or additional greens for a vibrant look.
2. Accompaniments: Pair your wraps with a side of chips, fresh fruit, or a light salad for a complete meal.
3. Dipping Sauce: Provide extra hummus or tzatziki for dipping, allowing guests to enhance their flavors.
4. Meal Prep Idea: These wraps store well in the fridge and can be enjoyed cold or gently reheated.
5. Beverage Pairing: A refreshing lemonade or iced tea goes perfectly with these wraps during warm weather.
By focusing on presentation and delicious accompaniments, you can turn your meal into a delightful dining experience. Grilled Vegetable Wraps are not just food; they are a culinary adventure that you and your guests will remember!
Enjoy these incredible culinary creations and share the joy with friends and family.
Additional Tips
– Use Fresh Produce: Opt for seasonal vegetables for the best flavor and nutritional value. Fresh produce makes a noticeable difference.
– Experiment with Herbs: Don’t shy away from adding fresh herbs like basil or cilantro for an added burst of flavor.
– Keep It Colorful: Use a variety of colorful vegetables to make your wrap visually appealing and nutritious.
– Adjust Texture: Consider adding nuts or seeds for a delightful crunch in every bite.
– Serve with Sides: Consider serving your wraps with a light soup or salad to complement the meal.
Recipe Variation
Feel free to customize your Grilled Vegetable Wrap by trying these variations:
1. Mexican-Inspired Wrap: Add black beans and corn, and use salsa as the sauce.
2. Mediterranean Twist: Stuff your wrap with olives, sun-dried tomatoes, and feta cheese for a zesty flavor.
3. Spicy Kick: Add jalapeños or drizzle with your favorite hot sauce for some heat.
4. Protein Boost: Include grilled chicken, turkey slices, or chickpeas for added protein.
5. Different Wraps: Experiment with spinach wraps or gluten-free tortillas for a unique take.
Freezing and Storage
– Storage: Wrapped in parchment or plastic, these wraps can be stored in the fridge for up to 3-4 days.
– Freezing: If you want to make them ahead, you can freeze assembled wraps. Wrap them tightly and store in an airtight container for up to 2 months.
– Reheating: Allow frozen wraps to thaw in the fridge before gently reheating on the grill or in a skillet until warmed through.
Special Equipment
To prepare your Grilled Vegetable Wraps efficiently, consider using the following tools:
– Grill or Grill Pan: Essential for achieving those perfect grill marks and smoky flavors.
– Cutting Board: For slicing your vegetables safely and efficiently.
– Bowl: For mixing and seasoning the vegetables.
– Tongs: Useful for flipping the vegetables on the grill without damaging them.
– Knife: A sharp knife will make cutting vegetables easier and quicker.
Frequently Asked Questions
Can I use frozen vegetables?
While fresh vegetables yield the best flavor, you can use frozen ones in a pinch. Just ensure they’re thawed and drained well.
What if I don’t have a grill?
You can roast the vegetables in an oven at 400°F (200°C) for about 20 minutes or sauté them in a pan.
Are Grilled Vegetable Wraps suitable for vegan diets?
Yes! The main components are vegetables and can be customized to exclude any animal products.
How can I increase the protein content?
Add chickpeas, beans, or grilled tofu to your wrap for an added protein boost.
How long can I keep prepped vegetables?
Chopped and prepped vegetables can last in the fridge for up to 3 days if stored in an airtight container.
Conclusion
Grilled Vegetable Wraps are not only a tasty meal but also a healthy one that everyone can enjoy. Packed with vibrant flavors, they offer flexibility and ease, making them a go-to option for busy days. Whether you indulge in them as a light lunch or a satisfying dinner, their nutritional benefits and deliciousness are undeniable. With a range of variations and serving options, you can always make them new and exciting. So grab your grill and fresh veggies, and start crafting your perfect Grilled Vegetable Wrap today!
Grilled Vegetable Wrap: An Incredible Ultimate Recipe for a Healthy Meal
- Total Time: 35 minutes
Ingredients
– 4 whole grain wraps or tortillas
– 1 zucchini, sliced
– 1 red bell pepper, sliced
– 1 yellow bell pepper, sliced
– 1 red onion, sliced
– 1 cup of fresh spinach or mixed greens
– 1-2 tablespoons olive oil
– 1 teaspoon garlic powder
– 1 teaspoon salt
– ½ teaspoon black pepper
– ½ teaspoon smoked paprika
– ½ teaspoon Italian seasoning
– Hummus or tzatziki sauce, for spreading
– Optional: Feta cheese or goat cheese for garnish
Instructions
Creating the perfect Grilled Vegetable Wrap is simple if you follow these easy steps:
1. Preheat the Grill: Preheat your grill or grill pan to medium-high heat.
2. Prepare the Vegetables: Slice the zucchini, bell peppers, and red onion into strips for grilling.
3. Season the Vegetables: In a bowl, combine the olive oil, garlic powder, salt, black pepper, smoked paprika, and Italian seasoning. Toss the sliced vegetables in the mixture until evenly coated.
4. Grill the Vegetables: Place the seasoned vegetables directly on the grill. Cook for about 5-7 minutes per side, or until they are tender and have nice grill marks.
5. Assemble the Wraps: Lay each whole grain wrap on a clean surface. Spread a generous layer of hummus or tzatziki sauce over each tortilla.
6. Add Vegetables and Greens: Layer the grilled vegetables and fresh spinach (or mixed greens) on top of the sauce.
7. Wrap It Up: Roll the wrap tightly, tucking in the sides as you go to secure the filling inside.
8. Grill the Wraps (Optional): For a toasted finish, grill the assembled wraps for an additional 2-3 minutes on each side.
9. Slice and Serve: Cut the wrap in half diagonally and enjoy immediately or pack for later.
With these steps, you can create Grilled Vegetable Wraps that are not only visually appealing but also packed with flavors that guarantee satisfaction!
- Prep Time: 15 minutes
- Cook Time: 20 minutes
Nutrition
- Serving Size: 4
- Calories: 250 kcal
- Fat: 10g
- Protein: 7g