How to Decorate a Cake to Look Like a Unicorn: Step-by-Step Guide
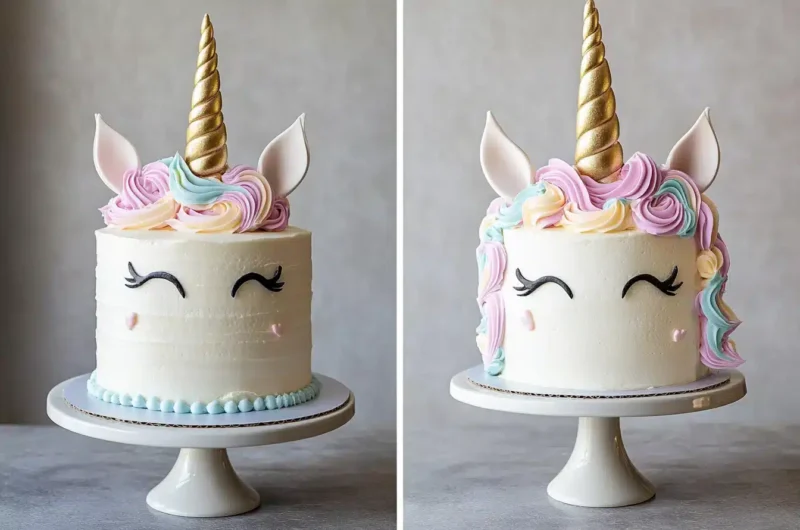
Unicorn cakes have become a staple for magical celebrations, blending vibrant colors and whimsical designs to create edible masterpieces. Whether you’re preparing for a birthday, wedding, or any festive occasion, learning how to decorate a cake to look like a unicorn is easier than you think! This comprehensive guide will walk you through each step, from selecting the right tools to adding those enchanting finishing touches.
Preparing for Unicorn Cake Decoration
1. Essential Tools and Materials for Decorating a Unicorn Cake
To achieve a flawless unicorn cake, gathering the right tools and materials is critical. This preparation step saves time and ensures a smoother decorating process.
- Tools You’ll Need:
- Piping bags and a variety of tips (e.g., star, round, and petal tips)
- Offset spatula for frosting application
- Fondant modeling tools for creating the unicorn’s horn and ears
- Edible markers for drawing fine details like eyes and lashes
- Gel food coloring for vibrant hues
- A turntable for easy frosting and decorating
- Materials Required:
- Buttercream frosting or fondant (depending on your preference)
- Pre-baked cake layers (vanilla or funfetti are popular choices)
- Fondant or modeling chocolate for the horn and ears
- Edible gold dust or spray for magical accents
- Edible glitter, sprinkles, or sugar flowers for extra flair
1.1. Choosing the Best Cake Base for Unicorn Decoration
Before diving into the decorating process, it’s essential to select a cake base that suits your design. While unicorn cakes can feature any flavor, vanilla or funfetti are most popular because their light colors complement the cake’s vibrant decorations.
- Why Vanilla and Funfetti Work Best:
Their neutral tones ensure that the buttercream or fondant colors shine without distraction. Additionally, these flavors appeal to a broad audience, making them perfect for parties. - Structural Considerations:
Choose a cake that’s sturdy enough to support the decorations, especially if you’re adding multiple layers. A moist yet firm texture is key—this ensures the cake doesn’t crumble under the weight of the frosting and fondant.
1.2. Mixing Buttercream Frosting for a Smooth Finish
Buttercream frosting is the foundation of any beautifully decorated unicorn cake. It not only provides a smooth surface but also serves as the “glue” for the decorations.
- Preparing the Frosting:
Start with softened unsalted butter, whipping it until light and fluffy. Gradually add sifted powdered sugar, a splash of vanilla extract, and heavy cream until the frosting reaches the desired consistency. - Coloring the Frosting:
Divide the frosting into separate bowls and tint each one with gel food coloring. Stick to pastel shades for a classic unicorn look or go bold with vibrant hues like electric blue or hot pink.
1.3. Applying the Crumb Coat
A crumb coat is a thin layer of frosting applied to trap any loose crumbs before adding the final layer. It’s an essential step for achieving a professional-looking finish.
- Steps for a Perfect Crumb Coat:
- Place one cake layer on a turntable and spread a thin layer of frosting over it.
- Stack additional layers, repeating the process between each.
- Apply a light coating of frosting over the entire cake to seal in crumbs.
- Refrigerate for 20–30 minutes to set the crumb coat before applying the final layer.
Creating the Unicorn’s Horn and Ears
2. The Unicorn’s Horn: A Magical Centerpiece
The unicorn’s horn is the signature element of the design, and it draws attention immediately. While it may look intricate, it’s surprisingly simple to make if you follow these steps.
- Step 1: Shaping the Horn
Start by rolling white fondant or modeling chocolate into a thick, elongated cone. Twist it gently to form the signature spiral effect. If you’d like a sturdier structure, insert a wooden skewer or toothpick through the center. This not only supports the horn but also helps secure it to the cake later. - Step 2: Adding the Sparkle
Paint the horn with edible gold dust or spray for that magical, glittery finish. Additionally, consider blending subtle gradients of color into the horn using food-safe brushes. - Step 3: Attaching the Horn
Position the horn at the center of the top tier. Secure it by inserting the skewer into the cake, ensuring it stands upright and remains steady.
2.1. Crafting the Unicorn’s Ears
The ears add charm to the overall design, complementing the horn and completing the unicorn’s adorable face.
- Step 1: Shaping the Ears
Roll out white fondant and cut out two teardrop-shaped pieces. These will form the base of the ears. For added realism, make the inner section of the ears smaller and tint it pink using gel food coloring. - Step 2: Adding Dimension
Fold each ear slightly at the base to give it a natural curve. This tiny detail helps the ears look more lifelike. - Step 3: Securing the Ears
Place the ears on either side of the horn, leaving a small gap for the mane. Attach them to the cake with a dab of buttercream or fondant adhesive. Ensure they are angled slightly outward to mimic a playful, whimsical pose.
2.2. Perfecting the Horn and Ears Together
The placement of the horn and ears is crucial for achieving a balanced design. Moreover, the harmony between their sizes and positions can make or break the overall look of the unicorn cake.
- Tips for Balance:
- Ensure the horn is tall enough to stand out but not so large that it overwhelms the rest of the cake.
- Position the ears symmetrically for a polished finish, and leave enough space for the flowing buttercream mane.
Designing the Unicorn’s Mane
3. The Mane: Adding Color and Whimsy
The mane is where your creativity can truly shine, as it brings vibrancy and life to the unicorn cake. Using colorful buttercream swirls, you can create a flowing, magical effect that captures the essence of a unicorn.
3.1. Preparing the Buttercream for the Mane
To achieve a multi-colored, eye-catching mane, start by dividing the buttercream into several portions. Tint each portion with gel food coloring in pastel or bold shades like pink, blue, purple, and yellow. The key is to use enough color for vibrancy without overwhelming the delicate flavor of the frosting.
- Tip: Use gel food coloring instead of liquid to avoid altering the frosting’s consistency.
3.2. Piping Techniques for a Flowing Mane
Using piping bags fitted with star or round tips, pipe the mane in swirls, rosettes, and teardrop shapes to mimic the natural flow of hair. The combination of textures and colors will make the mane appear dynamic and enchanting.
- Step 1: Positioning the Mane
Start from the top of the cake near the horn and cascade the buttercream swirls down one side. This placement creates a realistic flowing effect, as though the unicorn’s hair is gently cascading. - Step 2: Adding Texture
Alternate piping techniques—swirls, stars, and even zigzags—to add depth and interest to the mane. The variety of textures helps create a whimsical and playful design.
3.3. Enhancing the Mane with Edible Decorations
To elevate the design even further, add edible accents to the mane. These decorations add sparkle and texture, tying the entire design together.
- Sprinkles and Glitter: Sprinkle edible glitter or metallic accents over the mane for a shimmering, magical effect.
- Sugar Flowers: Place small fondant or sugar flowers along the mane to introduce additional pops of color.
- Candy Pearls: Add edible pearls for a touch of elegance and sophistication.
3.4. Balancing the Mane with the Overall Design
Although the mane is the most vibrant part of the cake, it’s essential to balance it with the other design elements, such as the horn and ears. Ensure that the mane complements, rather than overpowers, the entire cake.
- Tip: Step back and assess the cake from different angles. Adjust the size or placement of the mane if necessary to maintain harmony across all features.
Adding the Unicorn’s Eyes and Final Touches
4. The Eyes: Bringing the Unicorn to Life
The eyes of a unicorn cake are the feature that gives it personality, charm, and expression. While they may seem like a small detail, they play a major role in the overall design. Fortunately, creating beautiful eyes can be quick and simple if you follow the right steps
4.1. Drawing the Unicorn’s Eyes
Creating the eyes involves using black buttercream or edible markers to draw closed eyelids with long, delicate lashes. The key here is precision, so practicing on parchment paper before applying directly to the cake can help.
- Step 1: Plan the Placement
Position the eyes slightly below the horn and ears. Ensure they’re evenly spaced and symmetrical, as crooked eyes can throw off the entire look. - Step 2: Draw with Confidence
Use a fine piping tip or an edible marker to draw soft, curved lines for the closed eyelids. Add three to four lashes on each eye for a whimsical touch. - Step 3: Clean Up Mistakes
If you make a mistake, don’t panic. Gently scrape off the buttercream with a toothpick or a small spatula and try again.
4.2. Adding Finishing Touches
Final touches are what transform a pretty cake into a show-stopping masterpiece. Adding details like edible glitter, sprinkles, or flowers not only enhances the design but also ties everything together.
- Edible Glitter: Lightly dust the entire cake with edible glitter for a sparkling, magical effect. The glitter can be concentrated around the horn and mane for added emphasis.
- Sprinkles and Pearls: Scatter colorful sprinkles or candy pearls across the top and base of the cake to create a cohesive, festive look.
- Fondant Flowers: Arrange small fondant flowers along the mane and around the base to introduce texture and visual interest.
4.3. Balancing the Design
Although it’s tempting to add every decoration in sight, balance is essential. Overloading the cake with too many details can make it look cluttered. Instead, focus on a few standout elements and distribute them evenly.
- Step 1: Step Back and Assess
Take a step back and evaluate the cake from different angles. Does it look cohesive? Are any areas too busy or too sparse? - Step 2: Make Adjustments
If something feels off, remove or reposition decorations until the design feels harmonious.
Storing, Serving, and Transporting Your Unicorn Cake
5. Ensuring Your Unicorn Cake Stays Perfect
Once you’ve finished decorating, it’s essential to store, serve, and transport the cake carefully to preserve its beauty and flavor. Unicorn cakes are delicate creations, so proper handling is key to ensuring they remain stunning from assembly to the final slice.
5.1. Storing Your Unicorn Cake Properly
Storage is vital for keeping the cake fresh, especially if it’s prepared in advance. Using the right techniques ensures the cake retains its moisture and the decorations stay intact.
- Step 1: Cover and Chill the Cake
If you’ve completed the cake a day before the event, cover it loosely with plastic wrap or place it in a cake box. Store it in the refrigerator to keep the frosting firm. However, avoid pressing the covering too tightly to prevent damaging the decorations. - Step 2: Bring to Room Temperature Before Serving
Remove the cake from the fridge at least one hour before serving. This allows the frosting to soften and the flavors to shine. A cold cake may look good but can taste less appealing due to the hardened frosting.
5.2. Serving the Unicorn Cake
Serving a unicorn cake requires just as much care as creating it. Since every slice reveals layers of color and flavor, cutting it properly ensures each piece looks as magical as the whole cake.
- Step 1: Use a Warm Knife
Dip a sharp knife in warm water, then wipe it dry before slicing. This method ensures clean, smooth cuts without dragging frosting between layers. - Step 2: Serve Smaller Portions
Unicorn cakes are often rich due to their frosting and decorations. Cut smaller slices to accommodate guests while ensuring there’s enough for everyone. Additionally, smaller slices make it easier to enjoy the intricate details in every piece.
5.3. Transporting the Cake Safely
Transporting a unicorn cake can be nerve-wracking, but following a few simple steps minimizes the risk of accidents and keeps your cake looking flawless.
- Step 1: Use a Sturdy Base
Place the cake on a strong cake board that’s slightly larger than the bottom layer. This provides stability and prevents the edges of the cake from getting damaged. - Step 2: Box It Up
Use a tall cake box that won’t touch the decorations. Make sure the horn and ears are secure before placing the cake inside. If necessary, add bubble wrap or non-slip mats around the base to prevent movement during transit. - Step 3: Drive Carefully
Transport the cake in a flat area, such as the trunk or floor of the car. Drive slowly, avoid sudden stops, and keep the air conditioning on to prevent melting.
5.4. Maintaining the Magic
The goal is to ensure your unicorn cake remains as magical when it’s served as when it was created. By carefully storing, serving, and transporting it, you can guarantee that your hard work shines throughout the celebration.
FAQs: Unicorn Cakes
How to decorate a cake to look like a unicorn?
Decorating a unicorn cake involves several steps: start with a smooth frosted base, create a fondant horn and ears, and pipe colorful buttercream swirls for the mane. Add closed eyes using edible markers or black buttercream, and finish with sprinkles, glitter, and sugar flowers for a magical touch.
What frosting is best for a unicorn cake?
Buttercream frosting is the most popular choice because it’s easy to spread, holds its shape for decorations, and can be colored in vibrant or pastel shades. For a super smooth finish, you can also use fondant.
Can I make a unicorn cake without fondant?
Yes, you can create a unicorn cake without fondant! Use stiff buttercream to pipe the horn and ears, then freeze them for stability before attaching to the cake. All decorations, including the mane and eyes, can be done with buttercream.
How far ahead can I prepare a unicorn cake?
You can prepare the cake layers and frosting up to two days in advance. Wrap the layers tightly in plastic wrap and store at room temperature, and refrigerate the frosting. Assemble and decorate the cake on the day of the event to keep it looking fresh.
What tools are essential for decorating a unicorn cake?
Key tools include piping bags, various piping tips (star and round), an offset spatula, gel food coloring, fondant tools for the horn and ears, and edible glitter or sprinkles for extra flair.
Conclusion: Celebrate with the Magic of Unicorn Cakes
Unicorn cakes are a delightful blend of creativity, color, and whimsy. Whether you’re decorating for a child’s birthday or adding a playful touch to a wedding, these cakes bring joy and magic to every occasion. By carefully crafting each element—from the colorful mane to the shimmering horn—you can create a masterpiece that’s as delicious as it is enchanting.
Moreover, unicorn cakes are endlessly customizable, allowing you to experiment with flavors, decorations, and techniques. Whether you’re a seasoned baker or a beginner, the steps outlined here provide everything you need to make a magical unicorn cake that’s sure to dazzle and delight. So, gather your tools, let your imagination run wild, and get ready to create something truly unforgettable! 🦄✨


