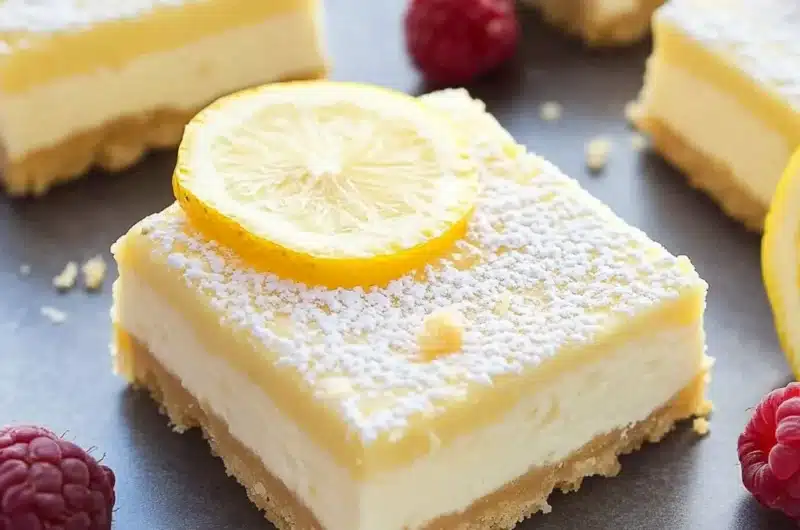
Lemon Greek Yogurt Cheesecake Bars are an incredible treat that brings together the tangy zest of lemon and the creamy richness of Greek yogurt. These bars are not just a dessert; they are a delightful experience that brightens any occasion. The vibrant flavor of lemon combined with the velvety texture of cheesecake creates a refreshing dessert that is perfect for warm days or any moment you wish to indulge.
With just five simple ingredients and an uncomplicated preparation process, these cheesecake bars can easily become your go-to dessert for gatherings, family events, or even a cozy night in. They have a lightness that is unmatched, making them suitable for those who may feel guilty indulging in richer, heavier desserts. If you’ve been searching for a way to impress your family and friends with minimal effort and maximum flavor, look no further!
In this article, you’ll discover why Lemon Greek Yogurt Cheesecake Bars are a must-try, how to prepare them, and the simple ingredients that make this recipe shine. Let’s dive right in and unveil the deliciousness that awaits!
Why You’ll Love This Recipe
Lemon Greek Yogurt Cheesecake Bars offer a wonderful combination of flavors and textures that will leave you craving more. Here are several reasons why you will fall head over heels for this recipe:
1. Refreshing Flavor – The zesty lemon flavor is bright and invigorating, making it an excellent choice for warm-weather occasions.
2. Healthier Option – Using Greek yogurt in the cheesecake filling provides protein and reduces fat compared to traditional cheesecake recipes.
3. Easy to Make – With only five ingredients and a straightforward preparation process, these bars are accessible for bakers of all levels.
4. Versatile Serving Options – The bars can be served as is or garnished with whipped cream, fresh berries, or a sprinkle of zest for added flair.
5. Perfect for Any Event – Whether it’s a family barbecue, a birthday party, or a simple dinner at home, these cheesecake bars fit right in.
Each bite is a delightful balance of sweetness and tartness, creating a blissful harmony that will leave your guests wanting seconds. Plus, you’ll appreciate how easy this dessert is to put together, making it perfect for each culinary occasion you face!
Preparation and Cooking Time
Making Lemon Greek Yogurt Cheesecake Bars is a quick process that won’t take much of your time. Here’s a breakdown of the total time involved in preparing and baking:
– Preparation Time: 15 minutes
– Chilling Time: 2-3 hours (or overnight for best results)
– Total Time: Approximately 2 hours and 15 minutes (with chilling time included)
This straightforward recipe ensures you won’t spend the entire day baking, allowing you to focus on enjoying your time with loved ones.
Ingredients
– 2 cups Greek yogurt (plain, full-fat preferred)
– 1 cup granulated sugar
– 1/2 cup fresh lemon juice (about 2-3 lemons)
– 3 large eggs
– 1 teaspoon vanilla extract
– Optional: Zest of 1 lemon for garnish
Step-by-Step Instructions
Creating Lemon Greek Yogurt Cheesecake Bars is a breeze. Follow these simple steps to achieve a delightful dessert:
1. Prepare the Baking Pan: Preheat your oven to 350°F (175°C) and line an 8×8-inch baking pan with parchment paper, leaving some overhang for easy removal.
2. Mix Ingredients: In a large bowl, combine the Greek yogurt, granulated sugar, fresh lemon juice, eggs, and vanilla extract. Whisk together until smooth and well blended.
3. Pour into Pan: Pour the yogurt mixture into the prepared baking pan, ensuring it’s evenly spread.
4. Bake: Place the pan in the preheated oven and bake for about 30-35 minutes, until the edges are set, and the center is slightly jiggly.
5. Cool Down: Once baked, remove the pan from the oven and let it cool at room temperature. Then, refrigerate the bars for at least 2-3 hours or until thoroughly chilled (overnight is best if you have time).
6. Slice and Garnish: Once chilled, lift the cheesecake out using the parchment paper overhang. Slice into bars and garnish with lemon zest if desired.
With these simple steps followed properly, you’ll achieve a refreshing and creamy dessert perfect for sharing or savoring alone.
How to Serve
When it comes to serving Lemon Greek Yogurt Cheesecake Bars, consider the following tips for an enjoyable experience:
1. Presentation: Arrange the bars on a decorative platter. For added flair, garnish with fresh mint leaves or edible flowers.
2. Accompaniments: Serve alongside fresh fruits like strawberries, blueberries, or even a dollop of whipped cream to elevate the flavor.
3. Temperature: These cheesecake bars taste best when chilled. Serve them straight from the refrigerator for that refreshing experience.
4. Flavor Pairing: Consider pairing with a light dessert wine or herbal tea that complements the citrusy notes of the lemon.
5. Portion Control: Cut the bars into smaller pieces if serving at a large gathering. This allows guests to enjoy a variety of desserts without feeling overly indulgent.
By presenting the Lemon Greek Yogurt Cheesecake Bars thoughtfully, you can create a lasting impression that encapsulates the joy of this delightful dessert! Enjoy creating and feasting on these incredible bars that are sure to become a treasured recipe in your collection.
Additional Tips
– Use Fresh Lemons: For the best flavor, always opt for fresh lemons instead of bottled juice. Fresh lemon juice enhances the tartness and brightness of the cheesecake filling.
– Allow to Chill Completely: Make sure to chill the bars for at least 2-3 hours, or overnight if possible. This helps them set properly and improves the texture.
– Serve with Fresh Garnishes: Pair your cheesecake bars with fresh fruits or a light whipped topping. This adds a beautiful presentation and elevated flavor.
– Adjust the Sweetness: Depending on your taste preferences, you can slightly increase or decrease the sugar. Taste the mixture before baking to find your perfect balance.
– Experiment with Crust: Though this recipe doesn’t include a crust, using crushed graham crackers or a gluten-free alternative can add a delightful layer of texture.
Recipe Variation
Feel free to switch things up! Here are a few variations to try:
1. Berry Swirl: Add a layer of your favorite berry puree (like raspberry or blueberry) on top of the cheesecake filling before baking for a fruity twist.
2. Coconut Infusion: Incorporate shredded coconut into the cheesecake mixture for a tropical flair.
3. Herbal Touch: Add finely chopped fresh mint or basil to the filling for a unique flavor profile.
4. Chocolate Drizzle: Drizzle melted dark chocolate on top of the bars once cooled for a rich contrast that pairs well with lemon.
Freezing and Storage
– Refrigeration: Store the cheesecake bars in an airtight container in the refrigerator. They will remain fresh for about 5-7 days.
– Freezing: For longer storage, you can freeze them. Wrap individual bars in plastic wrap and then in aluminum foil. They can be stored frozen for up to 3 months. To thaw, simply place them in the refrigerator overnight.
Special Equipment
You will need a few essential tools to prepare these cheesecake bars successfully:
– Mixing Bowls: For combining all the ingredients efficiently.
– Whisk or Electric Mixer: To ensure your filling is smooth and well mixed.
– 8×8-inch Baking Pan: Essential for baking the cheesecake bars.
– Parchment Paper: Helps with easy removal from the pan for perfect slicing.
– Refrigerator or Freezer: For chilling and setting the bars.
Frequently Asked Questions
Can I use low-fat Greek yogurt instead of full-fat?
Yes, you can use low-fat Greek yogurt for a lighter version, but the texture may be slightly less creamy.
How do I know when the cheesecake bars are done baking?
The bars are done when the edges are set and the center remains slightly jiggly. They will continue to firm up as they cool.
Can I make this recipe dairy-free?
You can substitute the Greek yogurt with dairy-free alternatives like coconut yogurt or cashew yogurt, though it may alter the flavor and texture slightly.
Is it necessary to add eggs?
Yes, the eggs help in binding the mixture and achieving the creamy cheesecake consistency. However, for eggless versions, you may try using flaxseed meal mixed with water as a substitute.
What should I do if the cheesecake cracks on top?
If cracks occur, don’t worry! They will be less noticeable once sliced. A light dusting of powdered sugar or garnishing can help disguise imperfections.
Conclusion
Lemon Greek Yogurt Cheesecake Bars are a delightful balance of sweetness and tang that brings freshness and lightness to any dessert table. With just five ingredients and simple steps, you can create an impressive dessert that’s perfect for any season. The combination of creaminess from the Greek yogurt and the zesty lemon flavor ensures every bite is a moment of indulgence without the heaviness typically associated with traditional cheesecakes. Whether you’re making them for a large gathering or a quiet evening at home, these cheesecake bars will undoubtedly become a favorite recipe cherished by all.
Lemon Greek Yogurt Cheesecake Bars: The Incredible 5-Ingredient Recipe
- Total Time: 12 minute
Ingredients
– 2 cups Greek yogurt (plain, full-fat preferred)
– 1 cup granulated sugar
– 1/2 cup fresh lemon juice (about 2-3 lemons)
– 3 large eggs
– 1 teaspoon vanilla extract
– Optional: Zest of 1 lemon for garnish
Instructions
Creating Lemon Greek Yogurt Cheesecake Bars is a breeze. Follow these simple steps to achieve a delightful dessert:
1. Prepare the Baking Pan: Preheat your oven to 350°F (175°C) and line an 8×8-inch baking pan with parchment paper, leaving some overhang for easy removal.
2. Mix Ingredients: In a large bowl, combine the Greek yogurt, granulated sugar, fresh lemon juice, eggs, and vanilla extract. Whisk together until smooth and well blended.
3. Pour into Pan: Pour the yogurt mixture into the prepared baking pan, ensuring it’s evenly spread.
4. Bake: Place the pan in the preheated oven and bake for about 30-35 minutes, until the edges are set, and the center is slightly jiggly.
5. Cool Down: Once baked, remove the pan from the oven and let it cool at room temperature. Then, refrigerate the bars for at least 2-3 hours or until thoroughly chilled (overnight is best if you have time).
6. Slice and Garnish: Once chilled, lift the cheesecake out using the parchment paper overhang. Slice into bars and garnish with lemon zest if desired.
With these simple steps followed properly, you’ll achieve a refreshing and creamy dessert perfect for sharing or savoring alone.
- Prep Time: 15 minutes
- Cook Time: 30-35 minutes
Nutrition
- Serving Size: 9 bars
- Calories: 150 kcal
- Fat: 4g
- Protein: 5g