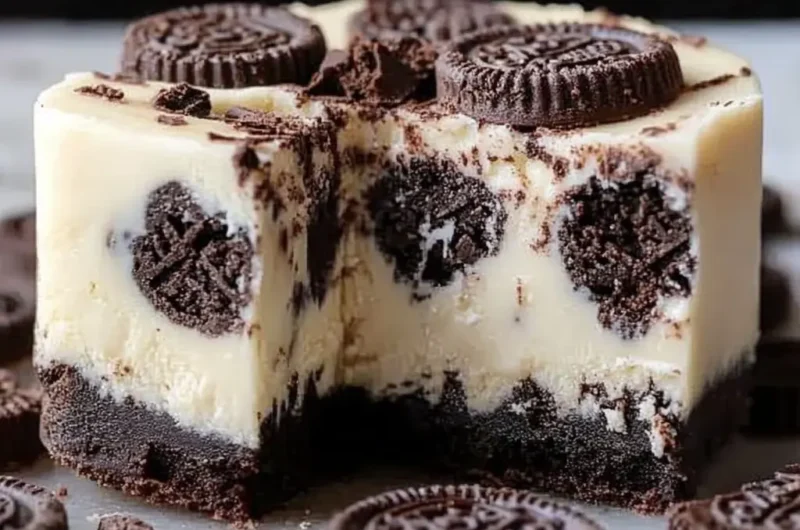
Oreo fudge is a decadent chocolate treat that marries the rich flavors of chocolate with the beloved crunch of Oreo cookies. This delicious combination creates a dessert experience that anyone with a sweet tooth will crave. Whether you’re indulging by yourself or sharing with family and friends, Oreo fudge tantalizes the senses and leaves everyone wanting more. Truly, it’s a chocolate lover’s dream come true.
Imagine biting into a piece of Oreo fudge. The smooth, velvety chocolate envelops the crunchy Oreo bits, resulting in a texture explosion that is simply delightful. Each bite offers a balance of sweetness and a slight creaminess, making this treat irresistible. What’s more, it’s an incredibly easy recipe to follow, perfect for both novice bakers and those more experienced in the kitchen.
This article will delve into why you’ll love making Oreo fudge, how to prepare it, what ingredients you’ll need, step-by-step instructions, and the best ways to serve it. The amazing flavors, combined with simplicity, will soon have this recipe at the top of your dessert repertoire. Let’s take a closer look at what makes Oreo fudge a must-try creation!
Why You’ll Love This Recipe
There are many delightful characteristics about Oreo fudge that will have you reaching for seconds. Here’s why you’ll undoubtedly love making and eating it:
1. Quick and Easy: This recipe requires minimal time and effort, allowing you to whip it up in no time.
2. Minimal Ingredients: Most ingredients are likely already in your pantry, making it convenient and cost-effective.
3. Versatile Flexibility: You can customize this fudge with different mixes or toppings to suit your tastes.
4. Impressive Presentation: The contrasting colors and textures of the Oreo pieces against the chocolate make it visually appealing.
5. Great for Any Occasion: Whether it’s a birthday party or a family gathering, Oreo fudge is a crowd-pleaser.
6. No Baking Required: This fudge sets in the refrigerator, making it a hassle-free dessert option.
These reasons highlight just how incredible Oreo fudge can be. Everyone will rave about this extraordinary treat, and you’ll find joy in sharing it!
Preparation and Cooking Time
Creating this incredible Oreo fudge is straightforward and requires minimal time in the kitchen. Here’s a breakdown of the preparation and cooking time involved:
– Preparation Time: 20 minutes
– Setting Time: 2 hours in the refrigerator
– Total Time: 2 hours and 20 minutes
With just a short time commitment, you’ll have a delicious treat ready to enjoy or share!
Ingredients
– 2 cups semi-sweet chocolate chips
– 1 can (14 oz) sweetened condensed milk
– 1 tablespoon unsalted butter
– 1 teaspoon vanilla extract
– 1 cup crushed Oreo cookies
– 1/2 cup mini marshmallows (optional, for added texture)
– Additional Oreo cookies for topping (optional)
Step-by-Step Instructions
Crafting this delicious Oreo fudge can be easily achieved by following these simple steps:
1. Prepare the Baking Dish: Line an 8×8-inch square baking dish with parchment paper, allowing some overhang for easy removal later.
2. Melt Ingredients: In a medium saucepan, combine the semi-sweet chocolate chips, sweetened condensed milk, and unsalted butter. Cook over medium-low heat, stirring frequently until the chocolate is fully melted and smooth.
3. Add Vanilla: Once melted, remove the saucepan from heat and stir in the vanilla extract, ensuring it is well combined.
4. Incorporate Oreos: Carefully fold in the crushed Oreo cookies and mini marshmallows, ensuring they are evenly distributed throughout the chocolate mixture.
5. Transfer to Dish: Pour the fudge mixture into the prepared baking dish, spreading it evenly with a spatula or spoon to create a smooth top.
6. Add Toppings: If desired, crush additional Oreo cookies and sprinkle them on top of the fudge for an added touch of flavor and decoration.
7. Chill the Fudge: Place the baking dish in the refrigerator and allow the fudge to set for at least 2 hours until firm.
8. Cut into Squares: Once set, lift the fudge out of the dish using the parchment overhang and cut it into small squares or rectangles.
9. Store: Store the Oreo fudge in an airtight container at room temperature or in the refrigerator for up to two weeks.
These easy steps provide a clear path to creating the perfect Oreo fudge, ensuring deliciousness from start to finish.
How to Serve
Serving your Oreo fudge can enhance the delight even further! Here are some ideas to make the presentation memorable:
1. Presentation Style: Arrange the fudge squares neatly on a decorative platter, dusting with powdered sugar for a fancy touch.
2. Accompaniment Options: Consider serving with a scoop of vanilla ice cream or a dollop of whipped cream to balance the rich flavors.
3. Flavor Pairings: Serve alongside a fresh fruit salad or berry compote to add a refreshing contrast to the sweetness of the fudge.
4. Individual Portions: For parties or gatherings, cut the fudge into smaller bite-sized pieces and serve in mini cupcake liners for easy handling.
5. Themed Decor: If it’s a special occasion, you can decorate the serving area with themed items relevant to the event, like festive plates or napkins.
By taking these steps to serve, you ensure that your Oreo fudge not only tastes incredible but looks just as inviting. Enjoy this rich, delicious treat with friends and family to create unforgettable memories!
Additional Tips
– Use Quality Chocolate: Choosing high-quality semi-sweet chocolate chips will enhance the flavor of your Oreo fudge significantly. Look for brands that offer rich and creamy chocolate.
– Chill Thoroughly: Ensure you allow enough time for the fudge to chill completely. This step is crucial for achieving the perfect consistency.
– Experiment with Mix-ins: Don’t be afraid to add your favorite ingredients, like chopped nuts, or dried fruits, to elevate the flavor profile further.
– Cut with Care: Use a sharp knife to cut the fudge into clean squares. Wiping the knife between slices can help maintain neat edges.
– Serve at Room Temperature: While Oreo fudge can be served chilled, letting it sit at room temperature for a few minutes before serving can enhance its flavor and texture.
Recipe Variation
Oreo fudge is versatile, so feel free to get creative! Here are some variations to consider:
1. Peanut Butter Oreo Fudge: Swirl in some peanut butter into the chocolate mixture for a nutty twist.
2. Mint Chocolate Fudge: Add a few drops of peppermint extract to the chocolate mixture for a refreshing minty flavor.
3. White Chocolate Oreo Fudge: Substitute semi-sweet chocolate chips with white chocolate chips for a sweeter version.
4. Caramel Drizzle: Drizzle caramel sauce over the top of the fudge before it sets for a sweet addition.
5. Rainbow Oreo Fudge: Use colorful sprinkles or crushed candies instead of Oreos for a festive variation.
Freezing and Storage
– Storage: Keep your Oreo fudge in an airtight container at room temperature for about one week. If you want to extend its shelf life, refrigerate it.
– Freezing: The fudge can be frozen for up to three months. Cut it into squares, wrap them individually in plastic wrap, and then place them in a freezer-safe container.
Special Equipment
While making Oreo fudge is simple, having the right tools makes the process easier:
– Medium Saucepan: For melting ingredients.
– Spatula: To help combine and spread the fudge mixture smoothly.
– 8×8-inch Baking Dish: The ideal size for setting the fudge.
– Parchment Paper: To line the baking dish for easy removal.
– sharp Knife: For cutting the fudge into even squares.
Frequently Asked Questions
What type of chocolate is best for Oreo fudge?
Semi-sweet chocolate chips work best, but feel free to experiment with dark or white chocolate.
Can I make this fudge vegan?
Yes! Use dairy-free chocolate chips and substitute the sweetened condensed milk with a vegan alternative.
How do I know when the fudge is set?
After chilling in the refrigerator for at least two hours, the fudge should be firm to the touch and easy to cut.
Is it necessary to crush the Oreos?
Crushing the Oreos allows for better distribution within the fudge, enhancing both flavor and texture.
What if I can’t find sweetened condensed milk?
You can make your own by simmering milk with sugar until it thickens, or look for an alternative recipe online.
Conclusion
Oreo fudge is a delightful treat that combines rich chocolate with the delectable crunch of Oreo cookies. The ease of preparation and the ability to customize it make it a favorite among dessert lovers. Whether you’re serving it at a gathering or enjoying it as a personal indulgence, Oreo fudge is sure to impress. With countless variations to explore and tips for perfecting your recipe, this decadent dessert will become a staple in your home. Share it with loved ones or savor it on your own—either way, you won’t be able to resist its charm!
Oreo Fudge: An Incredible Ultimate Chocolate Treat
- Total Time: 25 minutes
Ingredients
– 2 cups semi-sweet chocolate chips
– 1 can (14 oz) sweetened condensed milk
– 1 tablespoon unsalted butter
– 1 teaspoon vanilla extract
– 1 cup crushed Oreo cookies
– 1/2 cup mini marshmallows (optional, for added texture)
– Additional Oreo cookies for topping (optional)
Instructions
Crafting this delicious Oreo fudge can be easily achieved by following these simple steps:
1. Prepare the Baking Dish: Line an 8×8-inch square baking dish with parchment paper, allowing some overhang for easy removal later.
2. Melt Ingredients: In a medium saucepan, combine the semi-sweet chocolate chips, sweetened condensed milk, and unsalted butter. Cook over medium-low heat, stirring frequently until the chocolate is fully melted and smooth.
3. Add Vanilla: Once melted, remove the saucepan from heat and stir in the vanilla extract, ensuring it is well combined.
4. Incorporate Oreos: Carefully fold in the crushed Oreo cookies and mini marshmallows, ensuring they are evenly distributed throughout the chocolate mixture.
5. Transfer to Dish: Pour the fudge mixture into the prepared baking dish, spreading it evenly with a spatula or spoon to create a smooth top.
6. Add Toppings: If desired, crush additional Oreo cookies and sprinkle them on top of the fudge for an added touch of flavor and decoration.
7. Chill the Fudge: Place the baking dish in the refrigerator and allow the fudge to set for at least 2 hours until firm.
8. Cut into Squares: Once set, lift the fudge out of the dish using the parchment overhang and cut it into small squares or rectangles.
9. Store: Store the Oreo fudge in an airtight container at room temperature or in the refrigerator for up to two weeks.
These easy steps provide a clear path to creating the perfect Oreo fudge, ensuring deliciousness from start to finish.
- Prep Time: 15 minutes
- Cook Time: 10 minutes
Nutrition
- Serving Size: 16 squares
- Calories: 200 kcal
- Fat: 10g
- Protein: 3g