Peanut Butter Cup Chocolate Roll Cake is a delightful dessert that brings together two beloved flavors: chocolate and peanut butter. This amazing treat combines the rich, creamy taste of peanut butter with the decadence of chocolate, creating a decadent treat that satisfies any sweet tooth. This roll cake is not just visually stunning but also bursts with flavors that will make any gathering special. Whether you’re celebrating a birthday, hosting a holiday, or simply craving a sweet indulgence, this cake will impress your guests and leave them wanting more.
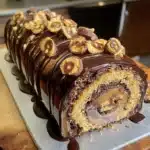
The beauty of the Peanut Butter Cup Chocolate Roll Cake lies not only in its taste but also in its texture. The thin, soft chocolate cake rolls up to envelop a luscious layer of peanut butter cream, and it’s all topped with a glossy chocolate ganache. Each slice reveals an irresistible swirl of two flavors, making it the ultimate dessert for peanut butter and chocolate lovers alike! In this article, we’ll walk you through why you’ll love this recipe, including preparation and cooking times, a detailed ingredient list, step-by-step instructions, and ways to serve this delightful treat.
Why You’ll Love This Recipe
The Peanut Butter Cup Chocolate Roll Cake is a crowd-pleaser for countless reasons. Here’s why this dessert stands out:
1. Decadent Flavor Combination: The marriage of chocolate and peanut butter creates layers of flavor that dance on your palate.
2. Impressive Appearance: The roll shape and swirl design make for a stunning presentation. Guests will ooh and aah when you unveil it!
3. Easy to Make: Despite its impressive appearance, this cake is surprisingly simple to prepare, making it perfect for both novice and experienced bakers.
4. Versatile Enjoyment: It’s great for special occasions like birthdays and holiday parties, but also perfect for casual family dinners or an indulgent treat any day of the week.
5. Flexible Recipe: You can adjust the sweetness or add your favorite ingredients, such as chopped nuts or even a hint of sea salt for extra flavor.
6. Leftover Treasures: If you manage to have leftovers, this cake stores well in the fridge, making it a delightful treat for days to come.
With such fantastic qualities, it’s clear why the Peanut Butter Cup Chocolate Roll Cake is sure to win hearts and taste buds alike!
Preparation and Cooking Time
Creating the Peanut Butter Cup Chocolate Roll Cake takes some time, but the results are totally worth it. Here’s a breakdown of how long you’ll need:
– Preparation Time: 30 minutes
– Cooking Time: 15-20 minutes
– Cooling Time: 30 minutes
– Total Time: Approximately 1 hour and 15 minutes
These times may vary slightly depending on your experience and kitchen tools, but this guide should give you an excellent estimate for planning your baking adventure.
Ingredients
– For the Chocolate Cake:
– 1 cup all-purpose flour
– 1 cup granulated sugar
– ½ cup unsweetened cocoa powder
– 1 teaspoon baking powder
– ½ teaspoon baking soda
– ¼ teaspoon salt
– 4 large eggs
– ⅓ cup vegetable oil
– 1 teaspoon vanilla extract
– ⅓ cup boiling water
– For the Peanut Butter Filling:
– 1 cup creamy peanut butter
– ½ cup powdered sugar
– ½ cup unsalted butter, softened
– 1 teaspoon vanilla extract
– 1-2 tablespoons milk (to adjust consistency)
– For the Chocolate Ganache:
– 1 cup semi-sweet chocolate chips
– ½ cup heavy cream
Step-by-Step Instructions
Creating a Peanut Butter Cup Chocolate Roll Cake can be straightforward if you follow these steps closely:
1. Preheat the Oven: Preheat your oven to 350°F (175°C). Line a 15×10-inch jelly roll pan with parchment paper and grease lightly.
2. Make Chocolate Cake Batter:
– In a medium bowl, combine flour, granulated sugar, cocoa powder, baking powder, baking soda, and salt.
– In another bowl, whisk together the eggs, oil, and vanilla extract.
– Gradually add the wet ingredients to the dry ingredients, stirring until combined.
– Carefully incorporate the boiling water (the batter will be thin, which is normal).
3. Bake the Cake:
– Pour the batter into the prepared pan, spreading it evenly.
– Bake for 15-20 minutes, or until a toothpick inserted comes out clean.
4. Cool the Cake:
– Once baked, immediately remove it from the oven and let it cool in the pan for 5 minutes.
– Carefully, invert the cake onto a clean kitchen towel dusted with powdered sugar.
5. Roll the Cake:
– Starting at one end, gently roll the cake with the towel inside. Allow it to cool completely in its rolled form, which helps retain its shape.
6. Prepare the Peanut Butter Filling:
– In a bowl, combine the creamy peanut butter, powdered sugar, softened butter, and vanilla extract.
– Mix until smooth and creamy, adding milk as needed for a spreadable consistency.
7. Fill the Cake:
– Once the cake has cooled completely, carefully unroll it.
– Spread the peanut butter filling evenly over the cake, leaving a small border at the edges.
8. Re-Roll the Cake:
– Gently re-roll the cake without the towel, starting from one end.
– Wrap it tightly in plastic wrap and chill in the refrigerator for at least 30 minutes.
9. Make the Chocolate Ganache:
– In a small saucepan, heat the heavy cream over medium heat until it begins to simmer.
– Remove from heat and pour over the chocolate chips in a bowl. Let it sit for about 5 minutes, then stir until smooth.
10. Assemble the Cake:
– Once chilled, unwrap the cake and place it on a serving plate.
– Drizzle or spread the chocolate ganache over the top, allowing it to drip down the sides.
11. Slice and Serve:
– Use a sharp knife to slice the cake into pieces, showcasing the beautiful layers.
How to Serve
To make your Peanut Butter Cup Chocolate Roll Cake experience unforgettable, consider these serving tips:
1. Presentation: Use a decorative cake stand or platter to showcase the beautiful swirls. Add a few chocolate shavings or peanut butter cups on top for an elegant touch.
2. Accompaniments: Serve slices with a dollop of whipped cream, a drizzle of chocolate sauce, or even a scoop of vanilla ice cream to complement the rich flavors.
3. Cutting Technique: Use a serrated knife to cut clean slices. Wipe the knife between cuts for neat edges, enhancing the cake presentation.
4. Beverage Pairing: Pair the cake with a cold glass of milk, a hot cup of coffee, or even a dessert wine for a delightful combination.
5. Storage: Store any leftovers in an airtight container in the fridge. Enjoy it chilled or allow it to come to room temperature before serving again.
Crafting the Peanut Butter Cup Chocolate Roll Cake will be a rewarding experience that delights everyone who tastes it. Enjoy every layer and flavor in this rich dessert!
Additional Tips
– Use Quality Ingredients: For the best flavor, always opt for high-quality cocoa powder and creamy peanut butter that you’ll actually want to eat on its own.
– Chill Between Steps: It can be helpful to chill the cake after rolling it. This helps maintain its shape and makes it easier to apply the ganache later.
– Poke Holes Generously: After unrolling the cake, consider poking small holes in it to help the peanut butter filling soak in, enriching the flavor in every bite.
– Adjust Sweetness: You can customize the sweetness of the filling by altering the amount of powdered sugar. Taste as you go!
– Presentation is Key: Using a decorative platter can elevate the presentation, especially if you add some fresh berries or mint leaves around the cake.
Recipe Variation
Here are several ways to modify the Peanut Butter Cup Chocolate Roll Cake for variety:
1. Nut-Free Version: If you need to accommodate nut allergies, use sunflower seed butter instead of peanut butter.
2. Different Flavor Cake: Swap the cocoa powder with matcha powder for a green tea flavor, which can be a unique twist.
3. Fruit Additions: Incorporate some sliced bananas between the cake and filling for a delicious banana-peanut butter flavor combo.
4. Colorful Options: Add colorful sprinkles on top of the ganache for festive occasions or use natural food coloring in the filling for a playful look.
5. Chocolate Flavor Boost: Mix in chocolate chips within the peanut butter filling for extra chocolate goodness in every bite.
Freezing and Storage
To ensure your Peanut Butter Cup Chocolate Roll Cake stays fresh:
– Storage: Keep the cake covered in the refrigerator. It will stay fresh for about 4-5 days without losing flavor.
– Freezing: If you want to enjoy it later, you can freeze individual slices for up to 3 months. Make sure each slice is wrapped tightly in plastic wrap, followed by aluminum foil to prevent freezer burn.
Special Equipment
To successfully prepare the Peanut Butter Cup Chocolate Roll Cake, you will need:
– Mixing bowls for combining ingredients.
– A hand-held or stand mixer to whip the filling smoothly.
– A jelly roll pan to create the perfect shape.
– Parchment paper to prevent sticking.
– A serrated knife for clean, smooth cuts when slicing the cake.
Frequently Asked Questions
How do I know when the cake is done baking?
Insert a toothpick into the center. If it comes out clean or with a few crumbs, the cake is ready to be removed from the oven.
Can I make this cake ahead of time?
Yes, making it a day ahead is actually beneficial. It allows the flavors to meld and improve over time.
Is this cake suitable for dietary restrictions?
You can accommodate dietary needs by substituting gluten-free flour for a gluten-free version or using dairy-free butter.
Can I eliminate the peanut butter?
Certainly! Swap in some almond or sun butter for a different flavor or omit the filling for a classic chocolate roll cake experience.
Conclusion
The Peanut Butter Cup Chocolate Roll Cake is a delightful combination of two classic flavors that creates a memorable dessert perfect for any occasion. With its beautiful swirl of chocolate and peanut butter, this cake is not only delicious but also visually stunning. Whether you’re celebrating a special event or enjoying a cozy night in, this cake is a guaranteed crowd-pleaser, satisfying cravings with every luscious slice!
Peanut Butter Cup Chocolate Roll Cake: An Incredible 7-Layer Recipe
- Total Time: 35 minutes
Ingredients
– For the Chocolate Cake:
– 1 cup all-purpose flour
– 1 cup granulated sugar
– ½ cup unsweetened cocoa powder
– 1 teaspoon baking powder
– ½ teaspoon baking soda
– ¼ teaspoon salt
– 4 large eggs
– ⅓ cup vegetable oil
– 1 teaspoon vanilla extract
– ⅓ cup boiling water
– For the Peanut Butter Filling:
– 1 cup creamy peanut butter
– ½ cup powdered sugar
– ½ cup unsalted butter, softened
– 1 teaspoon vanilla extract
– 1-2 tablespoons milk (to adjust consistency)
– For the Chocolate Ganache:
– 1 cup semi-sweet chocolate chips
– ½ cup heavy cream
Instructions
Creating a Peanut Butter Cup Chocolate Roll Cake can be straightforward if you follow these steps closely:
1. Preheat the Oven: Preheat your oven to 350°F (175°C). Line a 15×10-inch jelly roll pan with parchment paper and grease lightly.
2. Make Chocolate Cake Batter:
– In a medium bowl, combine flour, granulated sugar, cocoa powder, baking powder, baking soda, and salt.
– In another bowl, whisk together the eggs, oil, and vanilla extract.
– Gradually add the wet ingredients to the dry ingredients, stirring until combined.
– Carefully incorporate the boiling water (the batter will be thin, which is normal).
3. Bake the Cake:
– Pour the batter into the prepared pan, spreading it evenly.
– Bake for 15-20 minutes, or until a toothpick inserted comes out clean.
4. Cool the Cake:
– Once baked, immediately remove it from the oven and let it cool in the pan for 5 minutes.
– Carefully, invert the cake onto a clean kitchen towel dusted with powdered sugar.
5. Roll the Cake:
– Starting at one end, gently roll the cake with the towel inside. Allow it to cool completely in its rolled form, which helps retain its shape.
6. Prepare the Peanut Butter Filling:
– In a bowl, combine the creamy peanut butter, powdered sugar, softened butter, and vanilla extract.
– Mix until smooth and creamy, adding milk as needed for a spreadable consistency.
7. Fill the Cake:
– Once the cake has cooled completely, carefully unroll it.
– Spread the peanut butter filling evenly over the cake, leaving a small border at the edges.
8. Re-Roll the Cake:
– Gently re-roll the cake without the towel, starting from one end.
– Wrap it tightly in plastic wrap and chill in the refrigerator for at least 30 minutes.
9. Make the Chocolate Ganache:
– In a small saucepan, heat the heavy cream over medium heat until it begins to simmer.
– Remove from heat and pour over the chocolate chips in a bowl. Let it sit for about 5 minutes, then stir until smooth.
10. Assemble the Cake:
– Once chilled, unwrap the cake and place it on a serving plate.
– Drizzle or spread the chocolate ganache over the top, allowing it to drip down the sides.
11. Slice and Serve:
– Use a sharp knife to slice the cake into pieces, showcasing the beautiful layers.
- Prep Time: 15 minutes
- Cook Time: 20 minutes
Nutrition
- Serving Size: 8
- Calories: 350 kcal
- Fat: 15g
- Protein: 8g