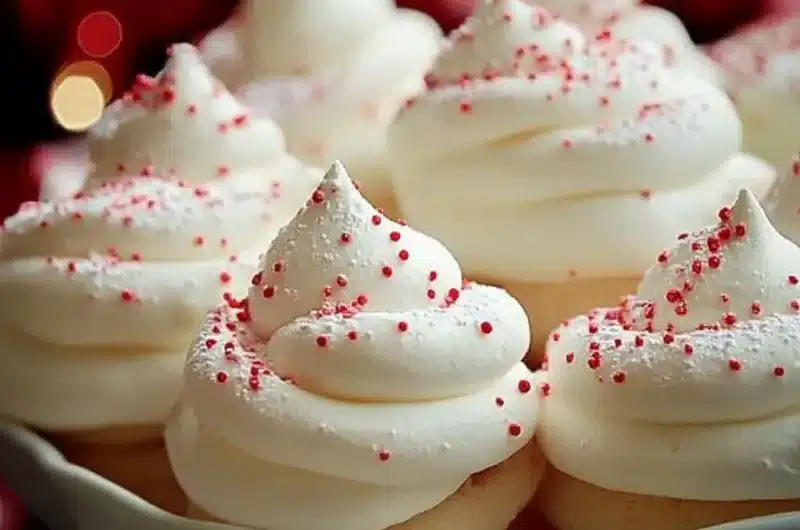
Peppermint Meringues are a delightful treat that combines the airy sweetness of meringue with the refreshing flavor of peppermint. These little clouds of sugar are perfect for festive occasions, holiday gatherings, or simply as a sweet snack whenever you crave something light and crisp. Their enchanting texture and minty flavor make them a standout dessert that’s sure to impress your guests or family.
These meringues are not only delicious but also incredibly versatile. They can be served on their own, used as cake or pie toppings, or combined as whimsical dessert garnishes. Imagine a winter party where these Peppermint Meringues steal the show, adding a touch of elegance and festive spirit to your spread.
In this article, you’ll discover how to make Peppermint Meringues step-by-step. Whether you’re a baking novice or a seasoned pro, you’ll find that this recipe is straightforward, rewarding, and offers an amazing taste experience everyone will love. Get ready to dive into a world of crispy, melt-in-your-mouth sweetness!
Why You’ll Love This Recipe
There are so many reasons why Peppermint Meringues will win your heart. Here are just a few:
1. Effortless Elegance – These meringues look impressive yet are easy to make, adding a sophisticated touch to any dessert table.
2. Delightful Flavor – The refreshing peppermint flavor provides a delightful twist that is perfect for holiday celebrations.
3. Light and Crispy Texture – Meringues create a unique texture that melts in your mouth, offering a satisfying treat that’s also low in calories.
4. Customizable – You can easily alter the flavor by mixing in other extracts or extracts, making the recipe your own.
5. Perfect for Gifting – Packaged beautifully, these meringues make lovely gifts for friends and family during the holiday season.
6. Kid-Friendly Activity – Making meringues can be a fun activity with children, allowing them to help pipe the meringue or sprinkle on toppings.
With these compelling reasons, it’s easy to see why this recipe for Peppermint Meringues has become a favorite among many home bakers!
Preparation and Cooking Time
Making Peppermint Meringues is relatively quick and straightforward. Below is the estimated time needed for preparation and baking:
– Preparation Time: 15 minutes
– Cooking Time: 1 hour
– Cooling Time: 30 minutes
In total, you should set aside about 1 hour and 45 minutes to create these delicious meringues.
Ingredients
– 4 large egg whites
– 1 cup granulated sugar
– 1 teaspoon vanilla extract
– 1 teaspoon peppermint extract
– 1/4 teaspoon cream of tartar
– A pinch of salt
– Red or green food coloring (optional)
– Crushed peppermint candies or candy canes for garnish (optional)
Step-by-Step Instructions
Creating delicious Peppermint Meringues can be accomplished with the following steps:
1. Preheat Your Oven: Begin by preheating your oven to 200°F (93°C). Line a baking sheet with parchment paper; this will prevent sticking.
2. Whip the Egg Whites: In a clean, dry mixing bowl, add the egg whites and a pinch of salt. Begin beating them on medium speed until they become frothy.
3. Add Cream of Tartar: Add the cream of tartar to the egg whites and continue to beat on medium speed until soft peaks form. This should take around 2-3 minutes.
4. Gradually Add Sugar: Slowly add the granulated sugar, one tablespoon at a time, allowing each spoonful to dissolve before adding the next. Continue to beat until stiff peaks form and the mixture is glossy. This can take an additional 5-7 minutes.
5. Mix in Flavorings: Once the sugar is fully integrated, add the vanilla and peppermint extracts. If desired, add a few drops of food coloring to create a swirled effect. Gently fold until everything is combined.
6. Pipe the Meringues: Using a piping bag fitted with a star tip, pipe the meringue onto the lined baking sheet, forming 1 to 2-inch rounds.
7. Bake: Place the baking sheet in the preheated oven and bake for about 1 hour, or until the meringues are dry and can easily lift off the parchment paper.
8. Cool Down: Once baked, turn off the oven and leave the meringues inside for about 30 minutes to cool completely.
9. Garnish (Optional): If desired, sprinkle crushed peppermint candies on top of the meringues right after removing them from the oven for added flavor and decoration.
With careful attention to detail and a little patience, you will create striking Peppermint Meringues that everyone will adore!
How to Serve
Serving Peppermint Meringues can be just as delightful as making them. Here are some suggestions to elevate your presentation:
1. Presentation Style: Arrange the meringues on a decorative platter or cake stand for an alluring display. Consider adding festive decorations or edible glitter for a more colorful setup.
2. Garnishing Options: Pair meringues with whipped cream, fresh berries, or drizzle some melted chocolate on top for extra treats.
3. Beverage Pairing: These meringues pair well with hot drinks like cocoa, coffee, or tea, making them a cozy choice for a winter gathering.
4. Gift Idea: Place meringues in a beautifully tied box or jar, and gift them to friends or family as a sweet treat during holiday seasons.
With this comprehensive guide, you now have all the tools to create and serve incredible Peppermint Meringues that will enchant your taste buds and impress your guests!
Additional Tips
– Use Room Temperature Eggs: For the best results, use room temperature egg whites. This helps achieve maximum volume when whipping.
– Avoid Grease: Ensure your mixing bowl and beaters are completely clean and free from any grease. Even a little residue can prevent the egg whites from whipping properly.
– Be Patient: Whipping the egg whites and sugar to stiff peaks takes time. Patience is key! Rushing this step may lead to slightly less stable meringues.
– Experiment with Flavors: While peppermint is a star in this recipe, feel free to experiment with other flavors, such as almond or lemon for a unique twist.
– Test Meringue Doneness: The meringues are done when they lift easily from the parchment paper and feel dry to the touch.
– Store Properly: If not serving immediately, store the meringues in an airtight container at room temperature to keep them crisp.
Recipe Variation
There are countless ways to enjoy Peppermint Meringues! Here are a few delightful variations to consider:
1. Chocolate Peppermint Meringues: Add cocoa powder to the egg white mixture before whipping for a chocolaty flavor with peppermint.
2. Chocolate-Dipped Meringues: After they cool, dip the bottoms in melted dark chocolate for an added layer of richness.
3. Swirled Colors: Use multiple colors of food coloring, swirling them into the meringue before piping to create a visually stunning effect.
4. Peppermint Bark Meringues: Crush peppermint bark and sprinkle it over the meringues before baking for added flavor and texture.
5. Nutty Twist: Fold in finely chopped nuts, such as almonds or pistachios, for a delightful crunch.
Freezing and Storage
– Storage: Keep your Peppermint Meringues in an airtight container at room temperature. This helps maintain their crispness. They should last about 1-2 weeks.
– Freezing: If you want to prepare them ahead of time, meringues can be frozen. Layer them with parchment paper in an airtight container. They can last for up to 3 months in the freezer. To enjoy, simply thaw at room temperature.
Special Equipment
To make Peppermint Meringues, you will need a few essential tools for success:
– Mixer: A stand mixer or hand mixer is crucial for whipping the egg whites to the right consistency.
– Piping Bag: A piping bag with a star tip is excellent for creating beautiful meringue shapes.
– Baking Sheet: A flat baking sheet lined with parchment paper is necessary for baking without sticking.
– Cornstarch or Powdered Sugar: A small amount can be included in the piping bag for easier filling if desired.
– Spatula: A silicone spatula is handy for folding ingredients without deflating the meringue.
Frequently Asked Questions
Can I use egg substitutes for this recipe?
While egg whites are essential for meringue, you may try aquafaba (chickpea water) as an egg white substitute. It can produce a similar texture but with a different flavor.
What do I do if my meringues are soft?
Soft meringues can indicate that the egg whites were not whipped enough or that excess moisture was present during the process. Ensure that all tools are dry and that the meringues are baked long enough to dry out completely.
What is the best way to store leftover meringues?
The best storage is a cool, dry place in an airtight container. Avoid humidity, as it can make meringues chewy.
Can chocolate and peppermint be paired?
Absolutely! Chocolate and peppermint are a classic pairing. You can dip the meringues in chocolate or sprinkle cocoa powder for a more intense flavor.
Do meringues need to be baked in a hot oven?
Meringues require low and slow baking at a lower temperature to prevent browning and to allow them to dry out.
Conclusion
Peppermint Meringues are a festive delight, perfect for holiday gatherings or a sweet treat anytime. Their light, airy texture combined with the refreshing flavor of peppermint creates a unique dessert experience that is both elegant and easy to make. By following these tips and variations, you can create a customized meringue that’s sure to impress. So preheat your oven and gather your ingredients, and let’s make some enchanting Peppermint Meringues!

Peppermint Meringues: An Amazing Ultimate Recipe with 5 Steps
- Total Time: 1 hour 15 minutes
Ingredients
– 4 large egg whites
– 1 cup granulated sugar
– 1 teaspoon vanilla extract
– 1 teaspoon peppermint extract
– 1/4 teaspoon cream of tartar
– A pinch of salt
– Red or green food coloring (optional)
– Crushed peppermint candies or candy canes for garnish (optional)
Instructions
Creating delicious Peppermint Meringues can be accomplished with the following steps:
1. Preheat Your Oven: Begin by preheating your oven to 200°F (93°C). Line a baking sheet with parchment paper; this will prevent sticking.
2. Whip the Egg Whites: In a clean, dry mixing bowl, add the egg whites and a pinch of salt. Begin beating them on medium speed until they become frothy.
3. Add Cream of Tartar: Add the cream of tartar to the egg whites and continue to beat on medium speed until soft peaks form. This should take around 2-3 minutes.
4. Gradually Add Sugar: Slowly add the granulated sugar, one tablespoon at a time, allowing each spoonful to dissolve before adding the next. Continue to beat until stiff peaks form and the mixture is glossy. This can take an additional 5-7 minutes.
5. Mix in Flavorings: Once the sugar is fully integrated, add the vanilla and peppermint extracts. If desired, add a few drops of food coloring to create a swirled effect. Gently fold until everything is combined.
6. Pipe the Meringues: Using a piping bag fitted with a star tip, pipe the meringue onto the lined baking sheet, forming 1 to 2-inch rounds.
7. Bake: Place the baking sheet in the preheated oven and bake for about 1 hour, or until the meringues are dry and can easily lift off the parchment paper.
8. Cool Down: Once baked, turn off the oven and leave the meringues inside for about 30 minutes to cool completely.
9. Garnish (Optional): If desired, sprinkle crushed peppermint candies on top of the meringues right after removing them from the oven for added flavor and decoration.
With careful attention to detail and a little patience, you will create striking Peppermint Meringues that everyone will adore!
- Prep Time: 15 minutes
- Cook Time: 1 hour
Nutrition
- Serving Size: 24 meringues
- Calories: 24 kcal per meringue
- Fat: 0g
- Protein: 0.5g