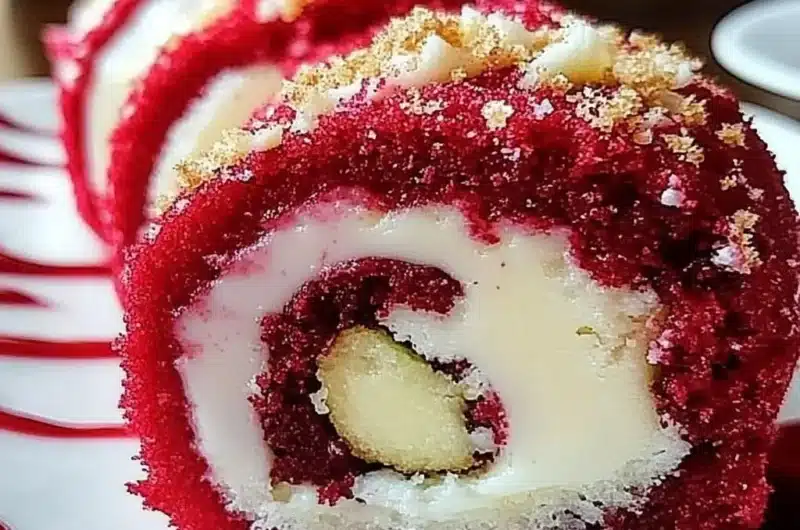
Red Velvet Cheesecake Sushi Roll Dessert is a creative and delightful twist on traditional desserts. Combining the rich flavors of red velvet cake with a creamy cheesecake filling and the aesthetics of sushi, this dessert will amaze your family and friends. It’s not just a treat for your taste buds but also a feast for the eyes. Whether it’s for a special occasion or just a weekend fun treat, this dessert promises to impress.
Imagine the soft, velvety texture of red velvet cake paired with a luscious cream cheese filling, all rolled up into a sushi-like presentation. Each bite bursts with flavor and will transport you to a dessert wonderland. If you’ve been searching for a dessert that is both incredibly delicious and visually stunning, look no further! In this article, we will guide you through this exciting fusion dessert that will be the centerpiece of any gathering.
The Red Velvet Cheesecake Sushi Roll Dessert combines flavors and textures that create a unique experience. You’ll learn about its amazing qualities, how to prepare it, and tips on making it as beautiful as it is delicious. This recipe is perfect for those who want to try something new and exciting in the dessert department. Let’s dive into what makes this dessert so special.
Why You’ll Love This Recipe
There are several reasons to fall in love with the Red Velvet Cheesecake Sushi Roll Dessert. Here are just a few:
1. Unique Presentation – The sushi roll appearance makes it a conversation starter at any gathering.
2. Decadent Flavor – The combination of red velvet and cheesecake is simply irresistible.
3. Perfect for Sharing – Slice the rolls into pieces for bite-sized treats, making them ideal for parties.
4. Easy to Customize – You can add toppings like berries, chocolate drizzle, or nuts for added texture and flavor.
5. Fun to Make – Rolling the sushi adds an interactive element to dessert preparation that everyone will enjoy.
6. Great for Any Occasion – Whether it’s a birthday, anniversary, or a casual gathering, this dessert fits right in.
The delightful surprise of this cheesecake sushi roll will surely captivate everyone. You’ll understand why this dessert has become a favorite for those who seek to elevate their dessert game!
Preparation and Cooking Time
Creating the Red Velvet Cheesecake Sushi Roll Dessert requires a bit of time and patience, but the end result is well worth it. The total estimated time for preparation and baking is about 1 hour, including assembling the rolls. Here’s the breakdown:
– Preparation Time: 30 minutes
– Cooling Time: 30 minutes
– Total Time: 1 hour
This makes it a feasible option for both experienced bakers and beginners willing to put in a little effort.
Ingredients
– For the Red Velvet Base:
– 1 cup all-purpose flour
– 1 cup granulated sugar
– 1 tablespoon cocoa powder
– 1 teaspoon baking soda
– ½ teaspoon salt
– 1 cup vegetable oil
– 1 cup buttermilk
– 2 large eggs
– 2 tablespoons red food coloring
– 1 teaspoon vanilla extract
– 1 teaspoon white vinegar
– For the Cheesecake Filling:
– 8 oz cream cheese, softened
– ½ cup powdered sugar
– 1 teaspoon vanilla extract
– 1 cup whipped cream or whipped topping
– For Assembly:
– Powdered sugar for dusting
– Fresh berries or chocolate sauce for garnish (optional)
Step-by-Step Instructions
To create this stunning Red Velvet Cheesecake Sushi Roll Dessert, follow these step-by-step instructions:
1. Preheat the Oven: Preheat your oven to 350°F (175°C). Prepare a baking sheet by lining it with parchment paper.
2. Mix Dry Ingredients: In a large bowl, sift together the flour, sugar, cocoa powder, baking soda, and salt.
3. Whisk Wet Ingredients: In another bowl, whisk together the vegetable oil, buttermilk, eggs, food coloring, vanilla extract, and vinegar until fully combined.
4. Combine Mixtures: Gradually add the wet ingredients to the dry ingredients, mixing until smooth and no lumps remain.
5. Spread Batter: Pour the red velvet batter onto the prepared baking sheet, spreading evenly.
6. Bake: Place the baking sheet in the preheated oven and bake for 15 to 20 minutes or until a toothpick inserted in the center comes out clean.
7. Cool the Cake: Remove the cake from the oven and allow it to cool for about 10 minutes. Then, carefully peel it from the parchment paper and cool completely on a wire rack.
8. Prepare the Cheesecake Filling: In a medium bowl, beat the softened cream cheese until smooth. Gradually add powdered sugar and vanilla extract. Fold in whipped cream until well combined and fluffy.
9. Assemble the Rolls: Once the red velvet cake is cool, place it on a clean, flat surface. Spread the cheesecake filling evenly over the cake.
10. Roll the Cake: Starting from one edge, carefully roll the cake into a log shape, tucking in the filling as you go. Use the parchment paper to help guide the roll.
11. Chill: Wrap the rolled cake in plastic wrap, then place it in the refrigerator to chill for about 30 minutes.
12. Slice: After chilling, carefully slice the roll into even pieces, about 1 inch wide.
13. Dust with Powdered Sugar: Before serving, dust the top of the rolls with powdered sugar.
14. Garnish (if desired): Serve the rolls with fresh berries or a drizzle of chocolate sauce for added flair.
By following these steps, you will create a beautiful and delicious Red Velvet Cheesecake Sushi Roll that is sure to impress!
How to Serve
When serving the Red Velvet Cheesecake Sushi Roll Dessert, consider the following tips to elevate the experience:
1. Presentation: Arrange the slices attractively on a decorative platter or cake stand to capture attention.
2. Serving Options: Offer an assortment of garnishes, such as whipped cream, berries, or chocolate sauce, to allow guests to customize their servings.
3. Pairing Suggestions: This dessert pairs wonderfully with a cup of coffee, milk, or even a glass of dessert wine.
4. Chill for Freshness: Serve chilled or at room temperature for the best flavor and texture.
5. Slice Size: Cut thin slices so guests can enjoy more without feeling overwhelmed—an invitation for seconds!
With these serving ideas, your Red Velvet Cheesecake Sushi Roll Dessert will become an unforgettable centerpiece that leaves everyone wanting more!
Additional Tips
– Use Quality Ingredients: Opt for high-quality cream cheese and butter for the cheesecake filling. This will enhance the overall taste.
– Cool Completely: Ensure the red velvet cake has cooled completely before spreading the filling. This prevents the filling from melting and making a mess.
– Roll Tightly: When rolling the cake, take care to roll tightly but not too tight to avoid squeezing out the filling.
– Dust Just Before Serving: Powdered sugar can absorb moisture over time. Dust the rolls just before serving for optimal presentation.
– Experiment with Flavors: Consider adding spices like nutmeg or cinnamon to the red velvet batter for a warm, spiced twist.
Recipe Variation
Feel free to serve up your creativity with these variations:
1. Mini Rolls: Create smaller rolls using half the cake batter for bite-sized delights. These make for easy sharing at gatherings.
2. Chocolate Drizzle: Drizzle melted chocolate over the top for an indulgent finish that adds richness.
3. Different Filling Options: Swap out the cheesecake filling for a flavored mousse like strawberry or lemon for a fruity alternative.
4. Vegan Version: Substitute eggs with flaxseed meal and use dairy-free cream cheese for a plant-based iteration of this dessert.
5. Gluten-Free Version: Use gluten-free all-purpose flour to make a gluten-free red velvet cake without compromising taste.
Freezing and Storage
– Storage: Keep any leftover sushi rolls tightly wrapped in plastic wrap in the refrigerator for up to 3 days. Ensure they remain airtight to avoid drying out.
– Freezing: These rolls can be frozen for up to 2 months. Slice them beforehand for easy serving and store in an airtight container to prevent freezer burn.
Special Equipment
To prepare this delightful dessert, you will need:
– Electric mixer: For mixing the cheesecake filling to a smooth and fluffy consistency.
– Baking sheet: To bake the red velvet cake uniformly.
– Parchment paper: To line the baking sheet for easy release of the cake.
– Plastic wrap: For chilling the rolled dessert and keeping it fresh.
– Sharp knife: For slicing the rolls into even pieces without damage.
Frequently Asked Questions
Can I use store-bought cream cheese frosting instead of making my own filling?
Yes, using store-bought frosting can save time, but homemade cream cheese filling offers a fresher taste.
What can I substitute for buttermilk in the cake recipe?
If you lack buttermilk, mix one cup of milk with a tablespoon of lemon juice or vinegar. Let it sit for 5-10 minutes before adding it to the batter.
Can I make this dessert without food coloring?
Yes, you can omit food coloring if you prefer a more subtle appearance. The flavor will remain intact.
How long does the red velvet cheesecake sushi roll last?
When stored properly, it can last for up to 3 days in the refrigerator or up to 2 months in the freezer.
Is it okay to serve this dessert at room temperature?
Yes, serving at room temperature works well. However, chilling it prior enhances the flavors and texture.
Conclusion
The Red Velvet Cheesecake Sushi Roll Dessert is not just a feast for the eyes but also a delight for your palate. This innovative treat combines the richness of red velvet cake with creamy cheesecake, wrapped in a stunning sushi-like format. Created with love, care, and a pinch of creativity, it is bound to be a hit at any gathering. Delight your loved ones with this recipe and watch their faces light up as they savor each bite!

Red Velvet Cheesecake Sushi Roll Dessert: An Amazing Ultimate Recipe
- Total Time: 50 minutes
Ingredients
– For the Red Velvet Base:
– 1 cup all-purpose flour
– 1 cup granulated sugar
– 1 tablespoon cocoa powder
– 1 teaspoon baking soda
– ½ teaspoon salt
– 1 cup vegetable oil
– 1 cup buttermilk
– 2 large eggs
– 2 tablespoons red food coloring
– 1 teaspoon vanilla extract
– 1 teaspoon white vinegar
– For the Cheesecake Filling:
– 8 oz cream cheese, softened
– ½ cup powdered sugar
– 1 teaspoon vanilla extract
– 1 cup whipped cream or whipped topping
– For Assembly:
– Powdered sugar for dusting
– Fresh berries or chocolate sauce for garnish (optional)
Instructions
To create this stunning Red Velvet Cheesecake Sushi Roll Dessert, follow these step-by-step instructions:
1. Preheat the Oven: Preheat your oven to 350°F (175°C). Prepare a baking sheet by lining it with parchment paper.
2. Mix Dry Ingredients: In a large bowl, sift together the flour, sugar, cocoa powder, baking soda, and salt.
3. Whisk Wet Ingredients: In another bowl, whisk together the vegetable oil, buttermilk, eggs, food coloring, vanilla extract, and vinegar until fully combined.
4. Combine Mixtures: Gradually add the wet ingredients to the dry ingredients, mixing until smooth and no lumps remain.
5. Spread Batter: Pour the red velvet batter onto the prepared baking sheet, spreading evenly.
6. Bake: Place the baking sheet in the preheated oven and bake for 15 to 20 minutes or until a toothpick inserted in the center comes out clean.
7. Cool the Cake: Remove the cake from the oven and allow it to cool for about 10 minutes. Then, carefully peel it from the parchment paper and cool completely on a wire rack.
8. Prepare the Cheesecake Filling: In a medium bowl, beat the softened cream cheese until smooth. Gradually add powdered sugar and vanilla extract. Fold in whipped cream until well combined and fluffy.
9. Assemble the Rolls: Once the red velvet cake is cool, place it on a clean, flat surface. Spread the cheesecake filling evenly over the cake.
10. Roll the Cake: Starting from one edge, carefully roll the cake into a log shape, tucking in the filling as you go. Use the parchment paper to help guide the roll.
11. Chill: Wrap the rolled cake in plastic wrap, then place it in the refrigerator to chill for about 30 minutes.
12. Slice: After chilling, carefully slice the roll into even pieces, about 1 inch wide.
13. Dust with Powdered Sugar: Before serving, dust the top of the rolls with powdered sugar.
14. Garnish (if desired): Serve the rolls with fresh berries or a drizzle of chocolate sauce for added flair.
By following these steps, you will create a beautiful and delicious Red Velvet Cheesecake Sushi Roll that is sure to impress!
- Prep Time: 30 minutes
- Cook Time: 20 minutes
Nutrition
- Serving Size: 10
- Calories: 320 kcal
- Fat: 15g
- Protein: 5g